向量数据库 Milvus 版
向量数据库 Milvus 版


文档指南

请输入


- 文档首页
 向量数据库 Milvus 版最佳实践向量数据库 Milvus 版与方舟大模型的图文多模态混合搜索实践
 复制全文
复制全文 下载 pdf
向量数据库 Milvus 版与方舟大模型的图文多模态混合搜索实践
 文档反馈
文档反馈 问问助手
问问助手随着 AI 技术的发展,多模态混合检索(如图文互搜)成为主流需求。用户希望既能通过上传图片找到相似图片,也能通过文字描述搜索目标图像。实现该需求的核心在于两点:
- 向量生成:将图片、文本等不同模态数据转化为统一维度的向量。
- 向量检索:高效存储和查询海量向量,快速匹配相似结果。
在本文实践中,我们可以使用方舟中提供的图文向量化模型、图像理解模型生成 Milvus 实体,使用向量数据库 Milvus 版进行向量存储与近邻检索,二者结合起来可以实现图文多模态混合搜索的完整功能。
整体架构
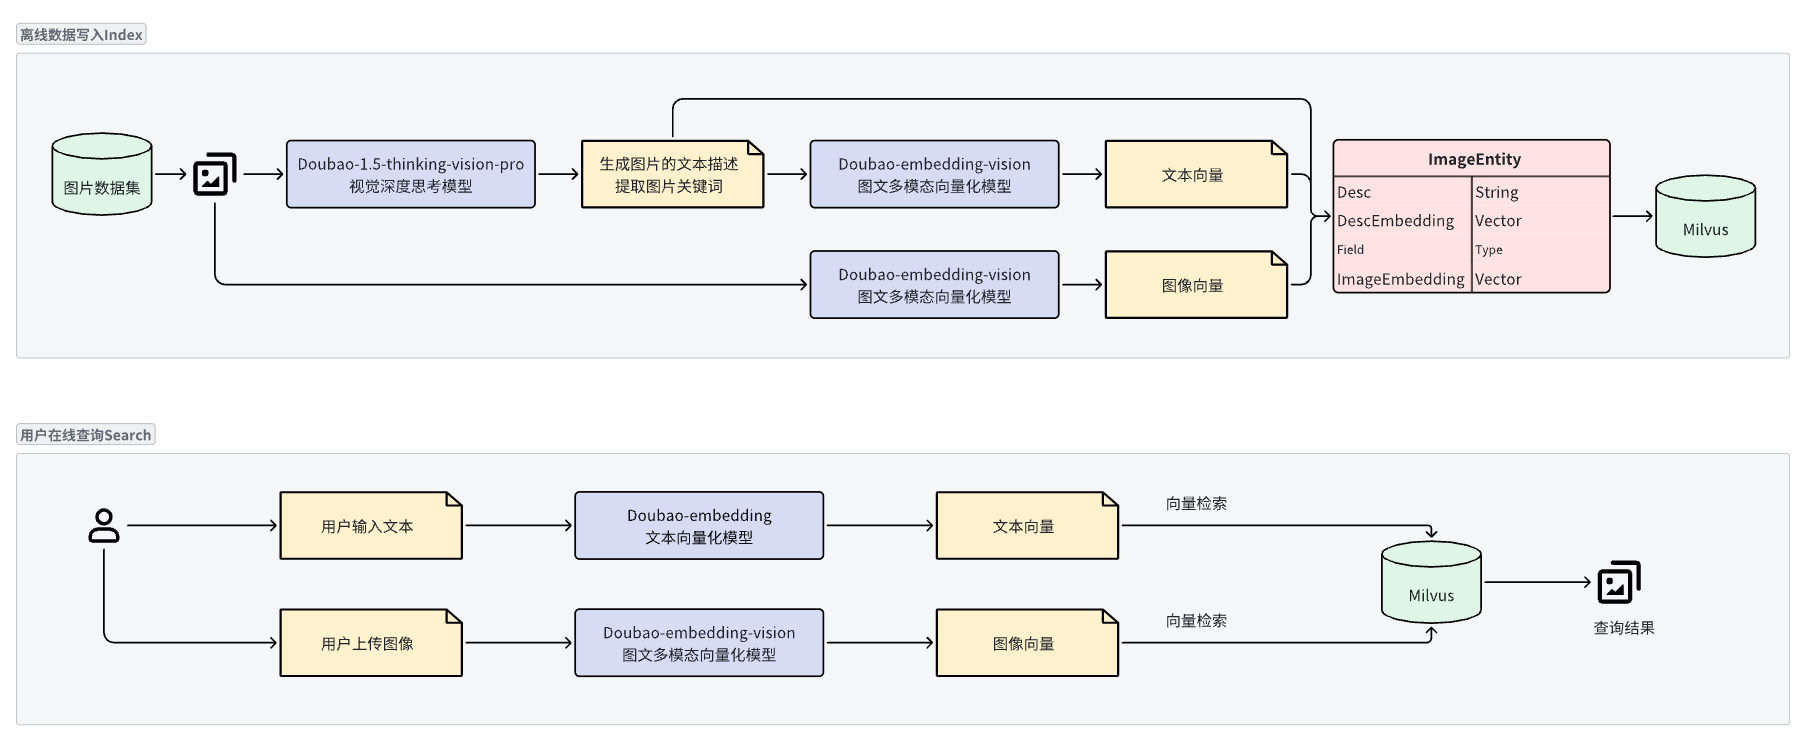
架构组成
- 离线数据写入:将图片数据集通过图生文模型,文本向量模型,图像向量模型生成 Milvus 数据实体写入向量数据库 Milvus 版。
- 用户在线查询:用户可以通过输入文本、上传图像等方式进行搜索,将用户输入转换为向量后在Milvus中进行搜索得到结果。
核心流程:
- 数据写入:图片 > 方舟图像向量化 > 生成向量 > 写入向量数据库 Milvus。
- 检索:
- 图片搜图:用户上传图片 > 图片生成向量 > 向量数据库 Milvus 版检索相似向量 > 返回关联图片。
- 文本搜图:用户输入文本 > 文本生成向量 > 向量数据库 Milvus 版检索相似向量 > 返回关联图片。
前提条件
- 已创建实例且实例处于运行中状态。具体操作,请参见创建实例。
- 已获取实例的访问地址。具体操作,请参见连接实例。
- 已在火山方舟控制台创建用于所需模型的在线推理接入点,并配置接入点限流,具体操作,请参见获取 Endpoint ID(创建自定义推理接入点)和管理推理接入点。
说明
本实践中使用多模态向量化模型(Doubao-embedding-vision)和多模态理解模型(Doubao-1.5-thinking-vision-pro)。您可根据需要选择其他模型。关于各模型的介绍,请参见模型列表。
- 已安装 pymilvus。安装命令如下。
- # Install specific PyMilvus versionpip install pymilvus==2.5.8# Update PyMilvus to the newest versionpip install --upgrade pymilvus# Verify installation successpython -m pip list | grep pymilvus
- 已安装火山方舟 SDK。具体操作,请参见安装与初始化。
- 已下载 Milvus 官方数据集并解压。命令如下。
- wget https://github.com/milvus-io/pymilvus-assets/releases/download/imagedata/reverse_image_search.zipunzip -q -o reverse_image_search.zip
数据处理
核心代码逻辑
- 读取单张图片,转为 base64 编码(方舟模型要求图片输入为 base64)。
- 调用方舟图生文接入点,生成描述文本。
- 调用方舟 embedding 模型接入点,生成图片和文本向量。
图片数据处理
本地图像数据需要转换成 base64 编码,或者需要提供可以访问的图片 URL。
import base64
def encode_image(image_path):
with open(image_path, "rb") as image_file:
return base64.b64encode(image_file.read()).decode('utf-8')
- 生成文本。
- 使用 doubao-1.5-thinking-vision-pro 模型为图片生成描述和关键词。
- from volcenginesdkarkruntime import Arkdef image_gen_text(image_path):image_base64 = encode_image(image_path)ark_client = Ark(api_key="<your_api_key>",base_url="https://ark-cn-beijing.bytedance.net/api/v3",timeout=120,max_retries=2,)response = ark_client.chat.completions.create(# 替换为您的推理接入点 IDmodel="<your_model_id>",messages=[{"role": "user","content": [{"type": "image_url","image_url": {# 需要注意:传入 Base64 编码前需要增加前缀 data:image/{图片格式};base64,{Base64 编码}:"url": f"data:image/jpeg;base64,{image_base64}"},},{"type": "text","text": "先用 50 字内的文字描述这张图片,然后再给出 5 个关键词",},],}],)return response.choices[0].message.content
- 生成图片向量。
- 使用 Doubao-embedding-vision 模型根据图片生成向量。
- from volcenginesdkarkruntime import Arkdef image_embedding(image_path):image_base64 = encode_image(image_path)ark_client = Ark(api_key="<your_api_key>",base_url="https://ark-cn-beijing.bytedance.net/api/v3",timeout=120,max_retries=2,)resp = ark_client.multimodal_embeddings.create(model="<your_model_id>",input=[{"type": "image_url","image_url": {"url": f"data:image/jpeg;base64,{image_base64}"}}])embedding = resp.data.embedding# 确保向量是numpy数组并展平为一维embedding = np.array(embedding).flatten()print(f"向量维度:{embedding.shape}")return embedding
- 生成文本向量。
- 使用 Doubao-embedding-vision 模型根据图片描述生成文本向量。
- from volcenginesdkarkruntime import Arkdef text_embedding(text):ark_client = Ark(api_key="<your_api_key>",base_url="https://ark-cn-beijing.bytedance.net/api/v3",timeout=120,max_retries=2,)resp = ark_client.multimodal_embeddings.create(model="<your_model_id>",input=[{"type": "text","text": text}])embedding = resp.data.embedding# 确保向量是numpy数组并展平为一维embedding = np.array(embedding).flatten()print(f"向量维度:{embedding.shape}")return embedding
数据写入
- 设置 Schema 和 Index。
- 向量数据库 Milvus版 中 Collection 类似传统数据库中的“表”,需先定义集合结构(含向量字段、元数据字段)。本示例将向量的 index_type 设置为 auto_index。metric_type 为距离类型,在搜索时如果要指定距离类型需要与 index_params 保持一致,支持的距离类型可参考度量类型。
-
- from pymilvus import MilvusClientfrom pymilvus import DataTypemilvus_client = MilvusClient(uri="http://milvus-xxx.milvus.ivolces.com:19530", # Milvus 实例的访问地址token="<user>:<password>", # Milvus 实例的用户名和密码,替换为创建实例的用户名密码)def create_schema():schema = MilvusClient.create_schema(auto_id=False,enable_dynamic_field=True,)schema.add_field(field_name="id", datatype=DataType.INT64, is_primary=True, auto_id=True)schema.add_field(field_name="image_path", datatype=DataType.VARCHAR, max_length=512)schema.add_field(field_name="image_embedding", datatype=DataType.FLOAT_VECTOR, dim=2048)schema.add_field(field_name="image_description", datatype=DataType.VARCHAR, max_length=1024)schema.add_field(field_name="image_desc_embedding", datatype=DataType.FLOAT_VECTOR, dim=2048)return schemadef create_index_params():index_params = milvus_client.prepare_index_params()index_params.add_index(field_name="id",index_type="AUTOINDEX")index_params.add_index(field_name="image_embedding",index_type="AUTOINDEX",metric_type="L2")index_params.add_index(field_name="image_description",index_type="AUTOINDEX")index_params.add_index(field_name="image_desc_embedding",index_type="AUTOINDEX",metric_type="L2")return index_params
- # IVF_FLAT类型index_params.add_index(field_name="your_vector_field_name", # Name of the vector field to be indexedindex_type="IVF_FLAT", # Type of the index to createindex_name="vector_index", # Name of the index to createmetric_type="L2", # Metric type used to measure similarityparams={"nlist": 64, # Number of clusters for the index} # Index building params)# HNSW类型index_params.add_index(field_name="your_vector_field_name", # Name of the vector field to be indexedindex_type="HNSW", # Type of the index to createindex_name="vector_index", # Name of the index to createmetric_type="L2", # Metric type used to measure similarityparams={"M": 64, # Maximum number of neighbors each node can connect to in the graph"efConstruction": 100 # Number of candidate neighbors considered for connection during index construction} # Index building params)
- 创建 Collection。
- 在已创建的向量数据库 Milvus 版实例中创建 Collection,完整代码如下。具体操作,请参见创建 Collection。
- from pymilvus import MilvusClientfrom pymilvus import DataTypemilvus_client = MilvusClient(uri="http://milvus-xxx.milvus.ivolces.com:19530", # Milvus 实例的访问地址token="<user>:<password>", # Milvus 实例的用户名和密码,替换为创建实例的用户名密码)def create_collection_if_not_exists(collection_name):if collection_name in milvus_client.list_collections():returnschema = MilvusClient.create_schema(auto_id=False,enable_dynamic_field=True,)schema.add_field(field_name="id", datatype=DataType.INT64, is_primary=True, auto_id=True)schema.add_field(field_name="image_path", datatype=DataType.VARCHAR, max_length=512)schema.add_field(field_name="image_embedding", datatype=DataType.FLOAT_VECTOR, dim=2048)schema.add_field(field_name="image_description", datatype=DataType.VARCHAR, max_length=1024)schema.add_field(field_name="image_desc_embedding", datatype=DataType.FLOAT_VECTOR, dim=2048)index_params = milvus_client.prepare_index_params()index_params.add_index(field_name="id",index_type="AUTOINDEX")index_params.add_index(field_name="image_embedding",index_type="AUTOINDEX",metric_type="L2")index_params.add_index(field_name="image_description",index_type="AUTOINDEX")index_params.add_index(field_name="image_desc_embedding",index_type="AUTOINDEX",metric_type="L2")milvus_client.create_collection(collection_name=collection_name,schema=schema,index_params=index_params,consistency_level="Bounded",num_shards=1)print(f"Created collection {collection_name}")
- 批量写入图片数据。
- 从下载的数据集中的 reverse_image_search.csv 文件逐条读取图片数据写入向量数据库 Milvus 版。代码如下。
- import pandas as pdfrom tqdm import tqdmfrom pymilvus import MilvusClientfrom pymilvus import DataTypemilvus_client = MilvusClient(uri="http://milvus-xxx.milvus.ivolces.com:19530", # Milvus 实例的访问地址token="<user>:<password>", # Milvus 实例的用户名和密码,替换为创建实例的用户名密码)def batch_insert():df = pd.read_csv("reverse_image_search.csv")success_count = 0failure_count = 0collection_name = "image_search_collection_demo"create_collection_if_not_exists(collection_name)for image_path in tqdm(df["path"].tolist(), desc="生成图像embedding"):print(f"开始处理{image_path}")try:image_vector = image_embedding(image_path)image_desc = image_gen_text(image_path)image_desc_vector = text_embedding(image_desc)milvus_client.insert(collection_name=collection_name,data=[{"image_path": image_path, "image_embedding":image_vector, "image_description": image_desc, "image_desc_embedding": image_desc_vector}])print(f"成功插入{image_path}")success_count += 1time.sleep(1) # 控制API调用频率except Exception as e:print(f"处理{image_path}失败,已跳过: {str(e)}")failure_count += 1print(f"成功插入 {success_count} 张图片,失败 {failure_count} 张图片")
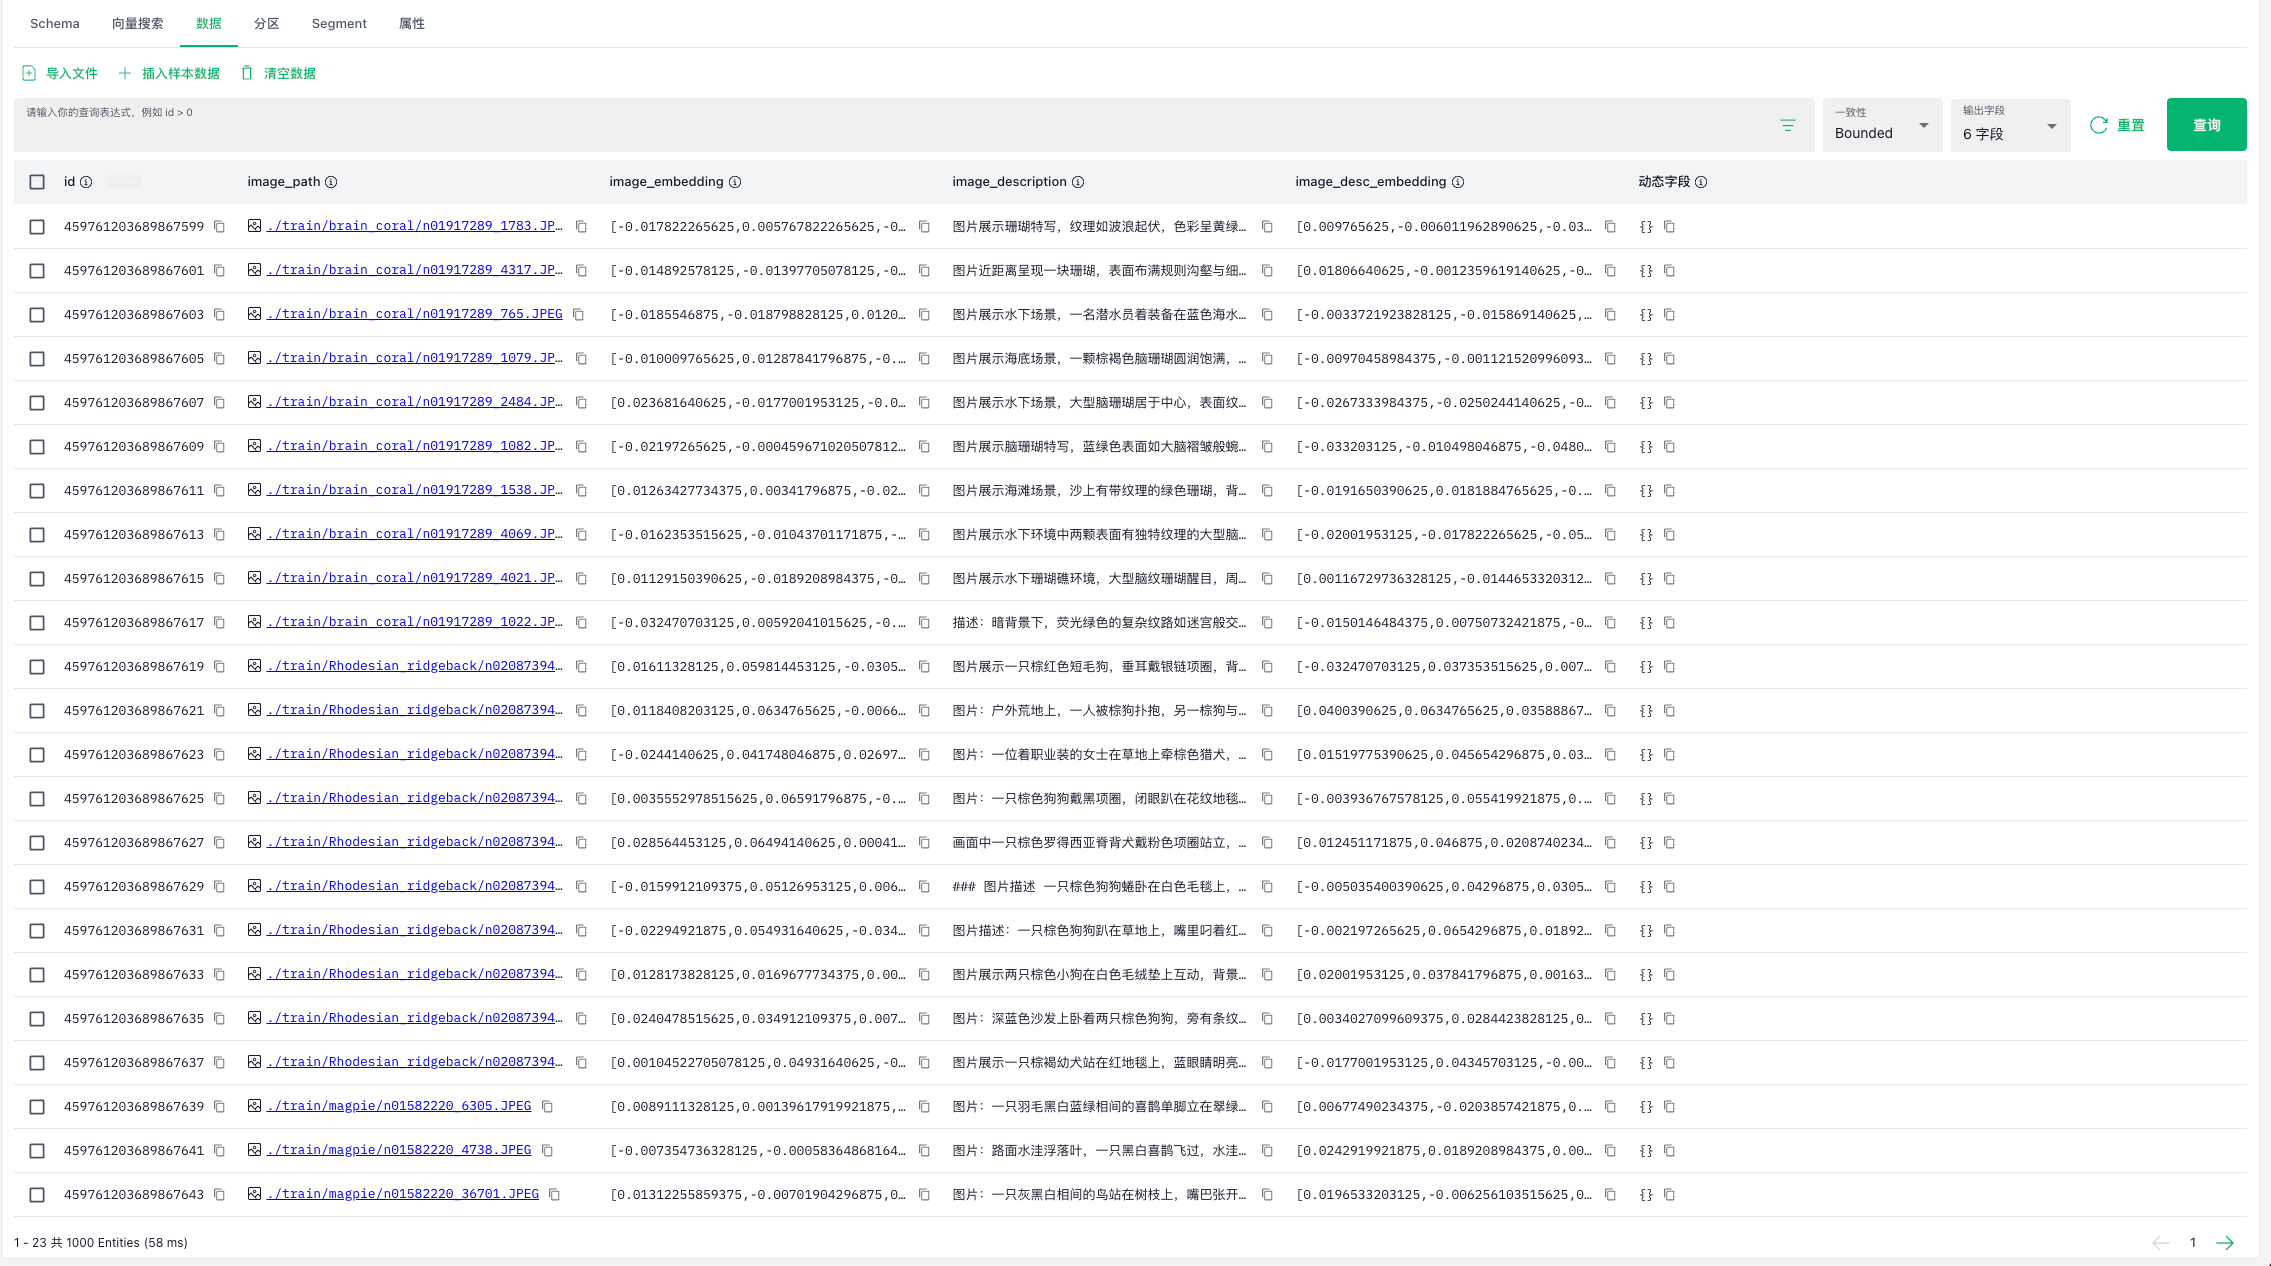
- 插入数据之后,可以在可视化管理工具 Attu 中查看写入的数据。具体操作,请参见 Attu 桌面快速入门。
-

- 查看写入数据。
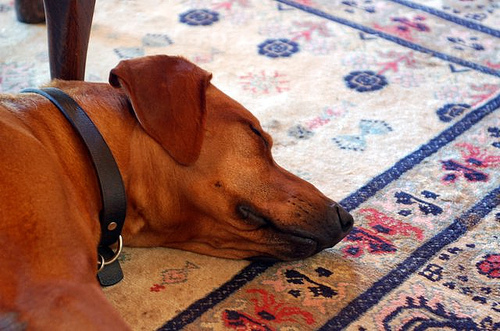
- 以 ./train/Rhodesian_ridgeback/n02087394_6382.JPEG 为例,生成的描述如下。
图片:一只棕色狗狗戴黑项圈,闭眼趴在花纹地毯上,氛围闲适。
关键词:狗狗、棕色、项圈、地毯、休憩。
-
搜索图片
以图搜图
用户上传一张图片,生成向量后在向量数据库 Milvus 版中检索相似图片,返回 top 10 结果。
milvus_client = MilvusClient(
uri="http://milvus-xxx.milvus.ivolces.com:19530", # Milvus 实例的访问地址
token="<user>:<password>", # Milvus 实例的用户名和密码,替换为创建实例的用户名密码
)
def query_by_image(image_path):
query_image_embedding = image_embedding(image_path)
res = milvus_client.search(
collection_name="image_search_collection_demo",
anns_field="image_embedding",
data=[query_image_embedding],
limit=10,
output_fields=["id", "image_path", "image_description"],
)
print(f"\n=== 图片搜索图片结果(查询图片:{image_path})===")
for i in range(len(res[0])):
print(f"第 {i} 个结果:")
print(f"id: {res[0][i].id}")
print(f"distance: {res[0][i].distance}")
print(f"image_path: {res[0][i].entity.get('image_path')}")
print(f"image_description: {res[0][i].entity.get('image_description')}")
query_by_image("test/basketball/n02802426_12693.JPEG")
输入图片如下。

输出结果如下。
=== 图片搜索图片结果(查询图片:test/basketball/n02802426_12693.JPEG)===
第 0 个结果:
id: 459761203689868587
image_path: ./train/basketball/n02802426_10137.JPEG
image_description: 图片展示篮球比赛场景,蓝队24号球员起跳投篮,白队23号球员尝试封盖,赛场为木质地板。
关键词:篮球比赛、投篮、防守、运动、球员
distance: 0.7994794249534607
第 1 个结果:
id: 459761203689868597
image_path: ./train/basketball/n02802426_7656.JPEG
image_description: 图片:室内篮球场,穿紫色“CURRY 35”球衣的球员投篮,白色球衣球员防守,旁有裁判观众。
关键词:篮球比赛、投篮、球员、球衣号码、室内球场
distance: 0.8123147487640381
第 2 个结果:
id: 459761203689868579
image_path: ./train/basketball/n02802426_8222.JPEG
image_description: 图片:室内球场上,三名身着篮球服的孩子参与比赛,穿橙色23号球衣的孩子正运球,两侧有队友与对手。
关键词:儿童篮球、篮球服、运球、室内球场、青少年运动
distance: 1.0420031547546387
... 其他结果省略
 |  |  |
以文搜图
用户输入文本描述,生成向量后在向量数据库 Milvus 版中检索相似图片,返回 top 10 结果。
milvus_client = MilvusClient(
uri="http://milvus-xxx.milvus.ivolces.com:19530", # Milvus 实例的访问地址
token="<user>:<password>", # Milvus 实例的用户名和密码,替换为创建实例的用户名密码
)
def query_by_text(text):
query_text_embedding = text_embedding(text)
res = milvus_client.search(
collection_name="image_search_collection_demo",
anns_field="image_desc_embedding",
data=[query_text_embedding],
limit=10,
output_fields=["id", "image_path", "image_description"],
)
print(f"\n=== 文本搜索图片结果(查询文本:{text})===")
for i in range(len(res[0])):
print(f"第 {i} 个结果:")
print(f"id: {res[0][i].id}")
print(f"image_path: {res[0][i].entity.get('image_path')}")
print(f"image_description: {res[0][i].entity.get('image_description')}")
print(f"distance: {res[0][i].distance}")
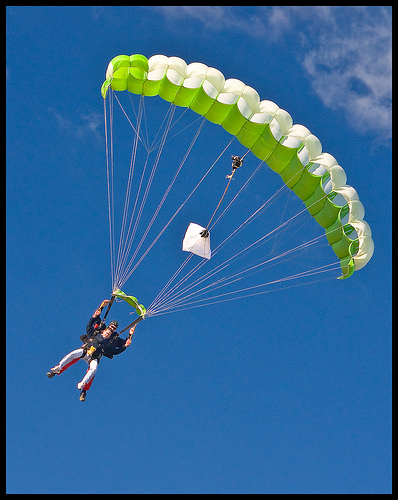
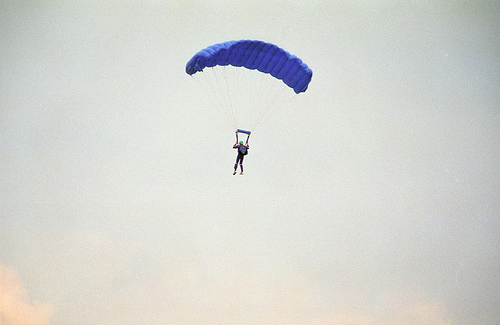
query_by_text("极限运动跳伞")
输出结果如下。
=== 文本搜索图片结果(查询文本:极限运动跳伞)===
第 0 个结果:
id: 459761203689868077
image_path: ./train/parachute/n03888257_2007.JPEG
image_description: 图片:蓝天背景下,一名跳伞者借助绿白相间的降落伞空中滑翔,装备专业,画面动感。
关键词:跳伞、降落伞、蓝天、极限运动、滑翔
distance: 0.9275163412094116
第 1 个结果:
id: 459761203689868071
image_path: ./train/parachute/n03888257_63966.JPEG
image_description: 图片:蓝天白云下,跳伞者借金色降落伞悬空,下方有饰白十字的深色翼状装置,画面充满动感。
关键词:跳伞、降落伞、蓝天、翼装、极限运动
distance: 0.9574025273323059
第 2 个结果:
id: 459761203689868065
image_path: ./train/parachute/n03888257_4738.JPEG
image_description: 图片中一人正进行跳伞,蓝色降落伞张开,其在淡色天空下悬浮。
关键词:跳伞、降落伞、高空、天空、极限运动
distance: 0.9625174403190613
...其他结果省略
 |  |  |
最近更新时间:2025.12.12 18:56:30
这个页面对您有帮助吗?
有用
有用
无用
无用