NAT Gateway
NAT Gateway


Document

- Documentation
 NAT GatewayBest PracticesSharing an Internet NAT Gateway across VPCs via CEN
 Copy page
 Download PDF
Best Practices
Sharing an Internet NAT Gateway across VPCs via CEN
Copy pageDownload PDFSharing an Internet NAT Gateway across VPCs via CEN
When multiple Virtual Private Clouds (VPCs) require Internet access, you can configure a single Internet NAT Gateway for these VPCs to conserve Elastic IP Address (EIP) resources and reduce enterprise costs. This topic describes how to use Cloud Enterprise Network (CEN) to enable multiple VPCs to share a single NAT Gateway for Internet access.
Background
A company has its development environment and testing environment deployed in two separate VPCs. The testing environment (VPC-A) shares the Internet NAT Gateway of the development environment (VPC-B).
- Testing Environment VPC (VPC-A): CIDR block: 172.16.0.0/16; Subnet (Subnet-A) CIDR block: 172.16.1.0/24; ECS (ECS-A) IP Address: 172.16.1.11.
- Development Environment VPC (VPC-B): CIDR block: 192.168.0.0/16; Subnet (Subnet-B) CIDR block: 192.168.1.0/24; ECS (ECS-B) IP Address: 192.168.1.22.
-
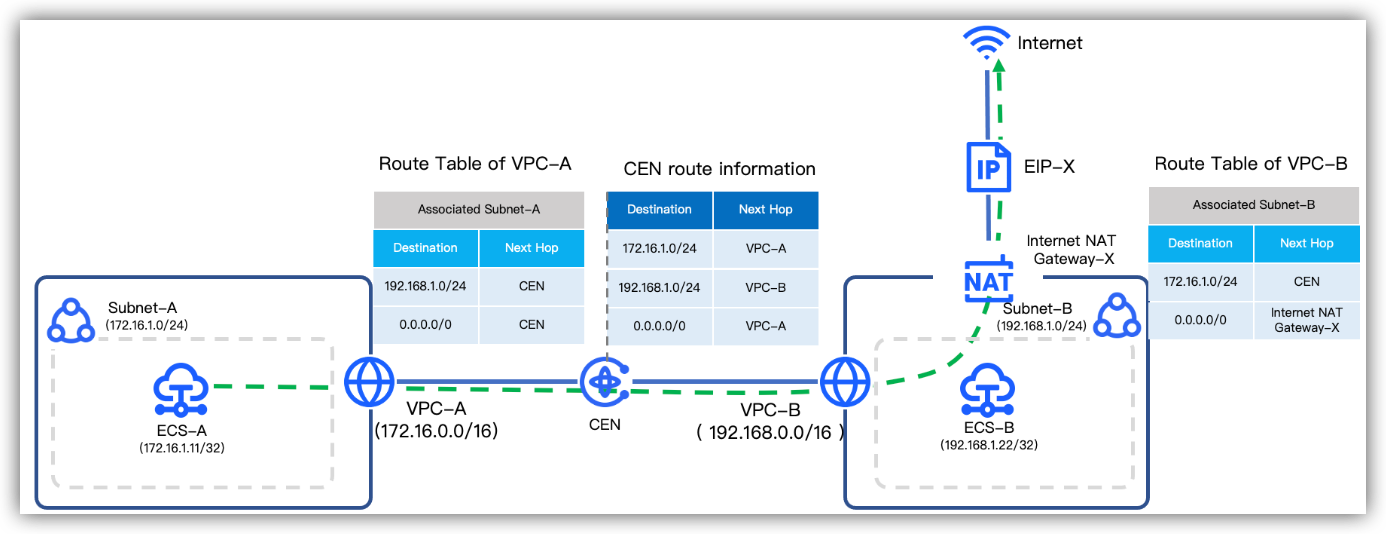
The diagram above illustrates a single SNAT rule (all-pass mode). In practice, you can create multiple SNAT and DNAT rules as needed.
Preparations
Complete the following steps based on the background information before proceeding:
- Use the same VolcanoEngine account to create two VPCs in China (Beijing), with their parameters consistent with the background introduction. For specific actions, see Creating a VPC.
- Create ECS-A (172.16.1.11) in Subnet-A of VPC-A, and create ECS-B (192.168.1.22) in Subnet-B of VPC-B. Neither ECS should be bound to an EIP. For specific actions, see Purchasing an ECS instance.
- Apply for 1 EIP not bound to any cloud resources. This topic uses EIP-X (180.XX.XX.44). For specific actions, see Applying for an EIP.
Procedure
Step 1: Configure CEN
Create a CEN instance, and attach both VPC-A and VPC-B to it to enable communication between VPC-A and VPC-B.
This topic uses VPC-A and VPC-B belonging to the same account and region as an example. For operational steps, see VPC interconnection (same account and same region).
In actual usage, the following situations may exist:
- For multiple VPCs within the same account but in different regions, see VPC interconnection (same account, cross-region).
- For multiple VPCs under different accounts but in the same region, see VPC interconnection (cross-account, same region).
- For multiple VPCs under different accounts and in different regions, see VPC interconnection (cross-account and cross-region).
Step 2: Create Internet NAT gateway
Through the following steps, you can create an Internet NAT Gateway in all-pass mode within the VPC-B.
- Log in to the Internet NAT Gateway console.
- In the top menu bar, select the target region and project. In this example, they are China (Beijing) and default.
- Click Create NAT gateway to enter the creation page for an Internet NAT gateway.
- Configure relevant parameters based on the table below.
-
- Click Confirm order.
- Follow the console guidance to review and accept the legal terms, and click Buy now to complete the action.
tip
Step 3: Manually publish the route
You can follow the steps below to publish the route of the above Internet NAT gateway to the Cloud Enterprise Network (CEN).
- Log in to the Route Table console.
- In the top menu bar, select the region and project of VPC-B's route table. This example uses China (Beijing) and default. In the left-side navigation pane, click Route table to access the route table console.
- In the route table list, click the name of the VPC-B system route table to navigate to its details page.
- Select the Route entry > Custom route tab, and click Publish on the right side of the route entry where the next hop points to the Internet NAT gateway.
- Click Publish to complete the propagation.
- Verify whether the route was successfully published.
- Log in to the Cloud Enterprise Network console.
- Click the target CEN name to navigate to its details page.
- On the Route Table tab, view whether there is a route entry with the Destination CIDR of 0.0.0.0/0.
Step 4: Verification
- Log in to the pre-prepared ECS instance ECS-A (172.16.1.11) and execute ping 8.8.8.8 in the command line.
- If the ping is successful, it indicates that ECS-A in VPC-A can access the Internet via the SNAT rule of the Internet NAT Gateway.
tip
Last updated: 2026.07.09 19:16:54
All rights reserved © Beijing Volcano Engine Technology Co., Ltd2024
