NAT Gateway
NAT Gateway


Document

- Documentation
 NAT GatewayBest PracticesAccessing the Internet via Internet NAT Gateway from an on-premises data center
 Copy page
 Download PDF
Best Practices
Accessing the Internet via Internet NAT Gateway from an on-premises data center
Copy pageDownload PDFAccessing the Internet via Internet NAT Gateway from an on-premises data center
If servers in your on-premises data center need to communicate with the internet, you can share a cloud-based Internet NAT Gateway to centrally manage their internet ingress/egress.This topic describes how to enable servers in an on-premises data center to use this shared gateway.
Background
A company uses a shared cloud-based Internet NAT Gateway for internet communication for servers in its on-premises data center.
- On-premises data center: CIDR block: 172.16.1.0/24; Server A IP address: 172.16.1.11.
- Cloud VPC Information: VPC Name: VPC-A; VPC CIDR Block: 192.168.0.0/16; Subnet 1 Name: Subnet-A; Subnet 1 CIDR Block: 192.168.1.0/24; ECS IP Address: 192.168.1.22.
-
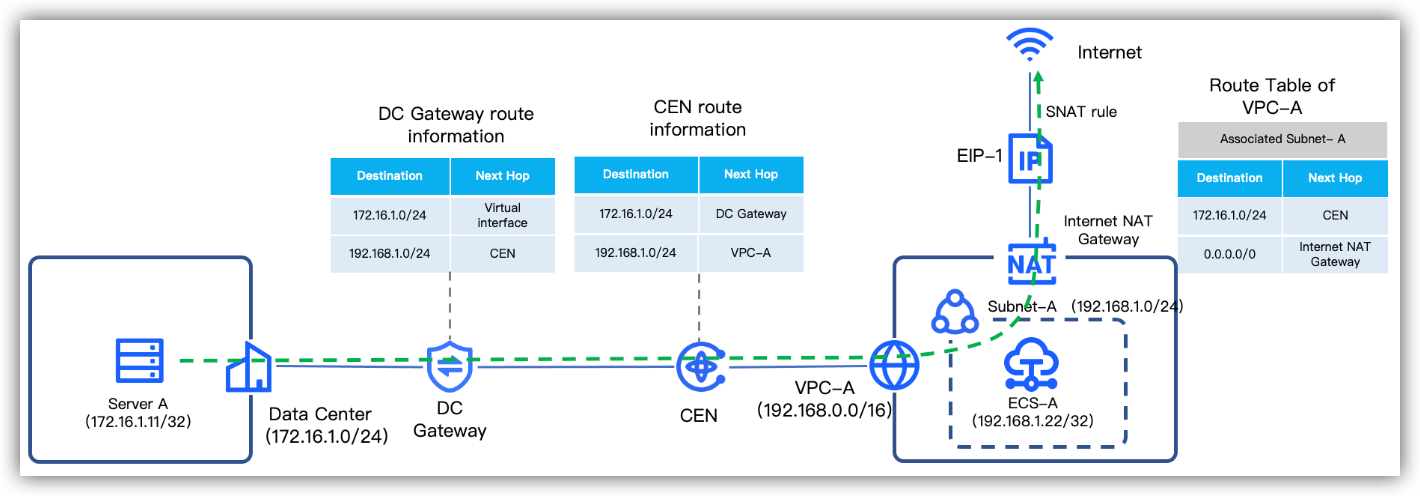
The diagram above illustrates a single SNAT rule (all-pass mode). In practice, you can create multiple SNAT and DNAT rules as needed.
Preparations
Complete the following steps based on the background information before proceeding:
- Create a VPC with parameters consistent with the Background description. For specific actions, see Creating a Virtual Private Cloud.
- Create an ECS-A (192.168.1.22) without an EIP in Subnet-A of VPC-A. For detailed steps, see Purchasing an Elastic Compute Service.
- Create a CEN and add VPC-A. For specific actions, see Creating a CEN instance.
- Configure a Direct Connect to enable communication between the on-premises data center and the VPC. For detailed steps, see Connecting on-premises data center to VPC.
- Apply for 1 EIP not bound to any cloud resources. This topic uses EIP-1 (180.XX.XX.44). For procedure, see Applying for an EIP.
Procedure
Step 1: Verify connectivity between on-premises data center and VPCs
- Log in to local Server A (172.16.1.11).
- Execute the ping 192.168.1.22 command in the command line.
- A successful ping response confirms connectivity between your on-premises data center and VPCs.
tip
If ping fails, see Troubleshooting network connectivity issues after cloud-to-on-premises configuration.
Step 2: Configure Internet NAT gateway
Through the following steps, you can create an Internet NAT Gateway in all-pass mode within the VPC.
- Log in to the Internet NAT Gateway console.
- In the top menu bar, select the target region and project. In this example, they are China (Beijing) and default.
- Click Create NAT Gateway.
- Configure relevant parameters based on the table below.
-
- Click Buy now.
- Follow the console guidance to review and accept Legal, and click Buy now to complete the operation.
Step 3: Manually publish the route
You can follow the steps below to publish the route of the above Internet NAT gateway to the Cloud Enterprise Network (CEN).
- Log in to the Internet NAT Gateway console.
- In the top menu bar, select the region and project.
- In the route table list, click the target system route table name.
- Select the Route entry > Custom route tab, and click Publish on the right side of the route entry where the next hop points to the Internet NAT gateway.
- Click Publish to complete the propagation.
- Verify whether the route was successfully published.
- Log in to the Cloud Enterprise Network console.
- Click the target CEN name to navigate to its details page.
- On the Route Table tab, view whether there is a route entry with the Destination CIDR Block of 0.0.0.0/0.
Step 4: Verification
- Log in to local Server A (172.16.1.11) and execute ping 8.8.8.8 in the command line.
- If the ping is successful, it indicates that after local Server A is included in the SNAT rule, it can access the internet through the Internet NAT Gateway and EIP-1.
Last updated: 2026.07.10 10:41:30
All rights reserved © Beijing Volcano Engine Technology Co., Ltd2024
