PrivateLink
PrivateLink


Document

- Documentation
 PrivateLinkQuick startImplementing private access between VPCs across accounts
 Copy page
 Download PDF
Quick start
Implementing private access between VPCs across accounts
Copy pageDownload PDFImplementing private access between VPCs across accounts
Scenario examples
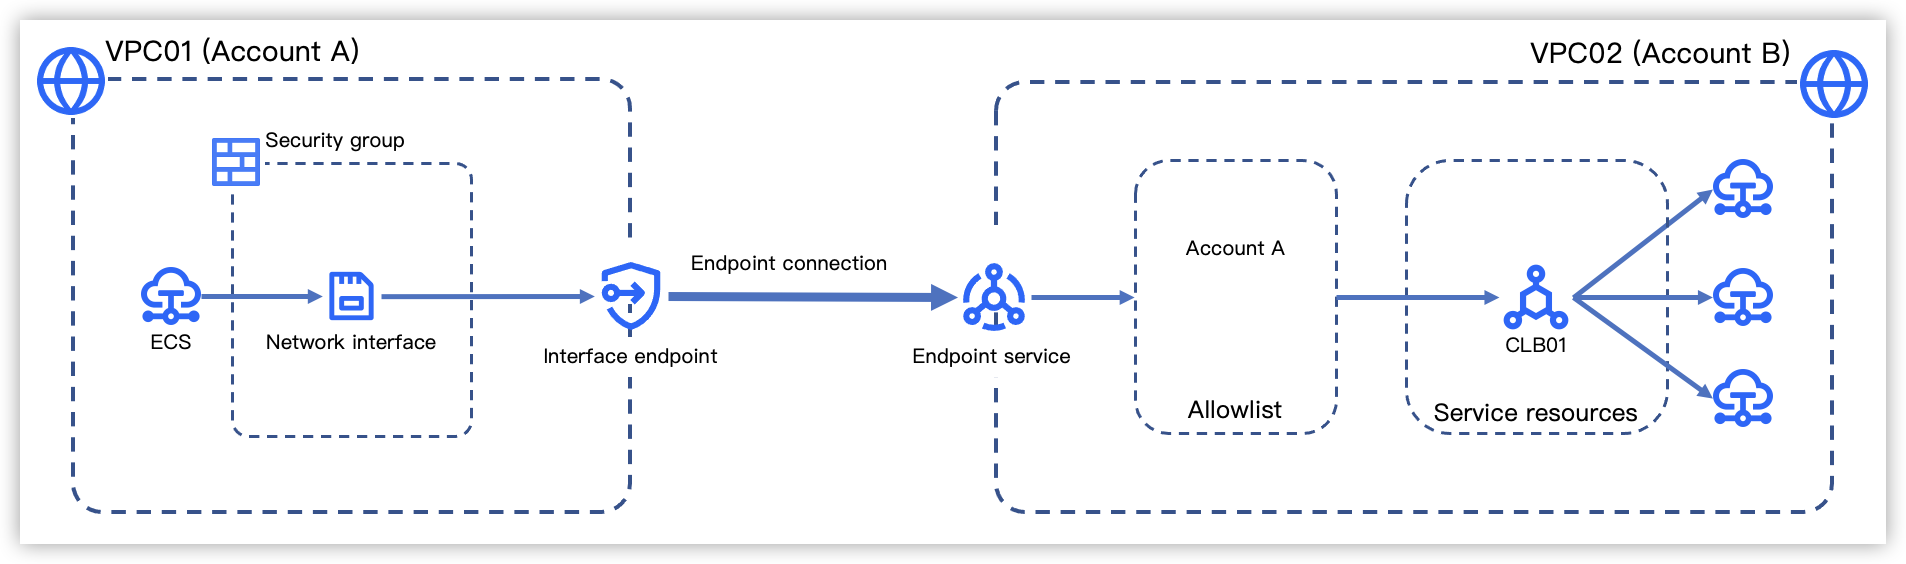
This topic describes the detailed configuration for enabling Elastic Compute Services (ECSs) in the endpoint's VPC to access service resources in the endpoint service across different accounts.
Prerequisites
Configuration procedures
tip
The following steps only describe the parameters required for the configuration in this document. For parameters not mentioned, keep the default values.
Step 1: Create endpoint service
- Log in to the Endpoint Service console using account B.
- Only accounts that have not completed cross-service role authorization need to perform this. If already authorized, ignore this step.
- On the Cross-service access request page, click Authorize.
- The authorized role will be displayed in the role list of the Identity and Access Management (IAM) platform. Deleting the authorized role may cause cross-service access failures. Proceed with caution.
- If the authorization role is deleted and you need to continue using the PrivateLink service, you must re-authorize the role.
- In the left-side navigation pane, click Endpoint Service again.
- In the top menu bar, select the target project and region.
- Click Create Endpoint Service and see the table below to configure the relevant parameters.
-
- Click Create to complete the action.
- Locate and record the Name of the successfully created endpoint service, as you will need it in Step 3: Create endpoint.
Step 2: Add allowlist
- Click the target endpoint service, and select Allowlist tab.
- Click Add allowlist, and configure the allowlist according to the table below.
-
- Click Add to complete the action.
Step 3: Create endpoint
- Log in to the Endpoint console using account A.
- Follow the steps below to complete cross-service role authorization.
- Only accounts that have not completed cross-service role authorization need to perform this. If already authorized, ignore this step.
- On the Cross-service access request page, click Authorize.
- The authorized role will be displayed in the role list of the Identity and Access Management (IAM) platform. Deleting the authorized role may cause cross-service access failures. Proceed with caution.
- If the authorization role is deleted and you need to continue using the PrivateLink service, you must re-authorize the role.
- In the left-side navigation pane, click Endpoint again.
- On the Interface Endpoint tab, click Create Endpoint, and configure the relevant parameters as per the table below.
-
- Click Buy now. Follow the console guidance to review and accept the Legal.
- Click Buy now to check whether the creation is successful.
- view and record the created Endpoint Domain. This will be needed in Step 4: Test connectivity.
Step 4: Test connectivity
tip
Before performing the following verification, ensure that the backend server for the CLB instance of the service resource is configured with the backend service. The procedure can be found in Configuring the backend service.
- Remotely log in to the Elastic Compute Service (ECS) in VPC01. For specific actions, see Logging in to a Linux instance.
- Execute the curl http://endpoint domain:listener port command to test network connectivity.
- For example, if the endpoint domain is ep-2fegvybuk2yv459gp68nbk2e7.epsvc-2fegvxu3a2h3459gp67rdzvhe.cn-guangzhou.privatelink.volces.com and the service resource CLB instance's listener port is 80, then execute: curl http://ep-2fegvybuk2yv459gp68nbk2e7.epsvc-2fegvxu3a2h3459gp67rdzvhe.cn-guangzhou.privatelink.volces.com:80.
- If the returned result displays the content of the backend service page configured on the backend server, it indicates successful network connectivity.
Last updated: 2026.06.29 18:20:25
All rights reserved © Beijing Volcano Engine Technology Co., Ltd2024
