Database Transmission Service
Database Transmission Service


Document

- Documentation
 Database Transmission ServiceBest practicesData migrationMigrating on-premises self-managed databases to the cloud via DTS
 Copy page
 Download PDF
Data migration
Migrating on-premises self-managed databases to the cloud via DTS
Copy pageDownload PDFMigrating on-premises self-managed databases to the cloud via DTS
In the scenario of business migration, after the local database is migrated to the cloud, you need to cut the traffic to switch the business to the cloud. To avoid exceptions in the database on the cloud after the business traffic is cut, it is recommended to use the DTS data migration function to configure a reverse migration link. When a business exception occurs, you can immediately switch the business to the local self-managed database. This topic uses an on-premises self-managed MySQL database instance and a Volcano Engine RDS for MySQL as examples to introduce how to use DTS to migrate on-premises data to the cloud, switch services, migrate data back, and roll back services.
Prerequisites
- The local self-built database and the VPC of Volcano Engine have been connected. Select a configuration method as needed according to the actual situation:
- When using VPN to perform data migration, the local network where the self-managed database is located has been connected to Volcano Engine via VPN gateway. For detailed steps, refer to Building a cloud VPC and on-premises multi-data-center network interconnection.
- If data migration requires a dedicated line connection, you need to establish a dedicated line connection between a single cloud VPC and a single on-premises data center network. For more information, refer to Configuring direct connections.
- An instance and database for RDS for MySQL have been created. Used to migrate local self-built data to the cloud. For details, refer to Creating an instance (RDS for MySQL) and Creating a database.
- When the database instance’s access method is VPC and access restrictions are enabled, add the subnet segment of the VPC connected by the dedicated line to the database instance’s allowlist or security group before creating the database transmission task. For more information, refer to Adding the CIDR block of the DTS server.
- Ensure that the servers to which the source and target ends belong have sufficient outbound bandwidth. Otherwise, the data migration rate will be affected.
Precautions
- Forward migration and reverse migration are two independent unidirectional migration tasks. Each independent task's constraints, operational restrictions, and other requirements must meet the basic requirements of the migration task. For precautions during the data migration process, please refer to Migrating MySQL connected over express network to Volcano Engine RDS for MySQL, and Migrating Volcano Engine RDS for MySQL to MySQL connected over express network.
- During the full migration process, the target database will generate a large number of Binlog files, resulting in the target database's disk usage being much greater than that of the original instance. We recommend that you modify the target database Binlog storage strategy before performing a full migration.
- Before starting the reverse migration task, the forward migration task must be paused first; otherwise, data loops may occur.
- Since performing a business switching operation requires stopping database writes and pausing business operations, it is recommended to perform the operation during off-peak hours to minimize the impact on business operations.
Database account minimum permission policy
Database | Schema migration | Full migration | Incremental migration |
Source | SELECT permission | SELECT permission | REPLICATION SLAVE, REPLICATION CLIENT, and SELECT permissions. |
Target | SELECT permission | SELECT permission | REPLICATION SLAVE, REPLICATION CLIENT, and SELECT permissions. |
Operation process
In the scenario of business relocation, after the local database is migrated to the cloud, business switching is required. To avoid exceptions in the cloud database after the business is switched, it is recommended to use the Database Transmission Service (DTS) data migration feature to configure a reverse migration link. When a business exception occurs, you can immediately switch the business to the local database. The main procedure is as follows:
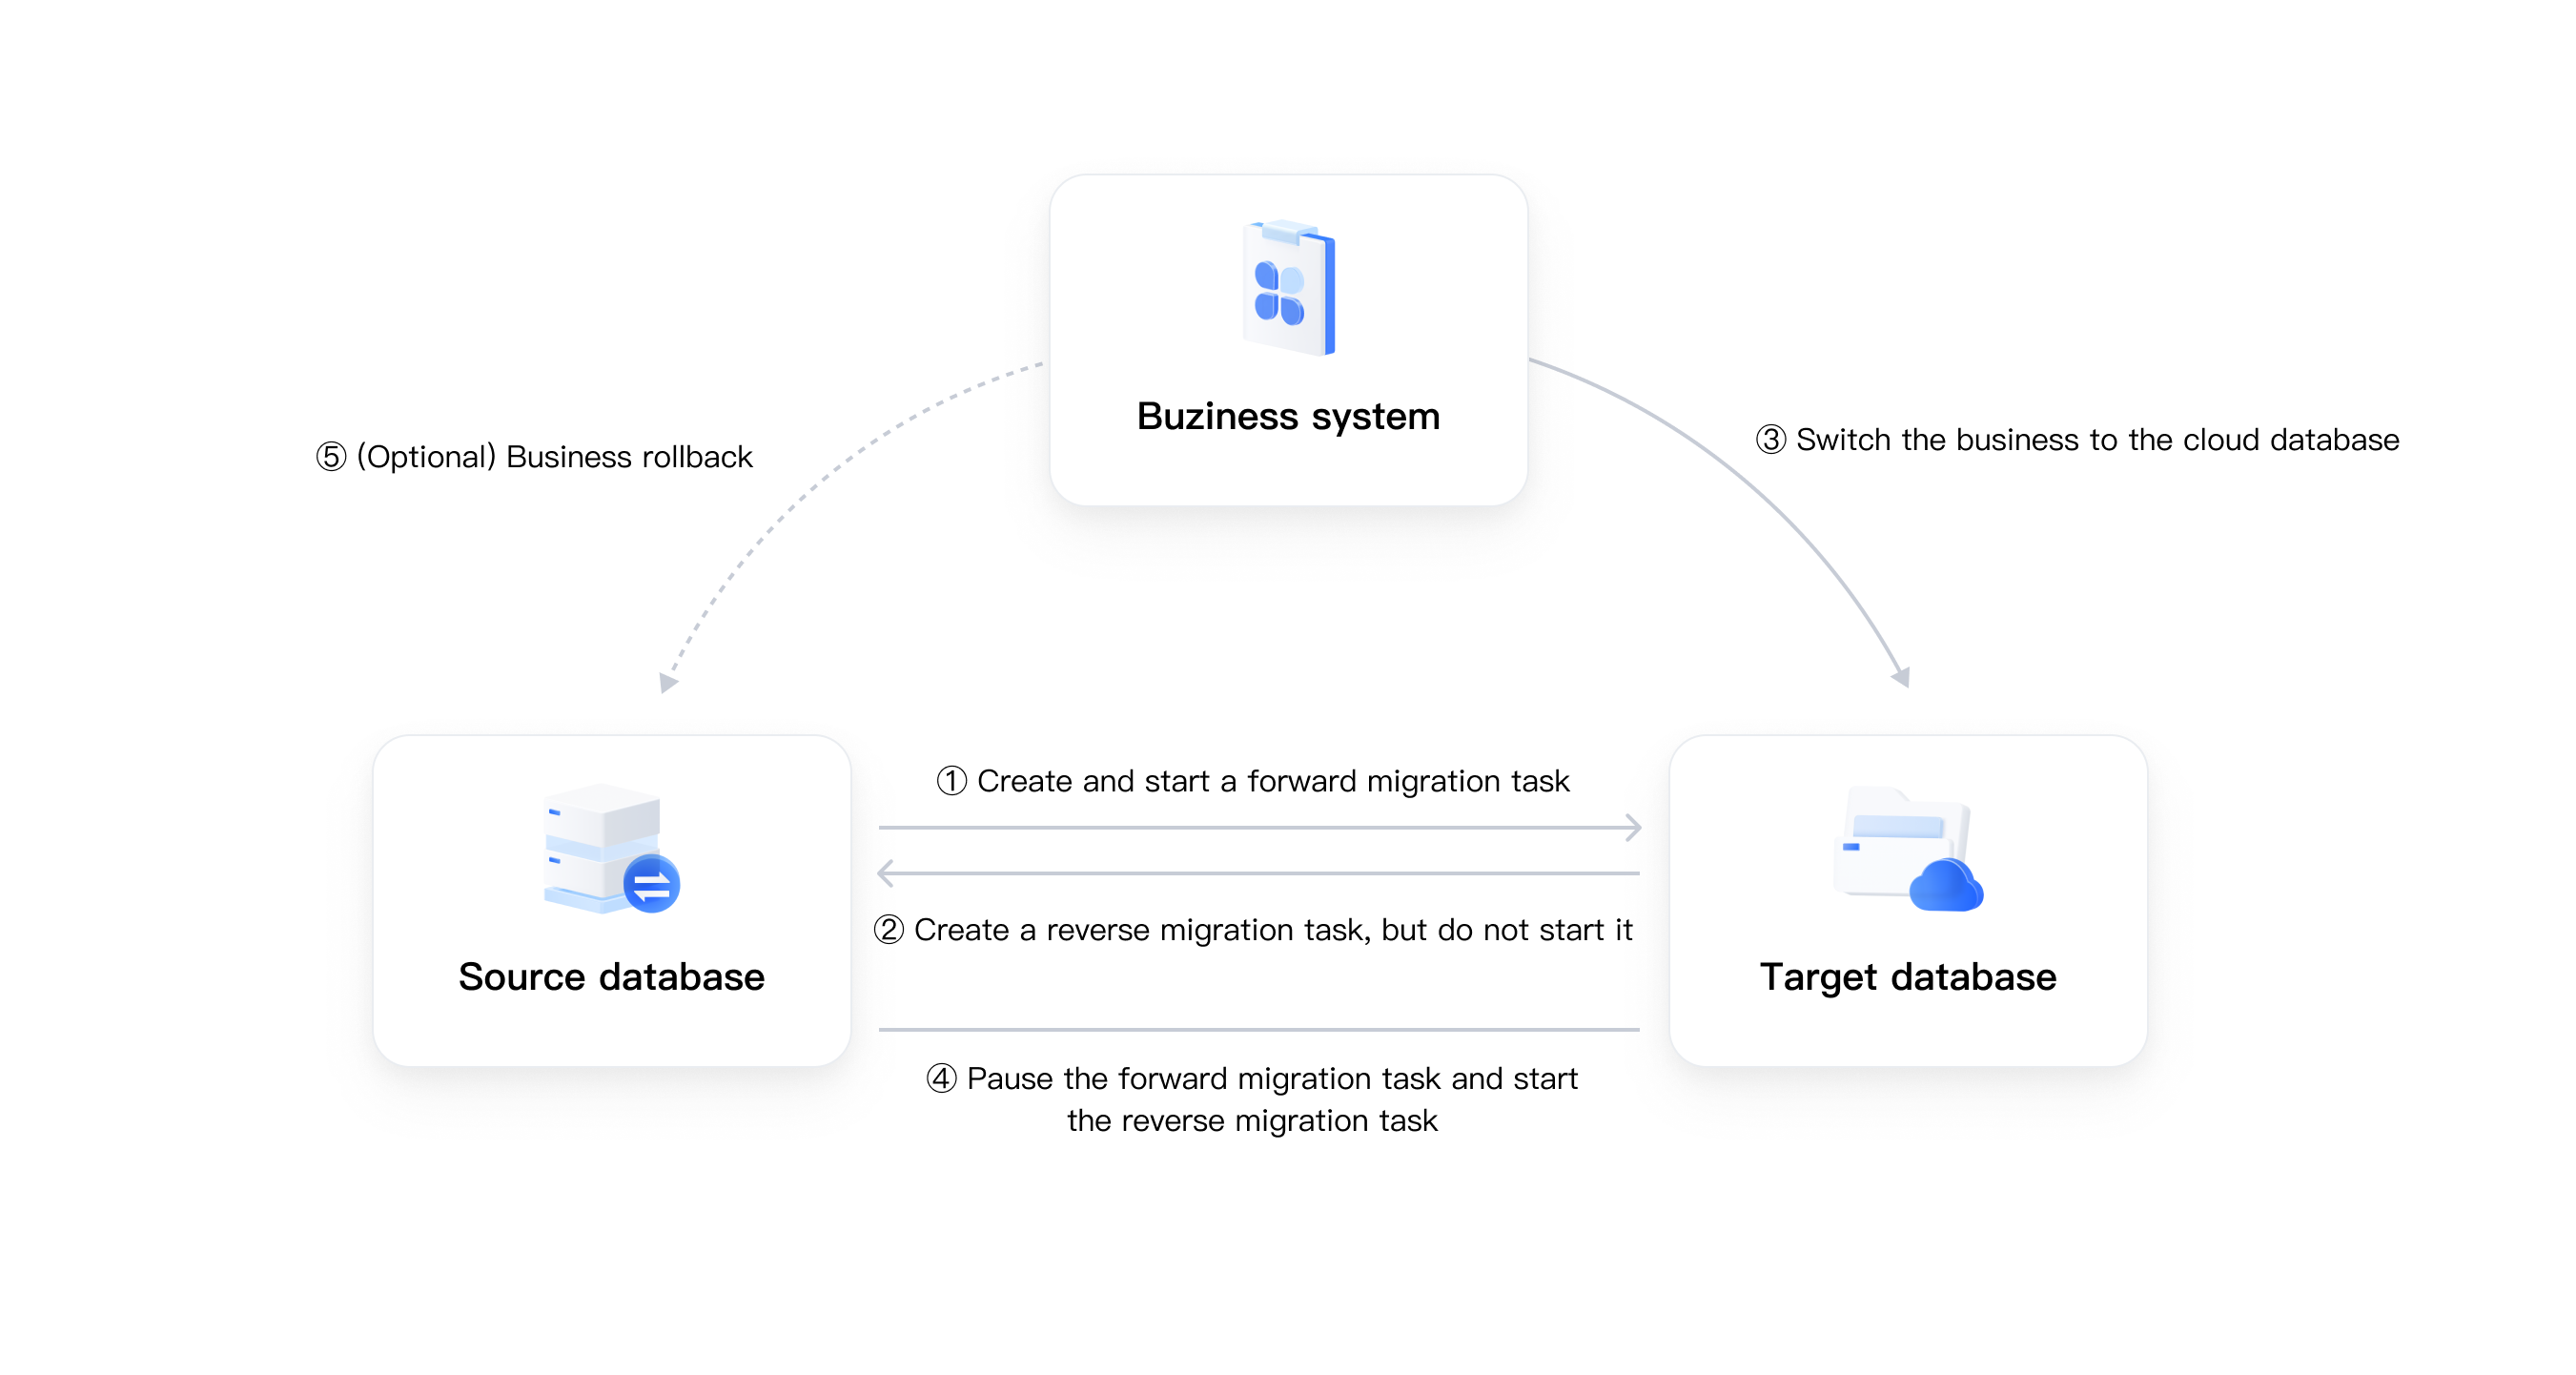
- Create and start a forward migration task
- For the forward task, select Schema migration + Full migration + Incremental migration to migrate the local self-built database to the cloud database.
- Create a reverse migration task, but do not start it
- For the reverse task, select Incremental migration. Create the task but do not start it to avoid data loopbacks.
- Switch the business to the cloud database
- Pause business writes to the source local self-built database and switch the business to the cloud database.
- Pause the forward migration task and start the reverse migration task
- Migrate incremental data generated by the destination cloud database to the local self-built database to provide a rollback solution for the business.
- (Optional) Business rollback
- If an exception occurs in the cloud service, you can switch the service to the local self-built database.
Procedure
Step 1: Create a forward migration task
- Log on to the DTS console.
- On the top menu bar, select the project and region.
- In the left navigation bar, click Data migration.
- On the Migration task list page, click Create task.
- On the Create migration task page, locate the Configure source and target database wizard, and configure the following parameters.
-
- Click Next step: configure migration object.
- On the Configure migration object wizard page, configure the related parameter information as shown in the table below.
- NameDescriptionMigration typeCheck Structural migration, Full migration, and Incremental migration.tipIf User migration is needed, user and permission migration must be handled separately. If some source database accounts do not support migration, ensure that business operations are not affected by the absence of these accounts.Migration userSelect the target accounts as needed, and set a new password in the New password (Optional) column. When migrating multiple users, click Batch change passwords to change all their passwords at once. Otherwise, the target account passwords will be the same as the source passwords.tipThis configuration is supported when Migration type is set to User migration.Migration starting pointSet to pull Binlog logs from a specified position or timestamp. The values are as follows:
- System default: The default is the task start time.
- Specify GTID: Enter the specified GTID in the input box, formatted as source_id:transaction_id.
- Set GTID_EXECUTED: Enter the specified GTID_EXECUTED in the input box, formatted as source_id:transaction_id. If multiple exist, separate them with commas (,). For how to obtain the instance's GTID_EXECUTED, refer to How to obtain the GTID_EXECUTED of the instance.
- Specify timestamp: Click the input box to select a date, click Select time to set the time point, then click OK.
tip- You can configure this parameter when selecting Migration type as Incremental migration.
- When Migration type selects both Full migration and Incremental migration, migration defaults to the current time point.
- GTID and GTID_EXECUTED must be legal values from the source end. Otherwise, pre-check reports an error.
- When selecting Specify timestamp, the time you set must be later than the earliest Binlog time on the source end. If there is no corresponding time Binlog, the closest Binlog starting point will be selected.
Whether to enable foreign key check?Select whether to enable foreign key check as needed. When enabled, the tool supports migrating cascading updates and deletes of foreign keys from the source, ensuring data integrity and consistency throughout the migration.Migration objectCheck the objects to migrate in the Migration object area. You can use Normal search and Global search to find target objects. At the same time, you can perform the following operations in the Selected object area:- Rename databases or tables: Click the pencil icon next to the target database, table, or view to rename them. If you select entire databases in the Migration object area, you can only modify the database name in the Selected object area, and can not expand the database.
- Filter and delete unnecessary targets: The search box in the Selected object area supports fuzzy search to batch delete unwanted databases, tables, and other targets.
- Filter data in tables: Check Filter data enables filtering of data within the table.
tip- Regular expression search for target objects is supported in the Migration object or Selected object areas.
- When the migration object is not the entire database, OnlineDDL operations are not supported. Meanwhile, incremental migration does not automatically migrate newly added objects and their changes.
- The migration object granularity can be either database or table. If tables are selected as the migration objects, other objects such as views, triggers, functions, or stored procedures will not be migrated to the target database.
- To ensure data migration performance and task stability, the source TRIGGER and EVENT will migrate only after the incremental migration completes.
Filter conditionOptional. Filtering data during a full data scan improves migration performance. Click the pen icon in the Filter condition column for the target database, table, or view, set the filter condition, then click Verification statement to validate the condition.tip- This feature is currently in beta testing. To use it, submit a ticket for technical support.
- This field can be configured only if Filter data is selected for the Migration object's database, table, or view.
- Filter condition currently supported =, !=, <, >, <=, >=, in, is null, and , or.
Error retry timeIf a migration task fails due to a disconnection between the source and target ends, the system immediately retries connecting to them multiple times within the specified time. Value range: 600 - 86,400, in seconds (s). The default value is 600 seconds.Full migration rateSet the full migration rate as needed. To prevent high migration rates from affecting the source database's performance, adjust the following parameters based on the read and write pressure of the source and target databases accordingly:- Rows migrated per second: Enable and set the rows migrated per second as needed. The default value is 100,000, and the value range is 1 to 100,000.
- Data volume migrated per second: Enable and set the data volume migrated per second as needed. The default value is 25,000. The value range is 1 to 25,000, and the unit is KB.
- Migration task concurrency: Set the concurrency of migration tasks as needed. The default value is 8, the value range is 1-64.
tip- You can configure this parameter when selecting Migration type as Full migration.
- If you apply to enable the full-incremental feature of the DTS, you can not set the migration task concurrency individually. To enable the full-incremental feature of DTS, submit a ticket for technical support.
- Click Data validation configuration.
- On the Create migration task page, locate the Configure data verification wizard, and configure the following parameters.
-
- Click Pre-check.
- Optional. If a pre-check has been performed for the created task, you can confirm whether to restart the pre-check based on the prompts. If you need to restart, click OK in the Whether to restart the pre-check dialog box.
- If the instances of the source and target databases are not modified, there is no need to restart the pre-check.
- If you modify the source and target database instance information or the migration task parameters, it is recommended to restart the pre-check to avoid task startup failures or interruptions.
- On the Pre-check configuration wizard page, perform the following actions based on the check result:
- Click Details in the Actions column of the pre-check results to view detailed alert and failure messages. After modifying the databases and tables accordingly, click Retry.
- Click Ignore in the Actions column to ignore the alert and continue starting the migration task. You can also click Ignore all to ignore all alert messages with one click.
tip
- If you choose to Ignore the alert and start the migration task, it may cause data inconsistencies and business risks.
- For details about the pre-check, refer to Pre-check items.
- At the bottom-right of the Pre-check page, click Confirm order.
- On the Confirm order configuration wizard page, confirm the configuration information again. Read the Service-Specific Terms for BytePlus Database Products and Services and check I have read and agree to Service-Specific Terms for BytePlus Database Products and Services, and click Create and start a task.
After successfully creating the data migration task, you can return to the DTS console to view the data migration task information on the data migration task list. For more information, refer to Viewing migration tasks.
Step 2: Create a reverse migration task
The reverse migration task provides a rollback solution for your business. After the business is restored, you can immediately switch the business to the original local self-built database if data exceptions occur.
tip
For a reverse migration task, you only need to select incremental migration for the migration type. You can create a reverse migration task according to the following guidance, but do not start the reverse migration task.
- Log on to the DTS console.
- On the top menu bar, select the project and region.
- In the left navigation bar, click Data migration.
- On the Migration task list page, click Create task.
- On the Create migration task page, locate the Configure source and target database wizard, and configure the following parameters.
-
- Click Next step: configure migration object.
- On the Configure migration object wizard page, configure the related parameter information as shown in the table below.
- NameDescriptionMigration typeFor reverse migration tasks, you only need to migrate the newly added data in the cloud to the local database as storage backup. Therefore, you only need to select Incremental migration.Migration starting pointSet to pull Binlog logs from a specified position or timestamp. The values are as follows:
- System default: The default is the task start time.
- Specify GTID: Enter the specified GTID in the input box, formatted as source_id:transaction_id.
- Set GTID_EXECUTED: Enter the specified GTID_EXECUTED in the input box, formatted as source_id:transaction_id. If multiple exist, separate them with commas (,). For how to obtain the instance's GTID_EXECUTED, refer to How to obtain the GTID_EXECUTED of the instance.
- Specify timestamp: Click the input box to select a date, click Select time to set the time point, then click OK.
Whether to enable foreign key check?Select whether to enable foreign key check as needed. When enabled, the tool supports migrating cascading updates and deletes of foreign keys from the source, ensuring data integrity and consistency throughout the migration.Migration objectIn the Migration object area, check the objects selected in the forward migration task. You can use Normal search and Global search to find target objects.Error retry timeIf a migration task fails due to a disconnection between the source and target databases, the system immediately retries connecting to them multiple times within the specified time. Value range: 600 - 86400, in seconds (s). The default value is 600 seconds.
- Click Save.
warning
To create a reverse migration task, simply click Save without starting the reverse migration task.
Step 3: Switch business to cloud database
When the forward task completes full migration and schema migration and enters the incremental migration stage, you can complete the service cut-over operation according to the following configurations.
- (Optional) Log in to the source database and execute the following command according to the database type to view the session information, and ensure that no new sessions perform write operations.
show processlist;
CLIENT LIST
use admin
db.runCommand({currentOp: 1, $all:[{"active" : true}]})
select * from pg_stat_activity;
- (Optional) Before switching services, you can perform data verification to verify whether the source and destination data are consistent.
- You need to create a full validation task and a schema verification task. For details, refer to Creating a data verification task.
- Switch the service to the cloud database.
- Suspend business writes to the local self-built database on the source end.
- Switch the service to the cloud database.
Step 4: Pause the forward migration task and start the reverse migration task
- Pause the forward migration task.Task For details, refer to Pausing a migration task.
tip
When the migration task is suspended, do not start the task at will; otherwise, data inconsistency may occur.
- Start the reverse migration task. For details, refer to Starting a migration task.
- Start writing cloud business.
- Test business functions.
Step 5: (optional) Service rollback
If an exception occurs in the cloud business, refer to the following operation prompts to reduce the impact of data migration on the business.
- Pause the business and prohibit the writing of new data.
- Switch the service to the source on-premises self-built database.
- Resume writing business data.
Last updated: 2026.09.02 16:10:46
All rights reserved © Beijing Volcano Engine Technology Co., Ltd2024
