Code Pipeline
Code Pipeline


Document

- Documentation
 Code PipelineUser guideAI applicationStable Diffusion ComfyUIOne-click deployment of the SD ComfyUI standalone version
 Copy page
 Download PDF
Stable Diffusion ComfyUI
One-click deployment of the SD ComfyUI standalone version
Copy pageDownload PDFOne-click deployment of the SD ComfyUI standalone version
The AI application platform is a one-stop solution for development, deployment, and operations, designed for large model online inference scenarios. This article introduces how to use a template for one-click deployment of Stable Diffusion ComfyUI for AI image generation.
Application introduction
SD ComfyUI is a node-based graphical user interface (GUI) specifically designed for Stable Diffusion. It allows users to build model workflows using a drag-and-drop method, supports real-time viewing and adjustment of model parameters, and simplifies the complexity of model construction and training. This enables users to operate models without needing an in-depth understanding of the underlying algorithms. The principle behind SD ComfyUI is to break down the entire image generation process into multiple independent nodes, each with its own feature, for example, loading models, providing text prompts, generating images, and more. Each module is connected by input and output lines to form a complete workflow.
Notes
The following section describes practices that have been tested and verified. To achieve the expected results and comply with the limit, please follow the approach described in this document or operate on the resources recommended in this document. If you need an alternative solution, you can contact the corresponding account manager for consultation.
Prerequisites
- Volcengine Kubernetes Engine (VKE)
- The VKE cluster has been created. For specific operations, refer to Cluster operations.
- (Optional) To mount object storage TOS, install the csi-tos component in advance. For specific operations, refer to Install components.
- (Optional) If you want to deploy using the Volcengine Container Instance method, this is only applicable to VKE clusters with the VPC-CNI network model. In addition, the vci-virtual-kubelet component must be installed in the cluster in advance. For specific operations, refer to Install components.
- Optional: If you need to use GPU resources, please install the nvidia-device-plugin component in advance. For specific operations, refer to Install components.
- Code Pipeline CP
- Deploy resource has been connected. The deploy resource must be a Volcengine Kubernetes Engine (VKE) cluster. For specific operations, refer to Access deploy resource.
- (Optional) If you need to mount model files, please complete the following preparations and choose any storage option.
- Torch Object Storage (TOS)
- The model has been uploaded to TOS Bucket storage. For specific operations, refer to the Object Storage Getting Started guide.
- The access keys AK & SK for the current account have been obtained. It is recommended to use IAM user access keys with least privilege, and require that permission to access the relevant files is granted.
- FileNAS
- The model has been uploaded to NAS storage. NAS and the VKE cluster to be deployed must be in the same VPC. For specific operations, refer to File Storage getting started.
- (Optional) If you need to configure an external access method, please complete the following preparations by choosing any method.
- API Gateway: The gateway instance has been created and must be in the same VPC as the VKE cluster to be deployed. For specific operations, refer to Create instance.
- CLB load balancer: A load balancer instance has been created. The load balancer instance and the VKE cluster to be deployed must be in the same VPC. For specific operations, refer to Create a load balancing instance.
Procedure
- Log in to the Code Pipeline Console.
- In the left navigation bar, select AI application.
- On the AI application page, click Create application.
- Select Create based on framework > AI Image Generation - Stable Diffusion ComfyUI Standalone Version, click Deploy.
- Fill in the relevant configuration information for the application as required. After the configuration is complete, click confirm. Application creation and deployment will begin.
- Basic Information
- Configuration ItemDescriptionsApplication IDEnter the Application ID as prompted by the interface. The Application ID is the unique identifier for the application and cannot be changed after it is created.Application nameDisplay name of the custom application.DescriptionEnter remarks information for the current application. This field can be left empty.
- Deploy a cluster
- Configuration ItemDescriptionsdeploy resourceSelect the VKE deployment cluster that has been connected in the prerequisites.warningTo deploy using the Volcengine Container Instance method, this is only applicable to VKE clusters whose network model is VPC-CNI, and the vci-virtual-kubelet component must be installed in the cluster in advance.NamespaceSelect or enter the namespace to deploy. If the namespace you enter does not exist, it will be created automatically.Environment IDCustomize the unique identifier for the current environment. After the Environment ID is created successfully, it cannot be modified.
- Model configuration
- Configuration ItemDescriptionsImage selectionThis template uses the pre-installed image SD ComfyUI.ModelBoth official model and self-hosted model are supported. Please select according to your needs.
- Official models: Built-in commonly used SD official models, helping you quickly launch services.
- Self-hosted model: You can configure your own model files using the following methods. Please select as needed.
- TOS mount: Mount model files using TOS via Volcano Engine Object Storage.
- Select the Region, Bucket, and enter the specific path.
- AK & SK: Enter the AccessKey ID (AK) and Secret Access Key (SK) for the current account. It is recommended to use access keys of IAM users with least privilege. Ensure that permission to access the relevant files is granted.
- Mount artifact repository: Mount model files through the Volcano Engine artifact repository.
- Artifact library: Select the Region, instance, repository, namespace, model name, and version in which the model file is located. Only AI artifact repository can be selected.
- AK & SK: Enter the access keys for the current account: AccessKey ID (AK) and Secret Access Key (SK). It is recommended to use the access key of an IAM user with minimal permissions, and it is required that this IAM user has been granted permission to mount the repository.
- NAS mount: Mount model files to NAS via Volcano Engine File Storage.
- File system type: Select the file system type. Supports Ultra-fast type and Capacity type. NAS and the VKE cluster to be deployed must be in the same VPC.
- Mount point: Select the file system and mount point to be mounted.
- Subdirectory: Enter the subdirectory information for the file system to be mounted; the default is the root directory./.
- Mount path: The target path to be mounted in SD ComfyUI. The default model loading directory for SD ComfyUI is /comfyui/models/checkpoints.
PluginOptional configuration. Mount other dependent resources, for example LoRA plugins, VAE models, CLIP models, and other resources, to the service.The following mount methods are supported; please select as needed. A service can add multiple plugins.- TOS mount: Use the TOS mount plugin for Volcano Engine Object Storage.
- Select the Region where the plugin is located, Bucket, and enter the specific path.
- AK & SK: Enter the AccessKey ID (AK) and Secret Access Key (SK) for the current account. It is recommended to use access keys for IAM users with least privilege. Ensure that permission to access the corresponding files has been granted.
- NAS mount: Mount NAS using the NAS mount plugin of Volcano Engine File Storage.
- File system type: Select the file system type. You can select High performance type or Capacity type. NAS and the VKE cluster to be deployed must be in the same VPC.
- Mount point: Select the file system and mount point to mount.
- Subdirectory: Enter the subdirectory information for the file system to be mounted; the default is the root directory./.
- Mount path: The target path to mount in SD ComfyUI. The root directory of SD ComfyUI is /comfyui. Depending on resource requirements, it needs to be mounted in different directories. For details, refer to the default commonly used ComfyUI paths in the preset image.
Drawing locationIf you want to persistently store the output items, you need to mount the output image directory.The following mount methods are supported. Please select as needed.- TOS mount: Mount the output directory via Volcano Engine Object Storage (TOS).
- Select the Region and Bucket where the output directory is located, and fill in the specific path.
- AK & SK: Enter the AccessKey ID (AK) and Secret Access Key (SK) for the current account. It is recommended to use the access keys of IAM users with minimal permissions.
- NAS mount: Mount the output directory via NAS in Volcano Engine File Storage.
- File system type: Select the file system type. The following types are supported: Performance and Capacity. NAS and the VKE cluster to be deployed must be in the same VPC.
- Mount point: Select the file system and mount point to be mounted.
- Subdirectory: Enter the subdirectory information for the file system to be mounted; the default is the root directory./.
- Mount path: The target path to mount to SD ComfyUI. The default output directory for images in the SD ComfyUI project is /comfyui/output.
Startup commandSet the application's start command and the container port to listen on. The default is python -u main.py --listen --port 7860, and modifying the start command according to business requirements is supported.
- Service specifications
- Check Deploy using the Volcengine Container Instance method
-
- Do not check Deploy using the Volcengine Container Instance method
-
- Access configuration (optional)
- Configure access methods for the AI application. For more details, refer to Access settings.
Result validation
Use ComfyUI through the console
- Verify whether the application is deployed successfully
- On the Basic information > Resource configuration tab of the application, view the deployment progress of the application. Supports viewing detailed startup and runtime information for the application through the instance's running status, real-time logs, and events.
- View real-time logs: Click Real-time logs to view the application's runtime information, which facilitates operations and troubleshooting.
- View events: Click Event to view the application's start information. You can view event information that occurred within the past hour.
- Access SD ComfyUI
- After the application is successfully deployed, you can copy the application's access address from the access settings area. Access SD ComfyUI at this address.
- Text-to-image
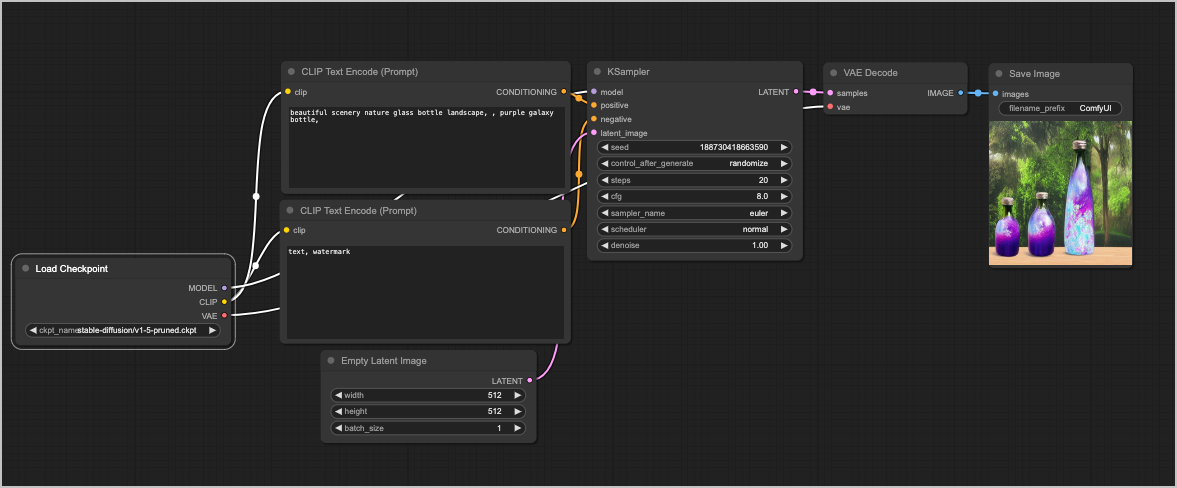
- In the SD ComfyUI Actions interface, arrange your text-to-image workflow. Enter positive and negative prompt words, then click Queue Prompt to generate a picture based on the prompt words.
-
Use ComfyUI through the API
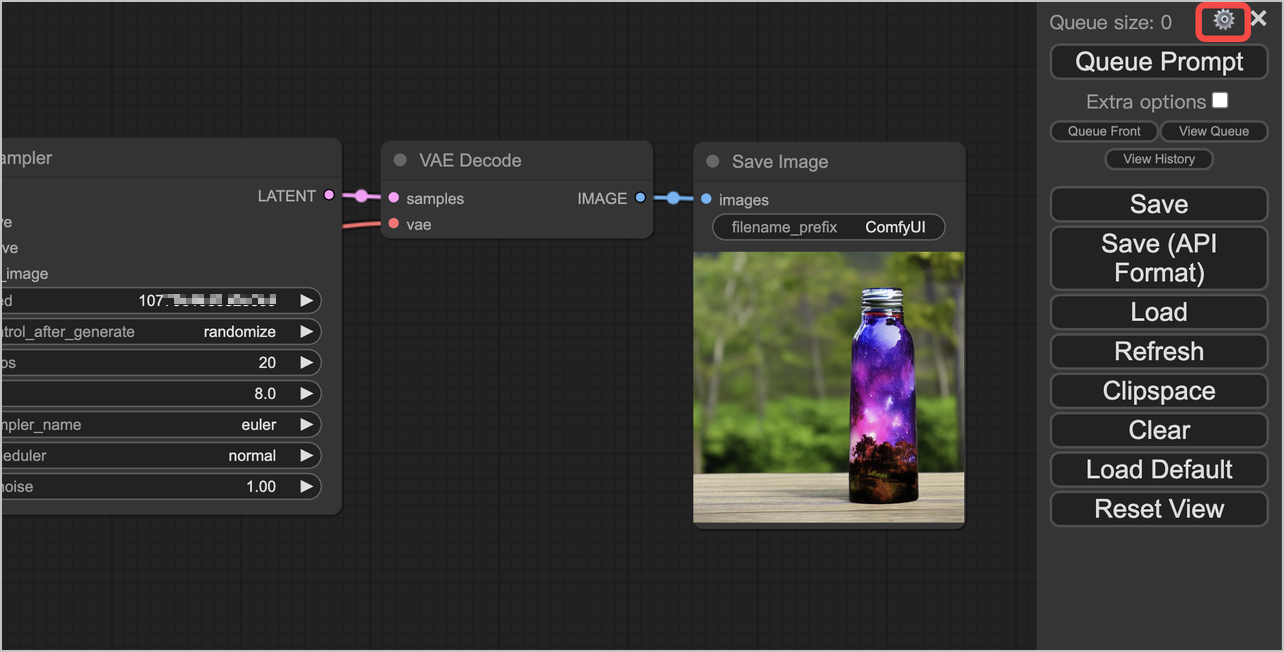
- In ComfyUI, copy the application's access address from the settings area.
-
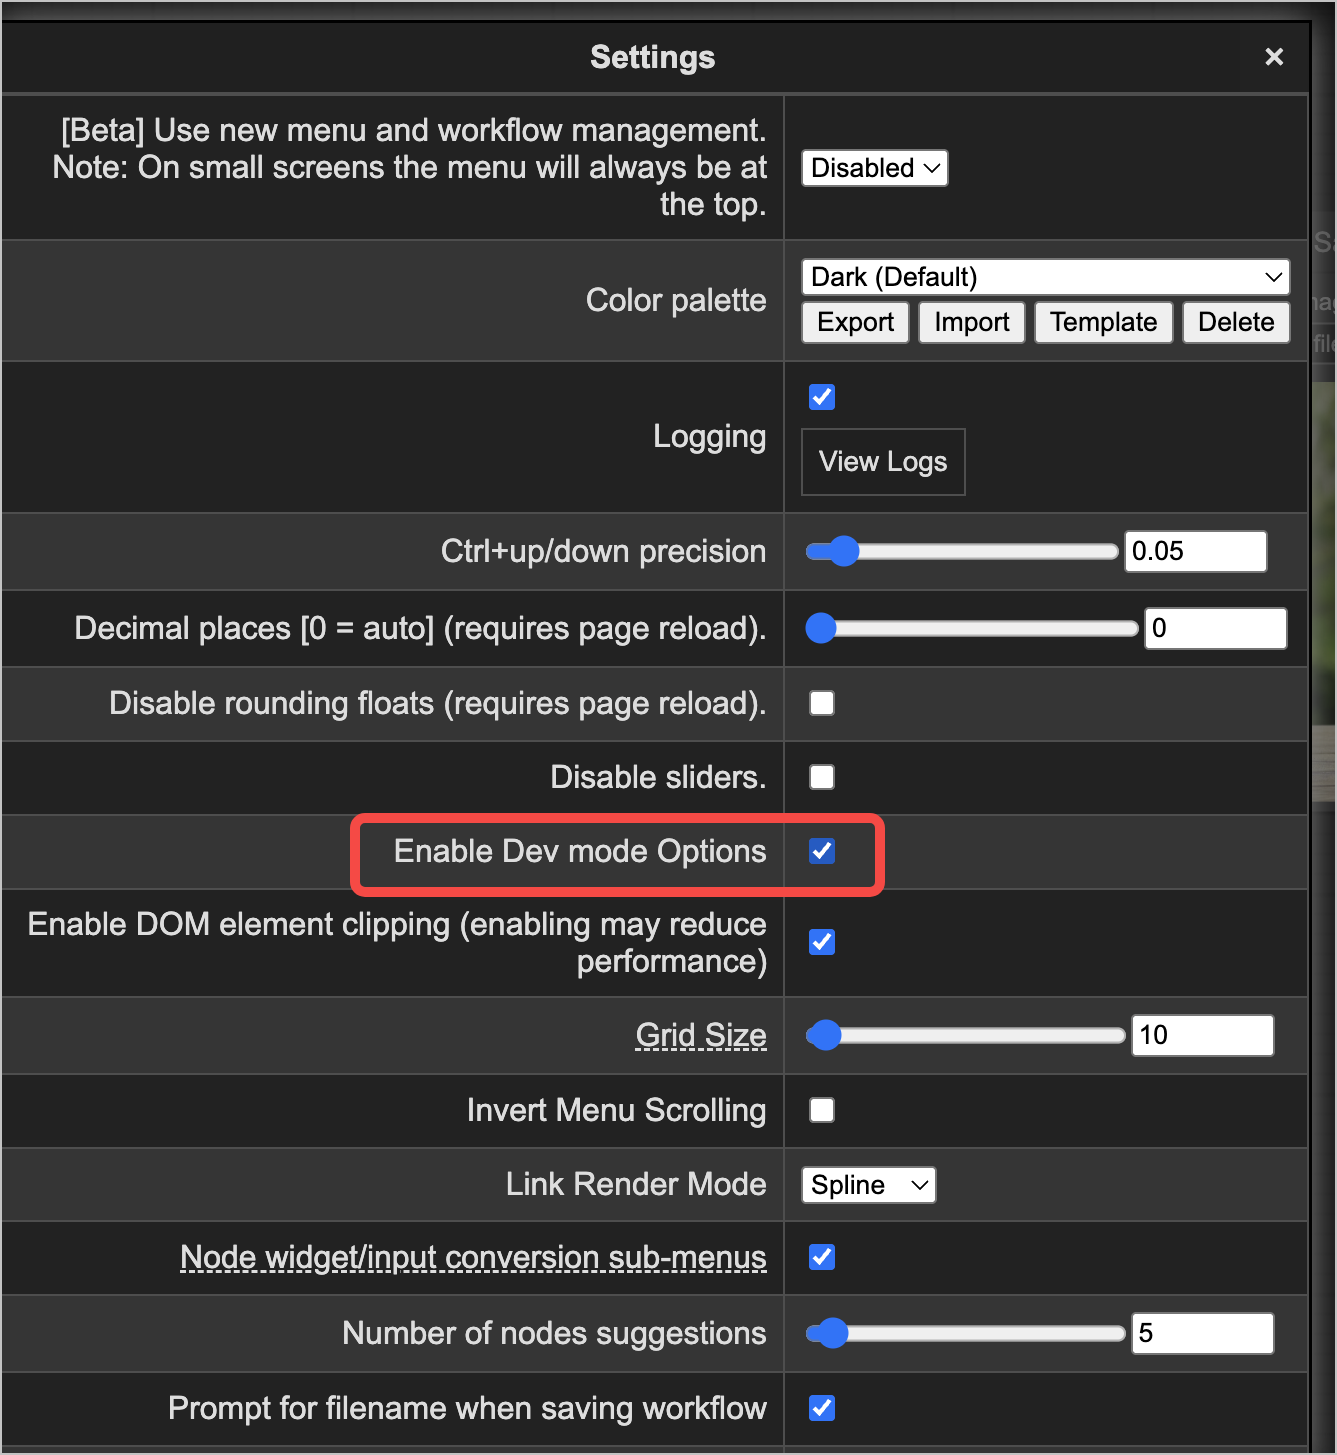
- Turn on developer mode.
-
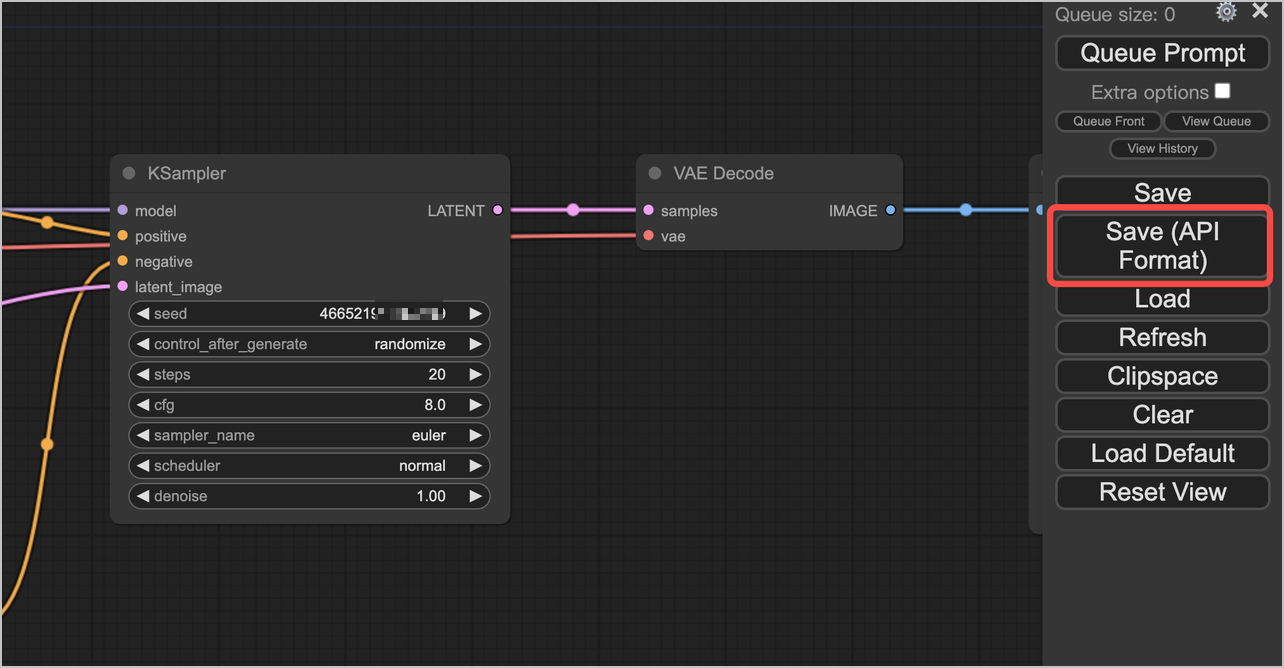
- Save the workflow in API format.
-
- Create a Python script comfyui_api.py.
- workflowfile: Replace with your workflow workflow file.
- COMFYUI_ENDPOINT: Replace with the access address in the access settings.
- import jsonimport osimport websocketimport uuidimport urllib.requestimport urllib.parsedef show_gif(fname):import base64from IPython import displaywith open(fname, 'rb') as fd:b64 = base64.b64encode(fd.read()).decode('ascii')return display.HTML(f'<img src="data:image/gif;base64,{b64}" />')def queue_prompt(prompt):p = {"prompt": prompt, "client_id": client_id}data = json.dumps(p).encode('utf-8')req = urllib.request.Request("http://{}/prompt".format(server_address), data=data)return json.loads(urllib.request.urlopen(req).read())def get_image(filename, subfolder, folder_type):data = {"filename": filename, "subfolder": subfolder, "type": folder_type}url_values = urllib.parse.urlencode(data)with urllib.request.urlopen("http://{}/view?{}".format(server_address, url_values)) as response:return response.read()def get_history(prompt_id):with urllib.request.urlopen("http://{}/history/{}".format(server_address, prompt_id)) as response:return json.loads(response.read())def get_images(ws, prompt):prompt_id = queue_prompt(prompt)['prompt_id']print('prompt')print(prompt)print('prompt_id:{}'.format(prompt_id))output_images = {}while True:out = ws.recv()if isinstance(out, str):message = json.loads(out)if message['type'] == 'executing':data = message['data']if data['node'] is None and data['prompt_id'] == prompt_id:print('Execution completed')break # Execution completed else:continue # Preview as binary data history = get_history(prompt_id)[prompt_id]print(history)for o in history['outputs']:for node_id in history['outputs']:node_output = history['outputs'][node_id]The picture branch if 'images' in node_output:images_output = []for image in node_output['images']:image_data = get_image(image['filename'], image['subfolder'], image['type'])images_output.append(image_data)output_images[node_id] = images_output# Video branch if 'videos' in node_output:videos_output = []for video in node_output['videos']:video_data = get_image(video['filename'], video['subfolder'], video['type'])videos_output.append(video_data)output_images[node_id] = videos_outputprint('Image retrieval completed')# print(output_images)return output_imagesdef parse_worflow(ws, prompt, seed, workflowfile):workflowfile = workflowfileprint('workflowfile:' + workflowfile)with open(workflowfile, 'r', encoding="utf-8") as workflow_api_txt2gif_file:prompt_data = json.load(workflow_api_txt2gif_file)Set text prompt prompt_data["6"]["inputs"]["text"] = promptreturn get_images(ws, prompt_data)def generate_clip(prompt, seed, workflowfile, idx):print('seed:' + str(seed))ws = websocket.WebSocket()ws.connect("ws://{}/ws?clientId={}".format(server_address, client_id))images = parse_worflow(ws, prompt, seed, workflowfile)for node_id in images:for image_data in images[node_id]:from datetime import datetimeObtain the current time and format it as YYYYMMDDHHMMSS timestamp = datetime.now().strftime("%Y%m%d%H%M%S")# Use formatted timestamp in the file nameGIF_LOCATION = "{}/{}_{}_{}.png".format(SageMaker_ComfyUI, idx, seed, timestamp)os.makedirs(os.path.dirname(GIF_LOCATION), exist_ok=True) # Automatically create a directoryprint('GIF_LOCATION:' + GIF_LOCATION)with open(GIF_LOCATION, "wb") as binary_file:# Write a binary file binary_file.write(image_data)# show_gif(GIF_LOCATION)print("{} DONE!!!".format(GIF_LOCATION))if __name__ == "__main__":# Set the working directory and project-related paths WORKING_DIR = 'output'SageMaker_ComfyUI = WORKING_DIRworkflowfile = 'workflow_api.json'COMFYUI_ENDPOINT = '14.**.**.**:***'server_address = COMFYUI_ENDPOINTclient_id = str(uuid.uuid4()) # Generate a unique client ID seed = 15465856prompts = ["Anime girl with long pastel pink hair, large sapphire gradient eyes, fair skin, wearing a floral kimono - inspired outfit with floating sakura petals.","Anime girl with long flowing mint green hair, striking emerald gradient eyes, smooth porcelain skin, adorned in a celestial - themed yukata with tiny glowing stars and floating iridescent feathers."]idx = 1for prompt in prompts:generate_clip(prompt, seed, workflowfile, idx)idx += 1
- Executing python3 comfyui_api.py will generate a picture and save it to a local file.
FAQs
What are the default common paths for ComfyUI in a prebuilt image?
For the default common ComfyUI paths in the preset image, refer to the table below.
Name | Path | Descriptions |
root | /comfyui | The root directory of the ComfyUI project. |
output | /comfyui/output | ComfyUI picture generation directory. |
custom_nodes | /comfyui/custom_nodes | The ComfyUI custom node directory. |
workflows | /comfyui/user/default/workflows | Directory for saving ComfyUI workflows. |
checkpoints | /comfyui/models/checkpoints | The ComfyUI checkpoints path. |
lora | /comfyui/models/lora | Configuration path for ComfyUI LoRA-related plugins. |
vae | /comfyui/models/vae | The ComfyUI VAE model configuration path. |
clip | /comfyui/models/clip | ComfyUI CLIP model configuration path. |
Last updated: 2026.06.17 16:54:30
All rights reserved © Beijing Volcano Engine Technology Co., Ltd2024
