VPN Connet
VPN Connet


Document

- Documentation
 VPN ConnetBest PracticesConnections between virtual private cloudsEstablishing single-tunnel VPN connectivity between VPCs (static route)
 Copy page
 Download PDF
Connections between virtual private clouds
Establishing single-tunnel VPN connectivity between VPCs (static route)
Copy pageDownload PDFEstablishing single-tunnel VPN connectivity between VPCs (static route)
This topic describes how to connect two Virtual Private Clouds (VPCs) under different accounts through IPsec-VPN using static routing mode to enable network connectivity.
Background
VPCs are naturally isolated. VPN Connect can build a tunnel between VPCs to enable communication. This topic uses two VPCs from different accounts as an example. For communication between VPCs under the same account, no account switch is required. Other actions remain the same as those in the current topic.
tip
To connect a VPC to a third-party VPC through VPN, you can configure the third-party VPC as a client when configuring VPN Connect. For more information on the third-party VPC configuration, see the vendor's documentation.
Prerequisites
- Activate accounts tesezh-01 and tesezh-02 and complete real-name authentication.
- Get account information about tesezh-01 and tesezh-02.
- Create VPC1 under tesezh-01 and VPC2 under tesezh-02, with non-overlapping private CIDR blocks between the two VPCs.
Related information
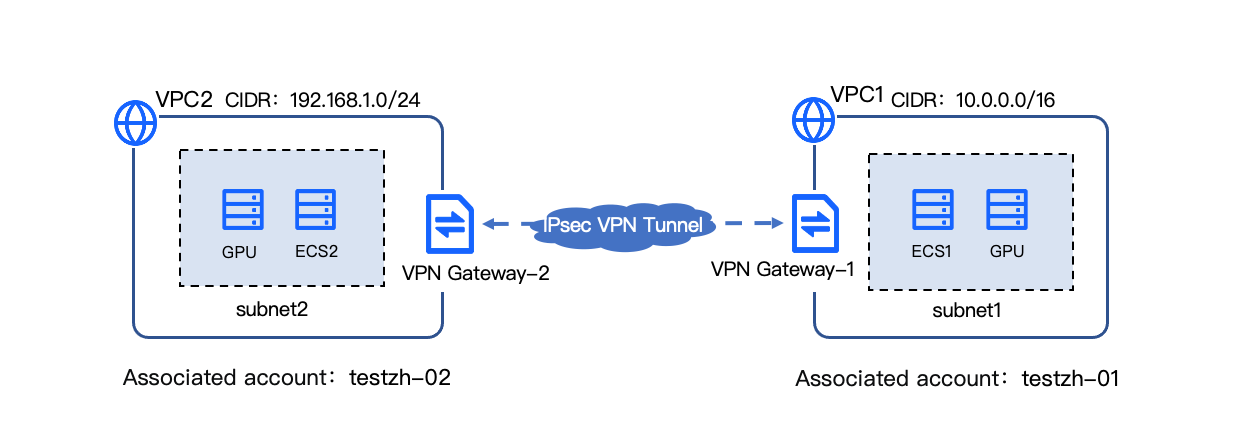
The existing deployment is illustrated in the diagram below. VPC1, VPC2, and Elastic Compute Services (ECS1 and ECS2) represent created resources. VPN Gateway 1 and VPN Gateway 2 are resources to be created in the following steps.
tip
- VPN Connect does not support establishing cross-border connectivity. In the scenario where a network connection is established between VPCs via the IPsec-VPN connection, the two interconnected VPCs must both belong to regions within China Mainland or both belong to regions outside China Mainland. It is not allowed that one VPC resides in a China Mainland region and the other resides in a region outside China Mainland. For more information, see Regions.
- If you need to connect one VPC in a China Mainland region with another VPC in a region outside China Mainland, we recommend you use the Cloud Enterprise Network (CEN) service. For details, see Cloud Enterprise Network.
- If you need to connect VPCs across different regions through an IPsec-VPN connection (where VPCs are either both in China Mainland regions or both in regions outside China Mainland), the network quality of IPsec-VPN is relatively poor due to the quality of the internet. We recommend using CEN. For procedure, see Inter-VPC communication across regions within the same account or Inter-VPC communication across regions and accounts.
Procedure
Step 1: Create VPN gateway
- Log in to the VPN Gateway console using tesezh-01.
- In the top menu bar, select the target project (Project-1) and region (China (Beijing)).
- Click Create VPN Gateway and configure the VPN gateway parameters based on the table below.
- Click Confirm order, and follow the console guidance to review and accept the legal terms.
- Click Buy now for payment to complete the purchase. Click Confirm order, and complete the action as prompted by the interface.
- After VPNGW-01 is created successfully, the system assigns the gateway egress IP as 180.XX.XX.207.
- Log in to the VPN Gateway console using tesezh-02, and repeat steps 2-7 to create VPNGW-02.
- After VPNGW-02 is created successfully, the system assigns a gateway egress IP of 180.XX.XX.209.
Step 2: Create customer gateway
- Log in to the Customer Gateway console using tesezh-01.
- In the top menu bar, select the target project (Project-1) and region (China (Beijing)).
- Click Create Customer Gateway.
- Configure the customer gateway based on the table below, and click Confirm when completed.
-
- Log in to Account tesezh-02 and the Customer Gateway console, then refer to Step 2 to Step 4 to create customer gateway CGW-02. In the parameters, set IP address to 180.XX.XX.207.
- At this point, the relationship between the VPC, VPN gateway, and customer gateway is as shown in the table below.
- AccountVPC nameVPN gatewayEgress IP addressCustomer gatewaytesezh-01VPC1VPNGW-01180.XX.XX.207CGW-01tesezh-02VPC2VPNGW-02180.XX.XX.209CGW-02
Step 3: Create IPsec-VPN connection
- Log in the VPN Connection console using tesezh-01.
- In the top menu bar, select the target project (Project-1) and region (China (Beijing)).
- Click Create VPN Connection.
- Configure the IPsec-VPN connection based on the table below, and click Create after completing the configuration.
- Basic information
- ParameterDescriptionSample valueRegionsSelect the region where the IPsec-VPN connection is located.China (Beijing)NameName of the IPsec-VPN connection.IPsecVPN-01Affiliated ProjectThe project to which the resource belongs. It is fixed as Project-1 that is selected before entering the creation page.Project-1
- Associate resources
-
- Connection information
-
- Log in to the VPN Connection console under Account tesezh-02, repeat steps 2 to 4, create the IPsec-VPN connection: IPsecVPN-02, with the Pre-Shared Key consistent with IPsecVPN-01, and set all settings to test@123.
- At this point, the relationship between the Virtual Private Cloud (VPC), VPN gateway, customer gateway, and IPsec-VPN connection is as shown in the table below.
-
Step 4: Configure route for on-premises VPN gateway
- Log in to the VPN Gateway console using tesezh-01.
- In the top menu bar, select the target project (Project-1) and region (China (Beijing)).
- Click VPNGW-01, the name of the VPN gateway, in the list.
- Click the Route information tab. On this tab, click Add route.
- Configure the routing information according to the table below.
- ParameterDescriptionSample valueDestination CIDREnter the private CIDR block of VPC2.192.168.1.0/24Next Hop typeFixed to IPsec-VPN connection.IPsec-VPN connectionNext HopSelect the IPsec-VPN connection created in the previous phase.IPsecVPN-01
- Click OK to complete the addition of the VPNGW-01 route entry.
Step 5: Configure remote route
- Log in to the VPN Gateway console using tesezh-02.
- In the top menu bar, select the target project (Project-1) and region (China (Beijing)).
- Click the VPN gateway name: VPNGW-02 in the list.
- Click the Route information tab. On this tab, click Add route.
- Configure the routing information with reference to the table below.
-
- Click OK to complete the addition of the VPNGW-02 route entry. This completes all configuration operations for the VPN Connect.
Test connectivity
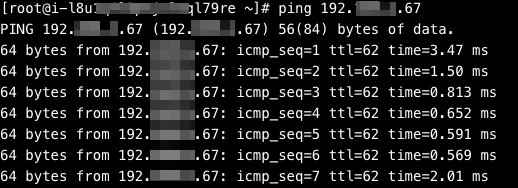
- Log in to ECS1 within VPC1.
- Execute the ping command to ping the private IP of ECS2.
- The result shown below indicates that the IPsec-VPN connection between VPC1 and VPC2 is successfully established and communication is working normally.
-
Last updated: 2026.07.15 18:18:56
All rights reserved © Beijing Volcano Engine Technology Co., Ltd2024
