Load Balancer
Load Balancer


Document

- Documentation
 Load BalancerClassic Load Balancer (CLB)Best PracticesDisaster Recovery Best PracticesConfiguring the active and standby availability zones in the same region for CLB disaster recovery
 Copy page
 Download PDF
Disaster Recovery Best Practices
Configuring the active and standby availability zones in the same region for CLB disaster recovery
Copy pageDownload PDFConfiguring the active and standby availability zones in the same region for CLB disaster recovery
This section describes how to implement disaster recovery of Classic Load Balancer (CLB) between the active and standby availability zones (AZs).
Scenarios
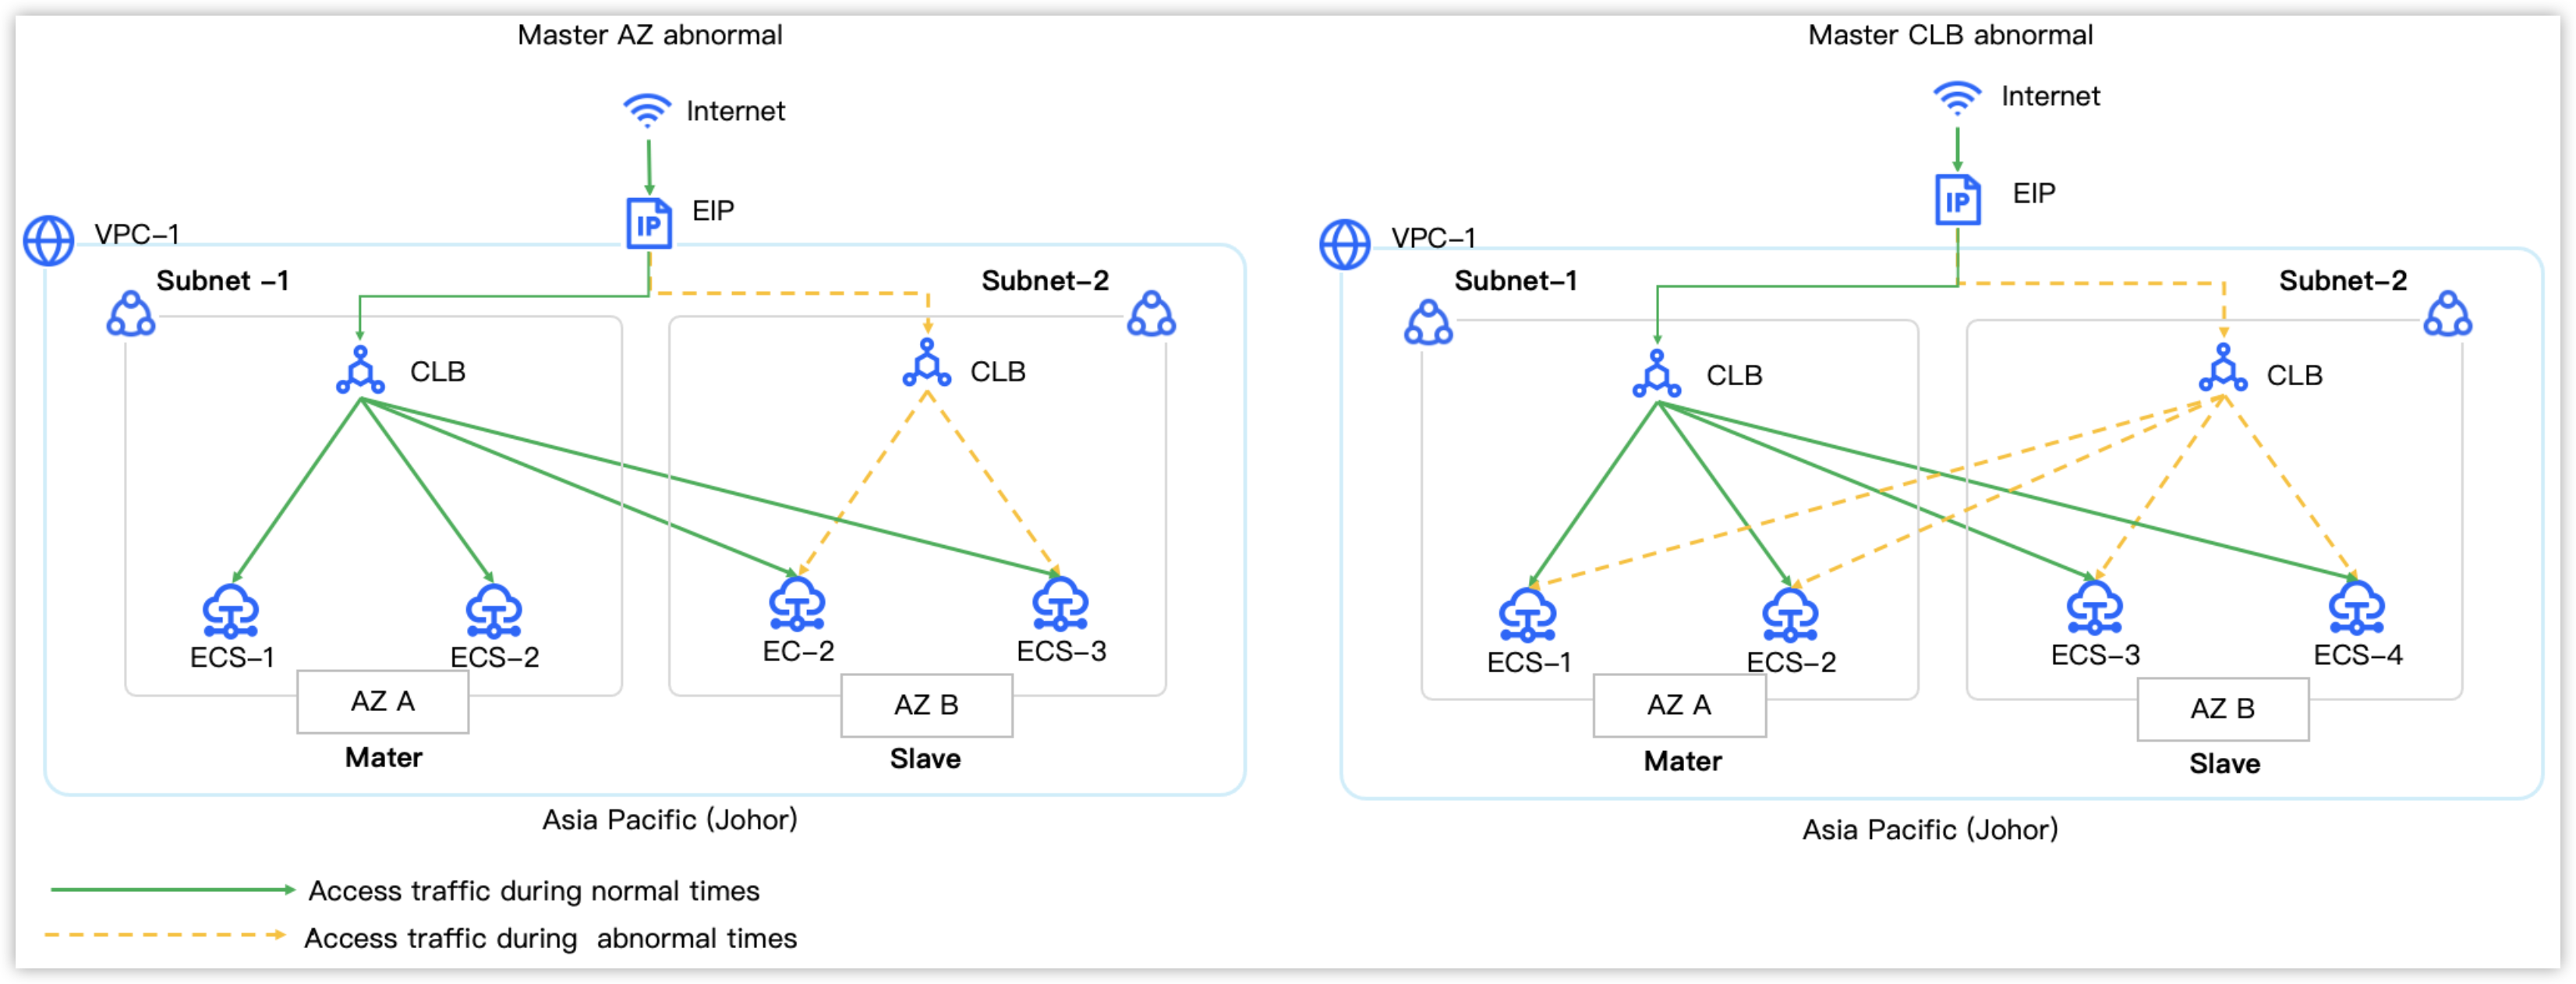
CLB supports disaster recovery between the active and standby AZs. Deploying CLB in different AZs within the same region can help you implement disaster recovery for services. When the active AZ fails because the network is abnormal or the CLB service is unavailable, inbound traffic can be distributed through CLB deployed in the standby AZ.
This section takes the China (Shanghai) region as an example to describe how to deploy CLB in the active and standby AZs to achieve disaster recovery. The specific scenario is shown in the figure below.
Prerequisites
- The required Virtual Private Cloud VPC-1 and subnets Subnet-1 and Subnet-2 have been created. For more information, refer to Setting up an IPv4 VPC.
- The required Elastic Compute Service (ECS) instances ECS-1, ECS-2, ECS-3, and ECS-4, have been created. For more information, refer to Purchasing ECS instances.
- The required ECS instances have completed backend service deployment. For more information, refer to Setting up a backend service.
- The security groups for the required Elastic Compute Service (ECS) server instances have allowed access from the CIDR block 100.64.0.0/10 over TCP, along with the required service ports (For example, TCP port 80). For details, refer to Configuring the backend server security group.
Configuration procedure
tip
The following describes only the required parameters and their values. For other parameters, retain the default values. For more information about other parameters, refer to CLB User Guide.
Step 1: Create a CLB instance
- Log in to the CLB console.
- Click Create Classic Load Balancer.
- Configure the basic information of the CLB instance as prompted.
- NameValid ValueBasic informationBilling methodsPay-as-you-goRegionChina (Shanghai)AZ
- Active availability zone: Availability Zone A
- Standby availability zone: Availability Zone B
Termclb-1Network ConfigurationIP Address VersionIPv4Network TypeInternetVirtual Private Cloudvpc-1Subnetsubnet-1IPv4 addressAutomatic assignment IPAssociating EIPISPBGP(multi-line)Billing rulePay-by-bandwidthBandwidth cap20MbpsInstance specificationTypesmall_1
- follow the console instructions to review and confirm the legal agreements.
- Click Submit Order. You will be redirected to the Application Submitted Successfully page.
- Click Go to console to view the newly created Classic Load Balancer instance on the Instances page.
Step 2: Configure a Server Group
- On the instance list page, click the name of the CLB instance clb-1.
- On the Server Group tab, click Create a Server Group.
- Input the name group-1, and click Confirm.
- Click the name of the created backend server group group-1.
- Click the Add Server button and select the created Elastic Compute Service (ECS) instances ECS-1, ECS-2, ECS-3, and ECS-4.
- Click Next to configure the port and weight for the ECS instances ECS-1, ECS-2, ECS-3, and ECS-4.
- In this example, the port is set to 80 and the weight is set to 100 for all backend servers.
- Click Confirm to complete the configuration.
Step 3: Add Listener
- On the details page of the CLB instance clb-1, select the Listener tab.
- Click Add Listener, refer to the table below to configure the protocol and listening parameters.
- NameValid ValueListener namelistener-1CLB protocolHTTPListening port80Scheduling algorithmWeighted Round Robin (WRR)IAMDisable
- The timeout period remains unchanged.
- After the configuration is complete, click Next.
- On the Default Server Group configuration page, select the created backend server group group-1, then click Next.
- On the Health Check configuration page, retain default values of all parameters, then click Next.
- On the Configuration Review page, click Confirm to complete the operation.
Result verification
- When the active AZ is normal, the CLB instance deployed in the active AZ will forward access requests to all backend servers in the backend server group associated with the listener according to the scheduler configured for the listener.
- When the active AZ is abnormal, the CLB instance deployed in the standby AZ will forward access requests to all backend servers that are located in the standby AZ and belong to the backend server group associated with the listener according to the scheduler configured for the listener.
- When the CLB instance in the active AZ is faulty, the CLB instance deployed in the standby AZ will forward access requests to all backend servers in the backend server group associated with the listener according to the scheduler configured for the listener.
Last updated: 2026.06.12 15:32:49
All rights reserved © Beijing Volcano Engine Technology Co., Ltd2024
