Load Balancer
Load Balancer


Document

- Documentation
 Load BalancerApplication Load Balancer (ALB)Best PracticesAccessing an ALB across VPCs via PrivateLink
 Copy page
 Download PDF
Best Practices
Accessing an ALB across VPCs via PrivateLink
Copy pageDownload PDFAccessing an ALB across VPCs via PrivateLink
This topic describes how to use PrivateLink to enable resources in one Virtual Private Cloud (VPC) to access the Application Load Balancer (ALB) service in another VPC within the same region.
Scenario examples
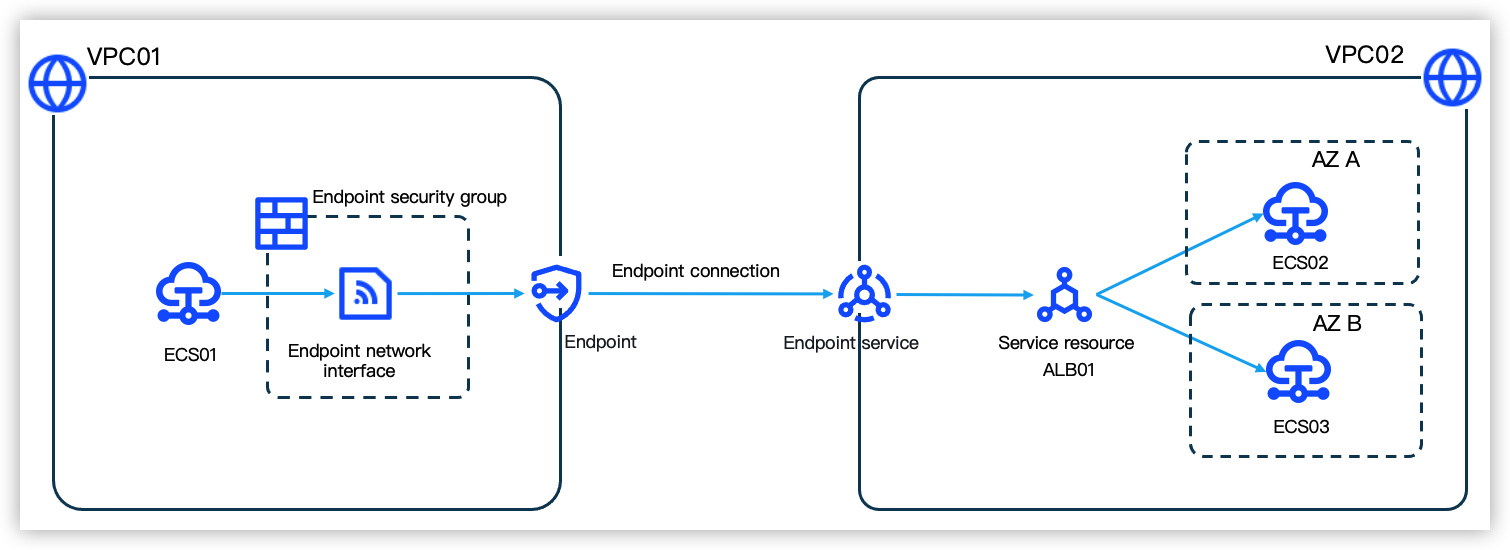
This topic demonstrates a scenario illustrated in the following diagram. A company created two VPCs (named VPC01 and VPC02) in China (Shanghai) using a single VolcanoEngine account. VPC01 contains an Elastic Compute Service (ECS) instance (named ECS01). VPC02 contains an ALB instance (named ALB01). The ALB is associated with a server group. The server group contains two ECS instances (named ECS02 and ECS03) located in separate availability zones. The company requires that ECS01 in VPC01 can access ALB01 in VPC02 via private connectivity, thereby gaining access to the applications deployed on ECS02 and ECS03.
To meet these requirements, the PrivateLink service should be implemented in this scenario. To use PrivateLink, you need to create an endpoint and an endpoint service. PrivateLink establishes private connectivity between endpoints and endpoint services. This enables resources in one VPC to access service resources in another VPC through private connectivity, avoiding potential security risks caused by internet access.
Limits
- You have contacted your account manager to enable the feature of "ALB instances serve as the PrivateLink endpoint service resource".
- When an ALB instance serves as a resource for PrivateLink endpoint service, the availability zones where the endpoint service's resources are deployed must be a subset of the zone where the ALB instance resides. Additionally, the availability zones of the endpoint must be a subset of the zones where the endpoint service's resources are deployed. Endpoint services and endpoints cannot communicate across availability zones. We recommend deploying your endpoint service resources and VPC endpoints in the same availability zones as your ALB instance for better disaster recovery.
Prerequisites
- You have created VPC01 and VPC02 in China (Shanghai). You have deployed a subnet (named VPC01-Subnet-A) in Availability Zone A within VPC01. Within VPC02, you have deployed a subnet (named VPC02-Subnet-A) in Availability Zone A and a subnet (named VPC02-Subnet-B) in Availability Zone B. For procedure, see Creating a VPC and Creating a subnet.
- You have created ECS01 within VPC01 to send requests. Within VPC02, you have deployed ECS02 in Availability Zone A and ECS03 in Availability Zone B to receive and process requests. You have deployed the NGINX service on ECS02 and ECS03. For creation procedure, see Buying ECS instances.
Procedure
tip
This procedure only describes required parameters. Use default values for other parameters. For parameter description, see the documents listed in the "Configuration procedure".
Configuration procedure
Step 1: Create an ALB instance
- Log in to the ALB console.
- In the left navigation pane, click Instance to enter the Instance management page.
- On the Instance management page, click Create instance.
- On the Create application load balancer page, configure parameters as shown in the table below.
-
- After confirming the configuration is correct, read and agree to SLA for ALB service, and click Submit.
Step 2: Create a server group
- On the Server group page, click Create backend server group.
- On the Create server group page, configure parameters as shown in the table below, then click Save.
-
- In the server group list, locate the new server group, then click Add backend server in the Actions column.
- On the Select backend server page, check the target backend servers of ECS02 and ECS03, then click Next: configure ports and weights.
- On the Configure ports and weights page, set the backend server port to 80 and the weight to 100, then click Save.
Step 3: Configure a listener
This following demonstrates how to create an HTTP listener.
- On the Instance management page, locate the ALB instance created in Step 1, then click Listener in the Actions column.
- In the Listener information tab, click Add listener.
- On the Add listener page, configure parameters according to the table below, then click Next: default backend server group.
-
- On the Default server group tab, select the server group created in Step 2 from the dropdown, then click Next: confirm the configuration.
- After confirming the listener’s configuration is correct, click Save.
tip
Step 4: Create an endpoint service
- Log in to the PrivateLink console.
- In the top menu bar, select the target project and region.
- In the left navigation pane, click Endpoint Service.
- On the Endpoint Service page, click Create Endpoint Service and configure parameters based on the table below.
-
- Click Create to complete the action.
- Check and record the name of the created endpoint service for use in subsequent steps.
Step 5: Create an endpoint
- On the Endpoint page, click Create Endpoint and configure parameters based on the table below.
-
- Confirm the order, and follow the console guidance to review and accept the Legal.
- Click Buy now to check whether the creation is successful.
- Check and record the name of the created endpoint for use in subsequent steps.
Step 6: Test connectivity
- Remotely log in to ECS01 in VPC01. The ECS instance in this example runs the Linux operating system. For procedure, see Logging on to a Linux instance.
- Execute the curl http://<endpoint_domain>:<listener_port> command to test network connectivity.
- For example, if the endpoint domain is ep-3qe9ayz306b5****.cn-shanghai.privatelink.volces.com and the listener port of the service resource (the ALB instance) is 80, run curl http://ep-3qe9ayz306b5****.cn-shanghai.privatelink.volces.com:80.
- If the response displays the content of the website configured on the backend server, it indicates successful network connectivity.
Last updated: 2025.12.12 17:45:50
All rights reserved © Beijing Volcano Engine Technology Co., Ltd2024
