You need to enable JavaScript to run this app.
Load Balancer

Load Balancer

Copy page
Download PDF
Quick Start
Setting up an IPv6 Network Load Balancer
Copy page
Download PDF
Setting up an IPv6 Network Load Balancer
Scenarios​
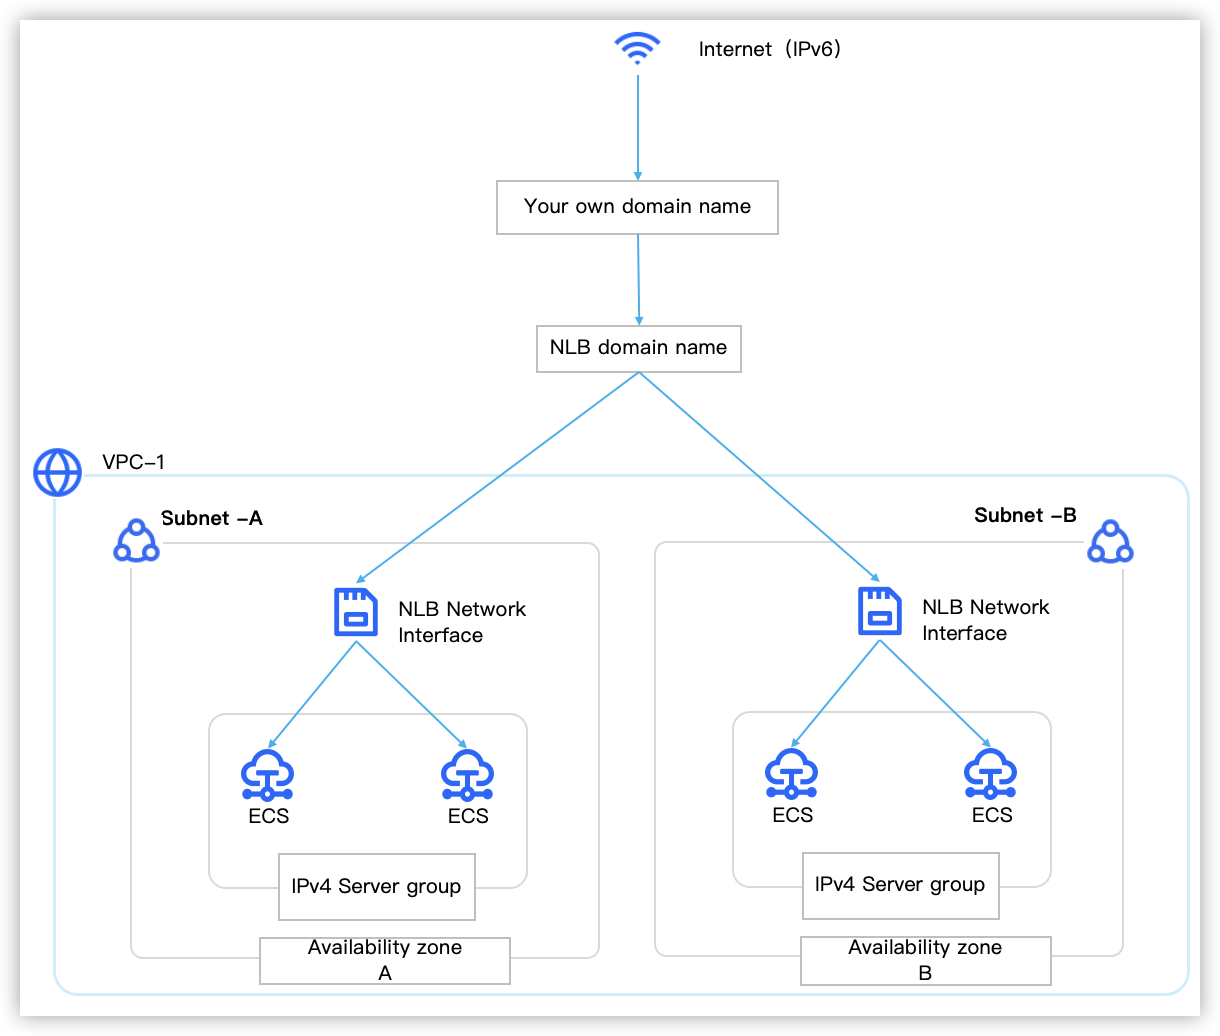
This article introduces how to quickly configure an IPv6 internet-type Network Load Balancer (NLB) with basic service capabilities. After configuration is completed, the NLB instance listens to requests from TCP port 80, and the ECS instances in the server group provide services through TCP port 80.​
​​​
Prerequisites​
  • The IPv6 feature for NLB is in Beta. After activating NLB product permissions, you still need to contact your account manager to enable the IPv6 feature.​
tip​
Besides NLB IPv6 permissions, you also need to activate VPC IPv6 permissions and IPv6 gateway product permissions.​
  • Data planning and resource preparation have been completed following Quick start.​
Configuration procedures​
tip​
The following steps only describe parameters required for this configuration. Keep other parameters at their default values. For more information about parameters, see User Guide.​
Step 1: Create an NLB instance​
  1. Log in to the NLB console.​
tip​
During initial login, follow the on-screen instruction to complete cross-service role authorization.​
  1. Click the Create NLB button. Configure the parameters of the NLB instance by referring to the table below.​
  • ​
    Parameter​
    Explanation​
    Example​
    Basic information​
    ​
    ​
    Regions​
    Select the Region where the NLB instance resides. After you select a region, the created NLB instance can only be used by resources in the selected region and cannot be migrated. You must confirm that the region of the instance is the same as that of the backend server instance.​
    China (Guangzhou)​
    Name​
    Type the name of NLB instance.​
    nlb02​
    Network Configuration​
    ​
    ​
    IP version​
    Select the private IP address type of the NLB instance.​
    • IPv4: Only IPv4 is supported.​
    • Dual-stack: Both IPv4 and IPv6 are supported.​
    Dual-stack​
    Network Type (IPv4)​
    Select the network type for the NLB instance's IPv4 address.​
    Private​
    Network type (IPv6)​
    During creation, IPv6 only supports the private IP address.​
    Private​
    VPC​
    Select the Virtual Private Cloud (VPC) to which the NLB instance belongs. Please ensure that this Virtual Private Cloud (VPC) has an IPv6 CIDR block.​
    VPC-X​
    AZs and Subnets​
    Select the supported Availability Zone for the NLB instance, and specify the subnet, IP address for each availability zone.​
    NLB supports multi-AZ active-active disaster recovery by default, and please select at least 2 availability zones.​
    • Subnet: The subnet must have IPv6 enabled, and the system will automatically create a network interface for the NLB instance within the subnet.​
    • IPv4 address: Select the allocation method for the IPv4 address of the NLB instance. After the instance is created, the allocated IPv4 address cannot be modified.​
    • IPv6 address: Currently, only automatic IP allocation is supported. After the instance is created, allocated IPv6 addresses cannot be modified.​
    • Availability zone A​
    • Subnet-A | 192.XX.XX.0/24​
    • Automatic IP assignment​
    • Automatic IP assignment​
    • Availability Zone B​
    • Subnet-B | 192.XX.XX.0/24​
    • Automatic IP assignment​
    • Automatic IP assignment​
    Security group​
    Select at least one security group for the NLB instance.​
    • In addition to the specified security group, the NLB instance will be automatically associated with an entrusted security group. After the instance is successfully created, you can view the detailed information of the security group on the instance details page.​
    • The specified security group and the entrusted security group are jointly used for controlling inbound and outbound traffic of the NLB instance.​
    default​
    ​
  1. Follow the console guidance to review and accept the Legal.​
  1. Click Submit order to complete the instance creation.​
  1. Click Go to console to view and record the domain name of the newly created NLB instance.​
Step 2: Create an IPv4 server group and add backend servers Create server group and add backend servers​
tip​
Currently, only IPv4-type server groups are supported. IPv6 requests are converted to IPv4 addresses by the NLB instance and can be properly processed by IPv4 backend servers.​
  1. In the left-side navigation pane, select Server Group.​
  1. Click Create Server Group button and configure basic information according to the table below.​
  • ​
    Parameter​
    Explanation​
    Example​
    Name​
    Enter server group name​
    rsp02​
    Server Group Type​
    Select the type of the server group.​
    • Server Type: Only the Elastic Compute Service (ECS) instances or secondary network interfaces within the same VPC as the server group can be added as backend servers.​
    • IP Type: Only IP addresses can be added as backend servers. You can add IP addresses from other VPCs or on-premises IDCs as backend servers, as long as they are network-reachable. Does not support IPv6 addresses.​
    Server type​
    IP version​
    Select the IP version of the server group.​
    IPv4​
    VPC​
    Select a server group in the same Virtual Private Cloud (VPC) as the NLB instance.​
    VPC-X​
    Backend protocol​
    The protocol used by the NLB instance to forward traffic to the backend server.​
    • TCP: Only support associating with TCP and TLS listeners.​
    • UDP: Only support associating with UDP listeners.​
    TCP​
    Scheduling algorithm​
    Select the rules that the server group follows to forward requests.​
    • Weighted Round Robin (WRR): In this case, higher weights values receive more frequent polling attempts (higher probability).​
    • Weighted Least Connection (WLC): First calculate the current connections/weight value of the backend server, then dispatch the request to the backend server with the smallest value.​
    • Source hashing (SH): A consistency hash based on the Source IP address, allowing the same source to be scheduled to the same backend server.​
    Weighted Round Robin (WRR)​
    ​
  1. Configure health check information according to the table below.​
  • ​
    Parameter​
    Explanation​
    Example​
    Health check​
    Health Check Switch When enabled, the NLB can automatically isolate abnormal backend servers to eliminate single points of failure.​
    warning​
    • Disabling health checks may result in requests being forwarded to abnormal backend servers. To ensure continuous availability of the service, it is discouraged to disable health checks.​
    • Health checks consume a certain amount of network resources. It is recommended to minimize the impact on the service by increasing detect intervals, lowering the healthy threshold and unhealthy threshold according to the business situation.​
    Check​
    Health check protocol​
    The protocol type of the health check request.​
    • TCP: Send SYN handshake packets to detect whether the backend server port status is normal.​
    • HTTP: Sends HEAD or GET requests to simulate browsing behavior and check if the application of the backend server is functioning properly.​
    • UDP: Sends ICMP or UDP probing packets to detect whether the backend server is functioning properly.​
    tip​
    When the backend protocol of the server group is TCP, health check does not support the UDP protocol.​
    TCP​
    Health check port​
    Configure the port used for the health check.​
    • Use the backend server port: Health checks are performed on the backend server's port by default, with no need to specify an additional port.​
    • Specify a specific port: This option is mandatory when the all-port forwarding feature is enabled. Port ranges from 1 to 65535.​
    Use backend server port​
    Response timeout​
    Configure the waiting time for the health check response.​
    • If no valid response is received from the backend server within the response timeout period, the health check is considered abnormal.​
    • Value range: 1 to 60 seconds. Default timeout period: 3 seconds.​
    3 seconds​
    Detect interval​
    Enter the interval for performing health checks.​
    • The detect interval must be greater than or equal to the response timeout period.​
    • Value range: 1 to 300 seconds. The default interval is 10 seconds, meaning a health check is performed on the backend server every 10 seconds.​
    10 seconds​
    Healthy threshold​
    Configure the number of required health checks to mark a backend server as normal.​
    • When the same backend server undergoes consecutive health checks for a specified number of times and all results are normal, its status changes from abnormal to normal.​
    • The value ranges from 2 to 10 times. Default: 3 times.​
    3 times​
    Unhealthy threshold​
    The number of health checks to mark a backend server as abnormal.​
    • When the same backend server undergoes consecutive health checks for a specified number of times and all results are abnormal, its status changes from normal to abnormal.​
    • The default is 3, meaning 3 consecutive health checks are conducted on the same backend server, and if all results are abnormal, the backend server is marked as abnormal.​
    • The value ranges from 2 to 10 times.​
    3 times​
    ​
  1. Click Create to complete the creation of the server group.​
  1. Click ··· > Add Server on the right side of the target server group.​
  1. Click Add Server and select the target Elastic Compute Service (ECS) instance.​
tip​
Please ensure that the security group associated with the Elastic Compute Service (ECS) instance has allowed traffic from NLB. For configuration details, refer to Configure backend server security group.​
  1. Click Next to configure ports and weights for the added backend servers.​
  • ​
    Parameter​
    Explanation​
    Example​
    Port​
    The port where the backend server provides services.​
    80​
    Weight​
    The probability of the backend server receiving a request (probability = the server weight / the sum of all servers' weights in the group).​
    • The larger the weight, the more requests are forwarded; the default is 100.​
    • Setting the weight to 0 means the server will not accept new requests.​
    • If the scheduling algorithm is Source IP Hash (SH), weights only distinguish between 0 and non-zero values.​
    100​
    ​
  1. Click Migrate to complete the action.​
Step 3: Add listener​
  1. In the left-side navigation pane, select Instances.​
  1. Click Configure Listener on the right side of the target NLB instance.​
  1. Click Add Listener and see the table below to configure the listener.​
  • ​
    Parameter​
    Explanation​
    Example​
    Listener name​
    Enter the listener name. If left blank, it defaults to Protocol-port, such as TCP-80.​
    listener02​
    Listening protocol​
    Select the protocol type for NLB instance listener. Prerequisite​
    TCP​
    Listening port​
    Select the port type and type the port. The port value ranges from 1 to 65535. Prerequisite​
    80​
    Timeout period​
    Set the timeout period. If no data is transferred over the connection within the timeout period, it will be automatically disabled. The value ranges from 10 to 900 seconds, with a default of 900 seconds.​
    900 seconds​
    ​
  1. Click Next and select the Server Group created above.​
  1. Click Next to confirm the configuration information.​
  1. Click Migrate to complete the action.​
Step 4: Activate IPv6 Internet bandwidth​
tip​
Modify the NLB instance to IPv6 internet, and the system automatically activates internet bandwidth for all IPv6 addresses of the NLB instance.​
  1. In the left-side navigation pane, select Instances.​
  1. Click the ··· > IPv6 Convert to Internet button on the right side of the target NLB instance.​
  1. Click Migrate to complete the action.​
Step 5: Configure security groups and Network Access Control List​
  • Security Groups and Network ACLs associated with the NLB instance​
  • Security Group configuration example:​
  • ​
    Rule direction​
    Priority​
    Strategy​
    Protocol type​
    Port range​
    Source/destination address​
    Description​
    Inbound​
    1​
    Allow​
    Listening protocol: TCP​
    Listening port: 80​
    Client address:​
    ::/0​
    Allow inbound client traffic to the NLB​
    ​
    1​
    Allow​
    ICMP​
    ALL​
    fd00:64::/32​
    Allow the traffic probing the availability of the private IPv6 address of the NLB instance​
    ​
    1​
    Deny​
    TCP​
    80​
    Access to the NLB's IP address is not allowed​
    Deny specified IP addresses from accessing the NLB​
    Outbound​
    100​
    Allow​
    ALL​
    ALL​
    ::/0​
    Allow-all fallback policy​
    ​
  • Network Access Control List configuration example:​
  • ​
    Rule direction​
    Priority​
    Strategy​
    Agreement​
    Source/destination address​
    Destination port​
    Description​
    Inbound​
    1​
    Allow​
    Listening protocol (TCP)​
    ::/0​
    Listening port​
    (80)​
    Allow client access traffic​
    ​
    2​
    ​
    Allow​
    ​
    Listening protocol and health check protocol​
    (All are TCP in this article)​
    Backend server private IP address​
    Backend server port and health check port (both port 80)​
    Allow health check response traffic from backend servers to the NLB, allow client-originated response traffic from backend servers to the NLB​
    ​
    3​
    Allow​
    ICMP​
    fd00:64::/32​
    ALL​
    Allow traffic for system probes to detect the availability of the NLB private IPv6 address​
    Outbound​
    1​
    Allow​
    ALL​
    ::/0​
    ALL​
    Allow all IPv6 traffic​
    ​
  • Security Groups and Network ACLs associated with the backend servers​
  • Security Group configuration example:​
  • ​
    Rule direction​
    Priority​
    Strategy​
    Protocol type​
    Port range​
    Source​
    Description​
    Inbound​
    1​
    Allow​
    Listening protocol and health check protocol​
    (all are TCP in this document)​
    Backend server port and health check port (both 80 in this article)​
    CIDR block of the subnet where the NLB instance resides.​
    Allow both request forwarding traffic and health check traffic from NLB to backend servers​
    ​
  • Network ACL configuration example:​
  • ​
    Rule direction​
    Priority​
    Strategy​
    Agreement​
    Source/destination address​
    Destination port​
    Description​
    Inbound​
    ​
    1​
    Allow​
    ​
    Listening protocol and health check protocol​
    (both TCP)​
    Source address:​
    The IPv4 CIDR block of the subnet associated with the NLB instance.​
    Backend server port and health check port (both port 80)​
    Allow both request forwarding traffic and health check traffic from NLB to backend servers​
    Outbound​
    1​
    Allow​
    ALL​
    Destination: 0.0.0.0/0​
    ALL​
    Allow all traffic​
    ​
Step 6: Resolve your own domain name to the NLB domain name​
VolcanoEngine does not allow users to Directly use the default domain name provided by the NLB service for Internet access. If you need to provide services to the internet through an NLB instance, please use your own domain name and resolve it via CNAME to the NLB domain name. If you do not have your own domain name, see Domain Services .​
Explanation​
This example uses configuring resolution records in VolcanoEngine's DNS service. If you manage your business domain name on another platform, please configure resolution records on the corresponding platform.​
  1. Refer to Add CNAME Record to resolve your domain name to the NLB instance domain and verify if the configuration takes effect. The parameter description is shown in the table below.​
  • ​
    Parameter​
    Description​
    Domain name​
    Set it to the host record (domain prefix) of your own domain name. For example: www.​
    Record type​
    Set to CNAME.​
    Record value​
    Set as the domain name of the NLB instance, in this text as nlb-2fe5ahfkoi9s059gp683y.cn-guangzhou.nlb.volces.com.​
    tip​
    For parameters not mentioned above, please keep the default values.​
    ​
    ​
Verification​
  1. Open the browser on your local computer.​
  1. Input http://your custom domain name, if the application page deployed by the backend server is displayed, it indicates that your business has successfully configured the NLB.​
Last updated: 2026.08.06 14:31:17