You need to enable JavaScript to run this app.
文档中心
火山方舟

火山方舟

复制全文
下载 pdf
接入 AI 工具
OpenCode
复制全文
下载 pdf
OpenCode
OpenCode 是一款开源的 AI 编程代理工具,提供终端界面、桌面应用和 IDE 扩展等多种使用方式。​
方舟 Coding Plan 支持在 OpenCode 中使用,可参考本文进行配置及使用。​
说明​
需要先访问 方舟 Coding Plan活动,按需订阅套餐后再配置使用编程工具。​
核心配置​
接入工具的核心参数如下:​
模型配置​
支持以下两种方式配置模型:​
​
配置 Model Name (配置文件指定)
配置 ark-code-latest (控制台管理)
​
在工具配置文件中指定 Model Name,可实时切换模型。支持配置的 Model Name:​
注意​
配置 Model Name 时,支持使用全小写格式,同时也支持直接复制开通管理页面中的模型名称。​
  • doubao-seed-evolving​
  • doubao-seed-2.1-pro​
  • doubao-seed-2.1-lite​
  • doubao-seed-2.0-mini​
  • glm-5.3 (glm-latest)​
  • glm-5.3-flash​
  • deepseek-v4.1-flash​
  • deepseek-v4.1-flash-economy​
  • deepseek-v4-flash​
  • deepseek-v4-pro​
  • kimi-k2.8-preview​
  • kimi-k3​
  • kimi-k3.1-pro​
说明​
Model Name 不支持配置为 Auto,如需使用,请通过控制台切换该模式。​
​
Base URL​
不同的工具配置的 Base URL 根据兼容的协议会有不同:​
  • 兼容 Anthropic 接口协议工具:https://ark.cn-beijing.volces.com/api/coding​
  • 兼容 OpenAI 接口协议工具:https://ark.cn-beijing.volces.com/api/coding/v3​
注意​
请勿使用 https://ark.cn-beijing.volces.com/api/v3 :该 Base URL 不会消耗您的 Coding Plan 额度,而是会产生额外费用。​
API Key​
​
一、安装 OpenCode​
前提条件:安装 Node.js 18 或更新版本。​
在命令行界面,执行以下命令安装 OpenCode。​
​
npm install -g opencode-ai​
​
安装结束后,执行以下命令查看安装结果,若显示版本号则安装成功。​
​
opencode --version​
​
二、配置 OpenCode​
方式 1:自动化助手(推荐)​
ArkCLI Helper 是一个编码工具助手,支持快速配置选择的工具接入 Coding Plan。安装并运行该助手,根据界面提示操作可自动完成工具配置,降低手动配置的时间成本和出错风险。​
注意​
  • ArkCLI Helper 是基于 Ark Helper 升级演进的工具配置服务,相关能力将持续在 ArkCLI Helper 上迭代更新。建议优先使用 ArkCLI Helper 完成工具配置。​
  • ArkCLI Helper 支持 macOS、Linux、Windows 系统。​
  1. 安装 Ark CLI。​
  • ​
    # 1. 通过 NPM 安装​
    npm install -g @volcengine/ark-cli@latest​
    ​
    # 2. 验证安装​
    arkcli --version​
    ​
  1. 登录 Ark CLI。​
  • ​
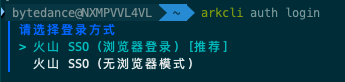
    arkcli auth login​
    ​
  • ​image-20260624-144256-509.png​​
  • 根据界面提示选择登录方式。若之前已登录过 arkcli,会沿用上次选择的配置;如需重新选择,请先执行 arkcli config reset 后再运行 arkcli auth login。首次登录时,按提示完成以下配置:​
  1. 选择项目(Project):可按需选择,或默认选择账号全部资源。​
  1. 选择消费模式(Type):选择 coding-plan。​
  • ​image-20260624-163746-727.png​​
  1. 运行 ArkCLI Helper,根据界面提示完成 OpenCode 的配置。​
  1. 在命令行界面输入 arkcli helper 命令,启动 ArkCLI Helper。​
  1. 选择要配置的 Plan profile:选择 coding-plan_cn-beijing_personal (Coding Plan)。​
  • ​image-20260624-163451-813.png​​
  1. 选择默认 model:按需选择。​
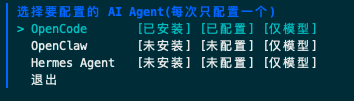
  1. 选择要配置的 AI Agent:OpenCode。​
  • ​image-20260624-164505-484.png​​
完成上述操作后,将自动完成 OpenCode 的基础配置,无需手动安装。​
方式 2:手动配置​
  1. 创建并打开 OpenCode 的配置文件。文件路径因系统而异,具体操作如下:​
  • ​
    macOS/Linux
    Windows
    ​
    macOS/Linux 系统 OpenCode 配置文件路径:~/.config/opencode/opencode.json。​
    1. 如果在主目录下没有.config/opencode目录,执行以下命令创建目录。​
    • ​
      mkdir -p ~/.config/opencode​
      ​
    1. 创建并打开配置文件。​
    • ​
      nano ~/.config/opencode/opencode.json​
      ​
    ​
  1. 编辑 opencode.json,需关注的配置信息如下:​
  • <ARK_API_KEY>:替换为您自己的 API Key。​
  • model:更新为需要使用的模型信息。支持的模型信息参见 模型配置。​
  • Coding Plan 兼容 OpenAI 接口协议,支持 Responses API、Chat API。推荐使用 Responses API 的配置,推理效果更好。​
  • 支持的两类 API 仅在 npm 配置上不同:​
  • Responses API 配置:"npm": "@ai-sdk/openai"​
  • Chat API 配置:"npm": "@ai-sdk/openai-compatible"​
  • 以配置ark-code-latest为例,具体信息如下。​
注意​
  • glm-5.3、deepseek-v4-flash、deepseek-v4-pro、kimi-k3.1-pro、kimi-k3、kimi-k2.8-preview 支持 1M 上下文窗口用于包含大型代码库的长会话,可以通过 limit.context 字段显式指定窗口大小。​
  • provider.volcengine-plan.models节点下有两处(对象键、name字段)需替换为同一 Model Name,切勿遗漏。​
  • 若需开启模型图片理解能力,需在模型配置节点下新增如下配置项:​
"modalities": {"input": ["text", "image"], "output": ["text"]}​
​
Responses API
Chat API
​
说明​
npm 必须使用 @ai-sdk/openai,模型才会使用 Responses API,在 baseURL 的基础上自动拼接 /responses。​
​
{​
"$schema": "https://opencode.ai/config.json",​
"model": "volcengine-plan/ark-code-latest",​
"provider": {​
"volcengine-plan": {​
"npm": "@ai-sdk/openai",​
"name": "Volcano Engine(Responses API)",​
"options": {​
"baseURL": "https://ark.cn-beijing.volces.com/api/coding/v3",​
"apiKey": "<ARK_API_KEY>"​
},​
"models": {​
"ark-code-latest": {​
"name": "ark-code-latest",​
"limit": {​
"context": 256000,​
"output": 32000​
},​
"modalities": {​
"input": [​
"text",​
"image"​
],​
"output": [​
"text"​
]​
}​
},​
"doubao-seed-2.1-pro": {​
"name": "doubao-seed-2.1-pro",​
"limit": {​
"context": 1024000,​
"output": 65536​
},​
"modalities": {​
"input": [​
"text",​
"image"​
],​
"output": [​
"text"​
]​
}​
},​
"doubao-seed-evolving": {​
"name": "doubao-seed-evolving",​
"limit": {​
"context": 1024000,​
"output": 65536​
},​
"modalities": {​
"input": [​
"text",​
"image"​
],​
"output": [​
"text"​
]​
}​
},​
"glm-5.3": {​
"name": "glm-5.3",​
"limit": {​
"context": 1024000,​
"output": 65536​
},​
"modalities": {​
"input": [​
"text"​
],​
"output": [​
"text"​
]​
}​
},​
"glm-5.3-flash": {​
"name": "glm-5.3-flash",​
"limit": {​
"context": 1024000,​
"output": 65536​
},​
"modalities": {​
"input": [​
"text",​
"image"​
],​
"output": [​
"text"​
]​
}​
},​
"glm-latest": {​
"name": "glm-latest",​
"limit": {​
"context": 1024000,​
"output": 65536​
},​
"modalities": {​
"input": [​
"text"​
],​
"output": [​
"text"​
]​
}​
},​
"deepseek-v4-flash": {​
"name": "deepseek-v4-flash",​
"limit": {​
"context": 1024000,​
"output": 65536​
}​
},​
"deepseek-v4-pro": {​
"name": "deepseek-v4-pro",​
"limit": {​
"context": 1024000,​
"output": 65536​
}​
},​
"deepseek-v4.1-flash": {​
"name": "deepseek-v4.1-flash",​
"limit": {​
"context": 1024000,​
"output": 65536​
},​
"modalities": {​
"input": [​
"text",​
"image"​
],​
"output": [​
"text"​
]​
}​
},​
"deepseek-v4.1-flash-economy": {​
"name": "deepseek-v4.1-flash-economy",​
"limit": {​
"context": 1024000,​
"output": 65536​
},​
"modalities": {​
"input": [​
"text",​
"image"​
],​
"output": [​
"text"​
]​
}​
},​
"doubao-seed-2.1-lite": {​
"name": "doubao-seed-2.1-lite",​
"limit": {​
"context": 1024000,​
"output": 65536​
},​
"modalities": {​
"input": [​
"text",​
"image"​
],​
"output": [​
"text"​
]​
}​
},​
"doubao-seed-2.0-mini": {​
"name": "doubao-seed-2.0-mini",​
"limit": {​
"context": 256000,​
"output": 65536​
},​
"modalities": {​
"input": [​
"text",​
"image"​
],​
"output": [​
"text"​
]​
}​
},​
"kimi-k2.8-preview": {​
"name": "kimi-k2.8-preview",​
"limit": {​
"context": 1024000,​
"output": 65536​
},​
"modalities": {​
"input": [​
"text",​
"image"​
],​
"output": [​
"text"​
]​
}​
},​
"kimi-k3": {​
"name": "kimi-k3",​
"limit": {​
"context": 1024000,​
"output": 65536​
},​
"modalities": {​
"input": [​
"text",​
"image"​
],​
"output": [​
"text"​
]​
}​
},​
"kimi-k3.1-pro": {​
"name": "kimi-k3.1-pro",​
"limit": {​
"context": 1024000,​
"output": 65536​
},​
"modalities": {​
"input": [​
"text",​
"image"​
],​
"output": [​
"text"​
]​
}​
}​
}​
}​
}​
}​
​
​
三、使用 OpenCode​
  1. 启动OpenCode:​
  • ​
    opencode​
    ​
  1. 输入/models,选择配置的模型并在 OpenCode 中使用。​
常见问题​
错误码​
在编程工具中使用 Coding Plan 套餐时可能会遇到报错,您可以根据错误信息查看对应的报错场景并定位问题,具体可参考错误码。​
​
最近更新时间:2026.10.28 20:32:46
这个页面对您有帮助吗?
有用
有用
无用
无用