GPU Compute Service
GPU Compute Service


Document

- Documentation
 GPU Compute ServiceGPU Compute ServiceBest PracticesGPU - Creating RDMA-enabled container image
 Copy page
 Download PDF
Best Practices
GPU - Creating RDMA-enabled container image
Copy pageDownload PDFGPU - Creating RDMA-enabled container image
When you set up a training environment, you may need to use container images. This topic describes how to build such an image on an HPC-optimized instance. You can also refer to this topic to verify if your existing container image meets the requirements.
Prerequisites
- In the example provided in this topic, Ubuntu 20.04 64 bit (RDMA) is used as the image of the HPC-optimized instance. You can also use other RDMA-enabled images.
- You have purchased an HPC-optimized hpcpni2 instance and associated an EIP with the instance. For more information, see Purchasing HPC-optimized instance.
Step 1: Install Docker
- Log in to the HPC-optimized instance. For more information, see Logging in to Linux instance.
- Add the Docker repository.
- Execute the vim docker.list command to create the docker.list file.
- Add the Docker repository to the file.
- echo "deb [arch=amd64] http://mirrors.ivolces.com/docker/linux/debian `lsb_release -cs` stable" | sudo tee /etc/apt/sources.list.d/docker.list
- Press the Esc key to exit edit mode, enter :wq, and then press Enter to save and exit the file.
- Execute the following commands in sequence to install the public key for the Docker repository.
- curl -fsSL http://mirrors.ivolces.com/docker/linux/debian/gpg | sudo apt-key add -apt-get updateapt-get install -y docker-ce docker-ce-cli containerd.io
- Execute the following command to view the Docker version.
- docker -v
- Execute the following commands in sequence to install docker-ce and NVIDIA Container Toolkit.
- apt update && apt install -y apt-transport-https ca-certificates curl gnupg-agent software-properties-commoncurl -s -L https://nvidia.github.io/nvidia-docker/gpgkey | sudo apt-key add -distribution=$(. /etc/os-release;echo $ID$VERSION_ID)curl -s -L https://nvidia.github.io/nvidia-docker/$distribution/nvidia-docker.list | sudo tee /etc/apt/sources.list.d/nvidia-docker.listapt updateapt install -y nvidia-docker2 # Install nvidia-docker2 containersystemctl daemon-reloadsystemctl restart docker #Restart the Docker container
- Execute the nvidia-docker -v command to check whether Docker is installed. If the following output is displayed, Docker is installed.
- Docker version 20.10.12, build 20.10.12-0ubuntu2~20.04.1
Step 2: Configure the container environment
Generally, a new image is created based on an existing image or container. In the example provided in this topic, "a container generated from the CUDA base image provided by NVIDIA on NGC" is used as an example to demonstrate how to add an RDMA-related environment on top of this container.
- On the HPC-optimized instance, execute the following commands in sequence to download the CUDA image, and start and enter the container.
tip
When you start the container by executing the second command, you need to mount the virtualTopology.xml file from the HPC-optimized instance into the container. Some bare metal specifications do not have this file and you can skip this mounting step directly.
- docker pull nvcr.io/nvidia/cuda:12.0.0-devel-ubuntu20.04nvidia-docker run --gpus all -it -v /run/nvidia-topologyd/virtualTopology.xml:/run/nvidia-topologyd/virtualTopology.xml:ro nvcr.io/nvidia/cuda:12.0.0-devel-ubuntu20.04 bash
- In the container, execute the following command to install the required software packages.
- apt update && apt install -y infiniband-diags openssh-server locate wget vim
- When the following output is displayed, enter "6".
-

- When the following output is displayed, enter "19" and wait for the execution to complete.
-

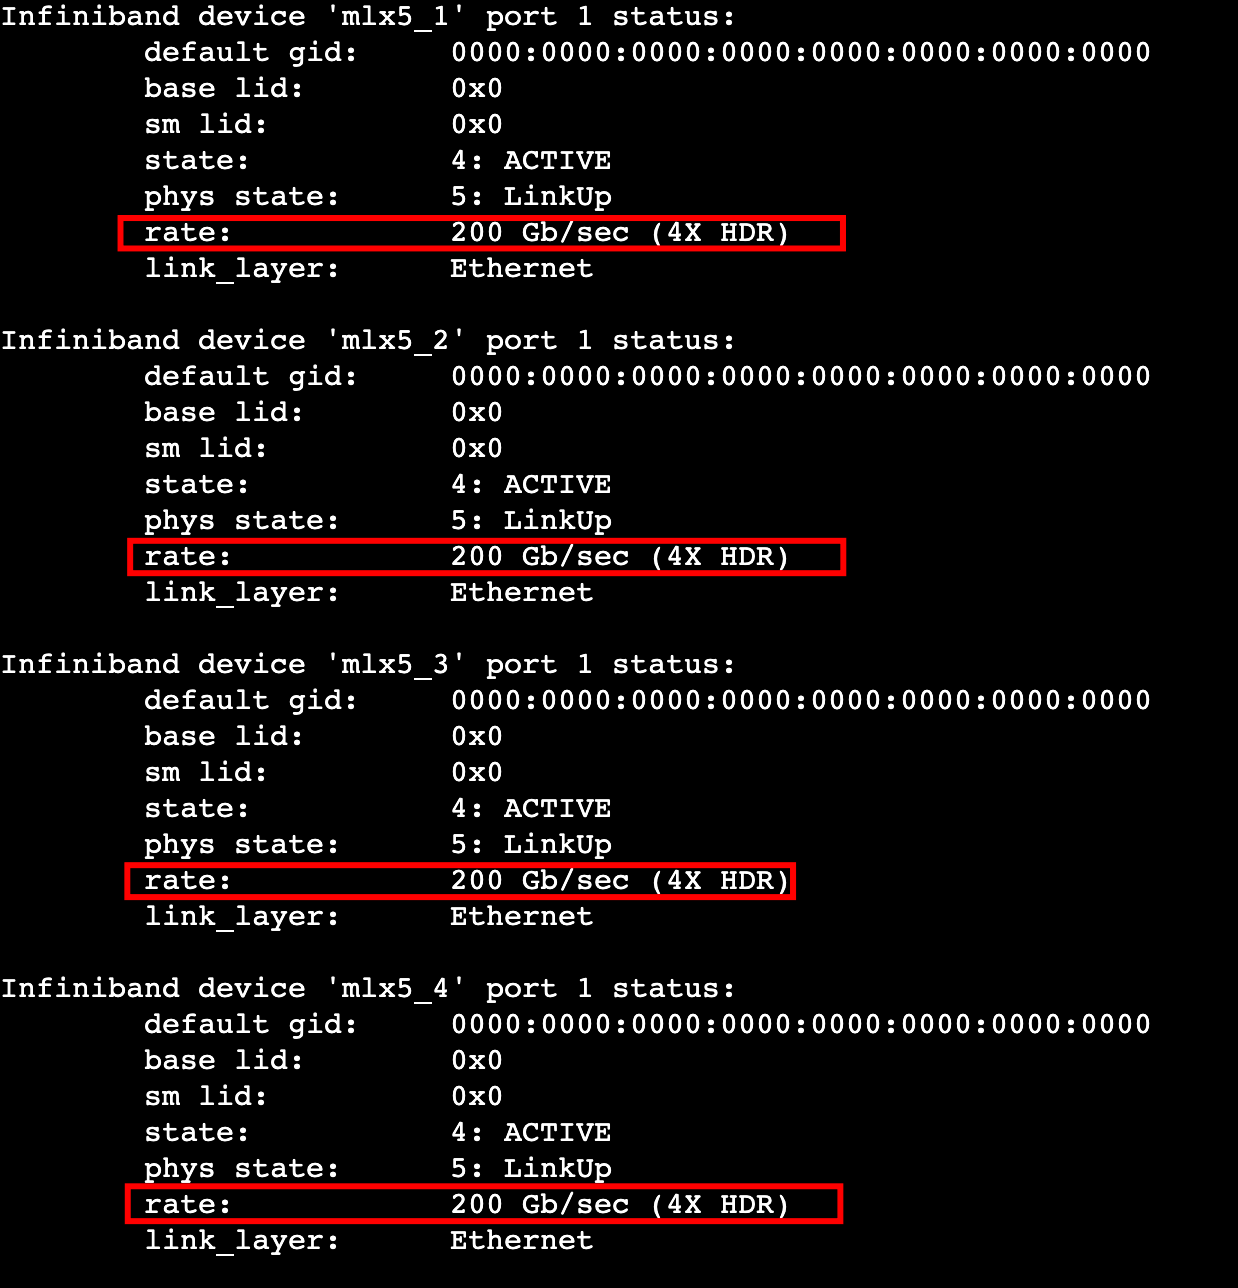
- In the container, execute the ibstatus command to view the network interface speed. In this example, the following output is displayed, indicating that the speed is 200 Gb/s.
-
- In the container, execute the following command to install RDMA-related libraries.
- apt update && apt install -y perftest ibverbs-providers libibumad3 libibverbs1 libnl-3-200 libnl-route-3-200 librdmacm1
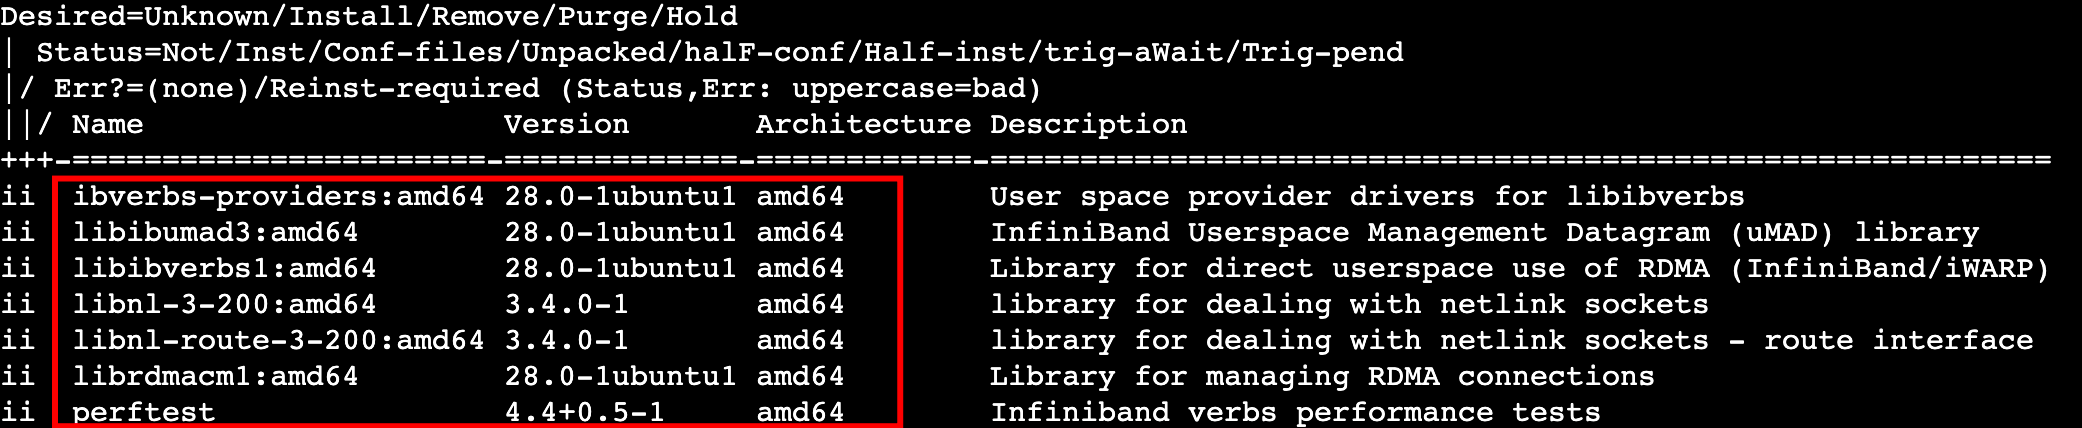
- In the container, execute the following command to check the installation status of RDMA-related libraries.
- dpkg -l perftest ibverbs-providers libibumad3 libibverbs1 libnl-3-200 libnl-route-3-200 librdmacm1
- If the following output is displayed, the installation is successful.
-
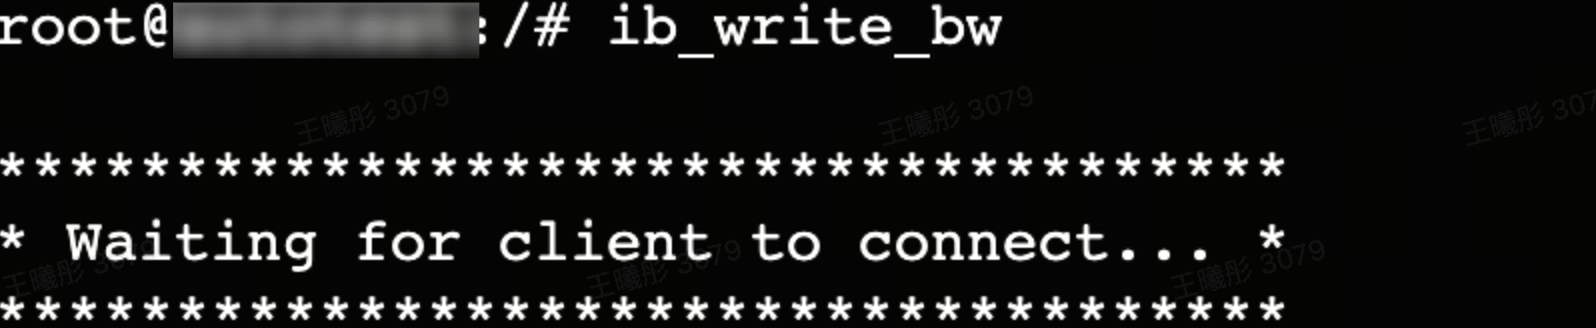
- In the container, execute the following command to check whether the RDMA network interface can be used as expected in the container.
- ib_write_bw
- If the following output is displayed, the RDMA network interface can be used as expected.
-
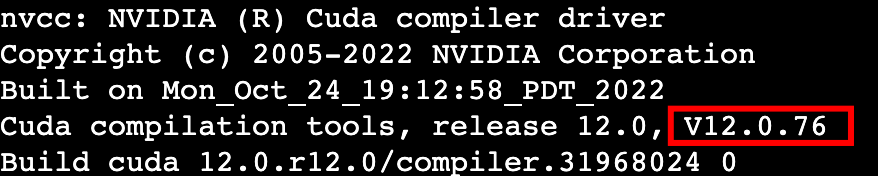
- In the container, execute the following command to check whether CUDA is installed.
- nvcc -V
- If the following output is displayed, CUDA is installed correctly and its version is 12.0.
-
- Select the NCCL version and install it. If NCCL is already included in your container, you can skip this step.
- Visit the NVIDIA official website to determine the appropriate NCCL version based on your requirements and the CUDA version installed in the container. Access to this website requires logging in with your NVIDIA developer account.
-
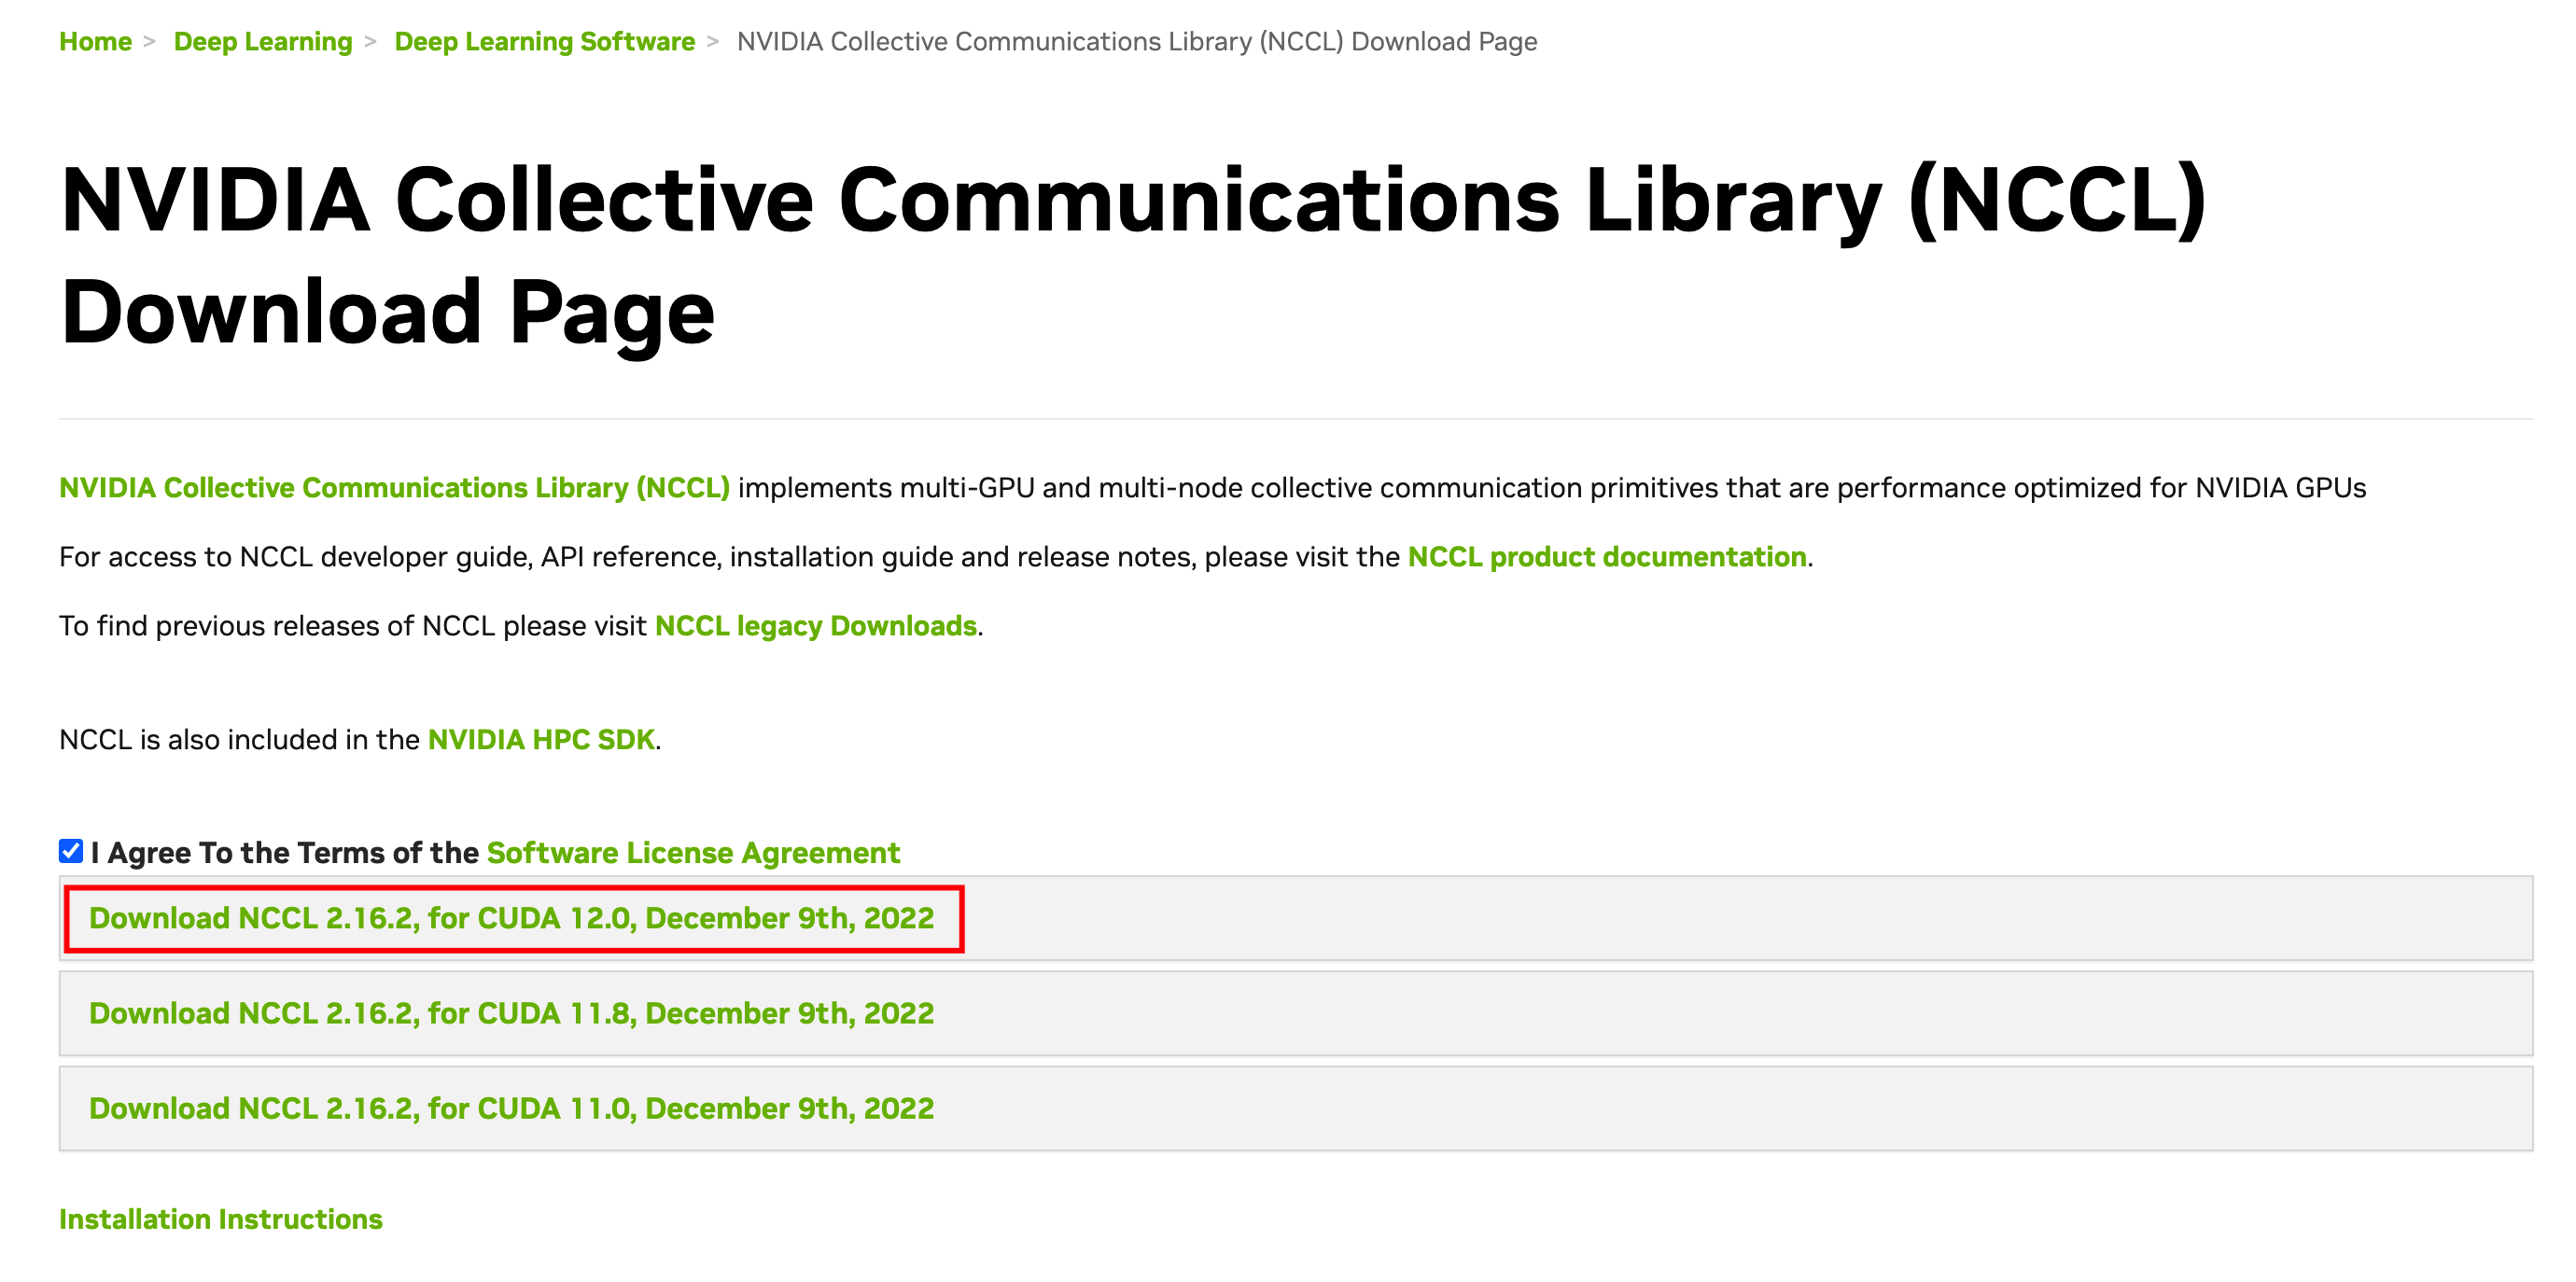
- Click the red-boxed area in the figure above to expand the detailed installation guide and view the installation command for the corresponding image.
-
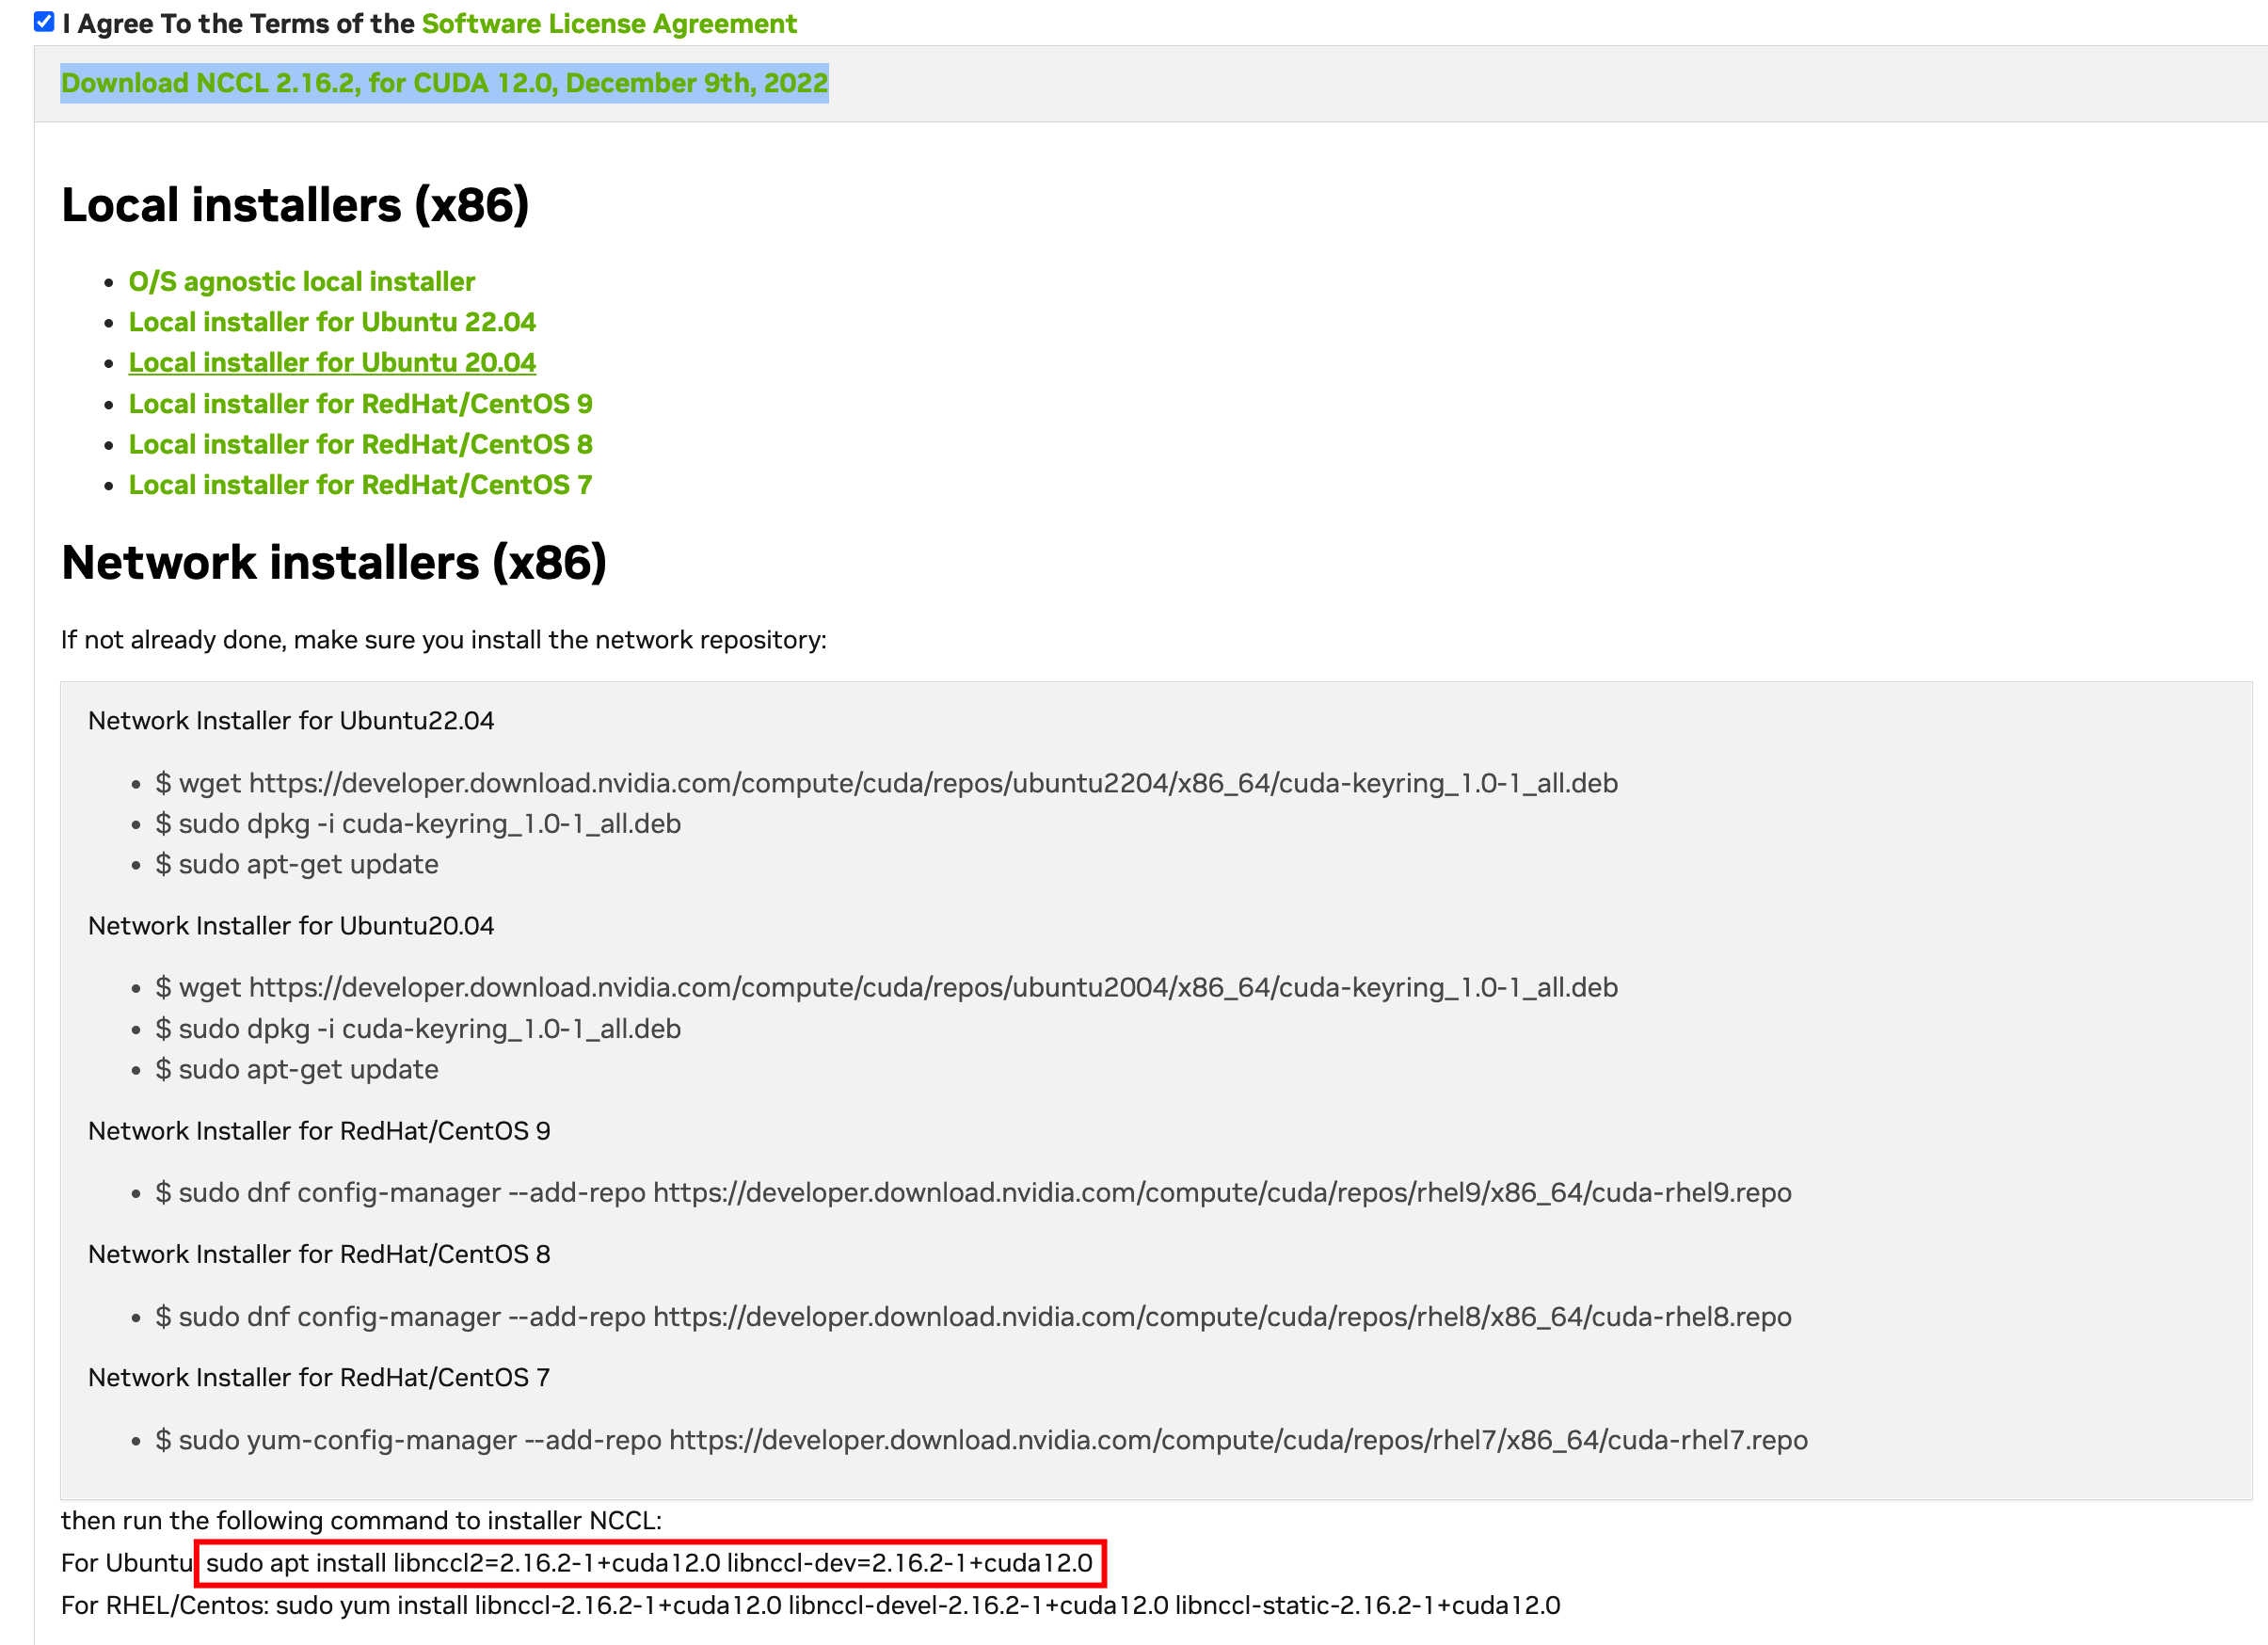
- In the container, execute the following command to install NCCL. <nccl_version> is the determined NCCL version number, and <cuda_version> is the CUDA version number.
- apt install libnccl2=<nccl_version>+cuda<cuda_version> libnccl-dev=<nccl_version>+cuda<cuda_version>
- In this example, the command is apt install libnccl2=2.16.2-1+cuda12.0 libnccl-dev=2.16.2-1+cuda12.0
- Execute the following commands in sequence to check whether NCCL is installed correctly.
- updatedblocate nccl| grep "libnccl.so" | tail -n1 | sed -r 's/^.*\.so\.//'
- If the following output is displayed, the installation is successful.
- 2.16.2
- Install OpenMPI. If OpenMPI is already included in your container, you can skip this step.
- In the container, execute the following commands in sequence.
- cd ~wget https://download.open-mpi.org/release/open-mpi/v4.1/openmpi-4.1.4.tar.bz2tar xf openmpi-4.1.4.tar.bz2cd openmpi-4.1.4./configure --prefix=/usr/local/openmpi 2>&1 | tee config.outmake -j 80 all 2>&1 | tee make.outmake install 2>&1 | tee install.outsed -i '1i\export PATH=/usr/local/openmpi/bin:$PATH' ~/.bashrcsource ~/.bashrc
- Execute the following command to check whether OpenMPI is installed correctly.
- mpiexec --version
- If the following output is displayed, the installation is successful.
-

- Install NCCL Tests.
- In the container, execute the following command.
- cd ~wget https://github.com/NVIDIA/nccl-tests/archive/refs/tags/v2.10.1.tar.gztar -zxvf v2.10.1.tar.gzcd nccl-tests-2.10.1make -j40 MPI=1 MPI_HOME=/usr/local/openmpi CUDA_HOME=/usr/local/cuda NCCL_HOME=/usr/lib/x86_64-linux-gnused -i '1i\export LD_LIBRARY_PATH=/usr/local/cuda/lib64:/usr/lib/x86_64-linux-gnu:/usr/local/openmpi/lib:$LD_LIBRARY_PATH' ~/.bashrcsource ~/.bashrc
- Execute the following command to check whether NCCL Tests is installed correctly.
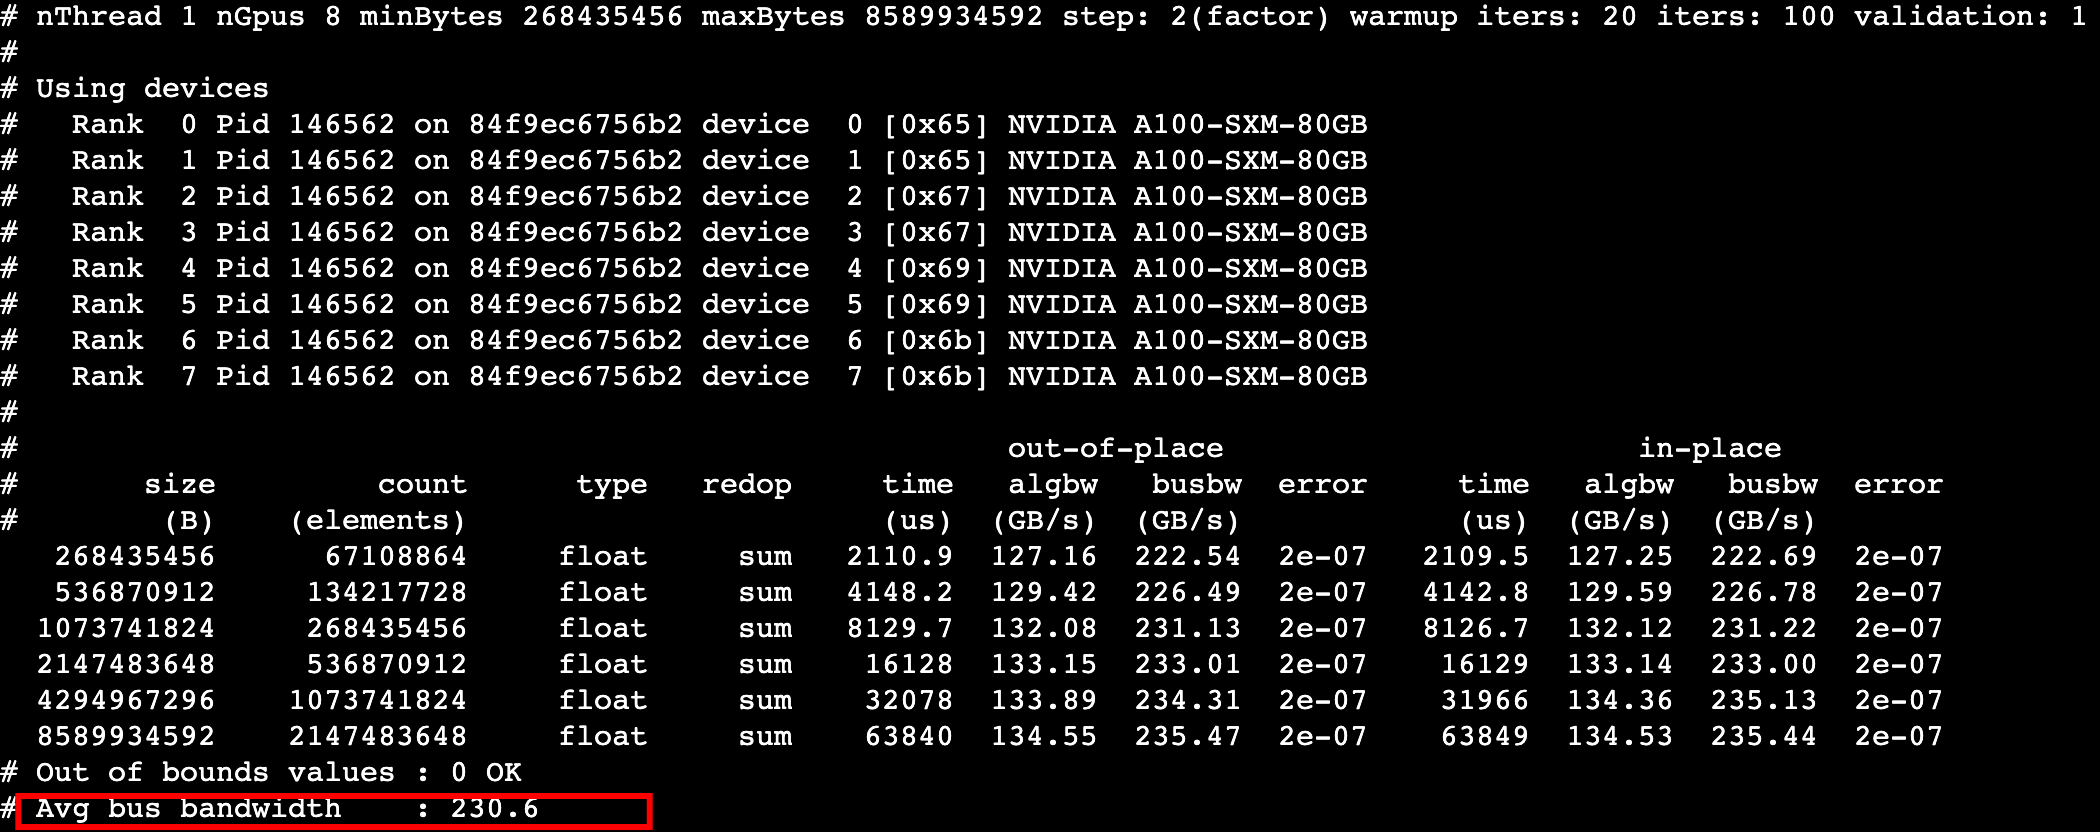
- ./build/all_reduce_perf -b 256M -e 8G -f 2 -g 8 -n 100 -w 20
- If the following output is displayed, NCCL Tests is installed correctly. In this example, the average single-node bandwidth is 230 GB/s.
-
Step 3: Create an image
This step provides you with the following two methods for creating an image. You may choose either method based on your needs.
Method 1: docker commit
You can create an image from the container.
- In the container, execute exit to return to the HPC-optimized instance. In the instance, execute the docker ps -a command to query the container ID.
-

- In the instance, execute the following command to create an image. <CONTAINER ID> is the container ID you found. You can configure [Image name] and [Image version] based on your needs.
- docker commit <CONTAINER ID> [Image name]:[Image version]
- If the following output is displayed, the image is created.
-

- Execute the following command to query the container image ID.
- docker images
- The following output is displayed. Record the image ID.
-

Method 2: docker build
You can directly write a Dockerfile to create an image from the original image.
- In the HPC-optimized instance, execute the following commands in sequence to write the Dockerfile.
- cd ~mkdir myimagevim myimage/Dockerfile
- Press i to enter edit mode and enter the following content.
- FROM nvcr.io/nvidia/cuda:12.0.0-devel-ubuntu20.04# install all libsRUN apt-get update && apt-get install -y --allow-downgrades --allow-change-held-packages --no-install-recommends infiniband-diags openssh-server wget vim libnccl2=2.16.2-1+cuda12.0 libnccl-dev=2.16.2-1+cuda12.0 perftest ibverbs-providers libibumad3 libibverbs1 libnl-3-200 libnl-route-3-200 librdmacm1# install openmpiRUN wget https://download.open-mpi.org/release/open-mpi/v4.1/openmpi-4.1.4.tar.bz2 && tar xf openmpi-4.1.4.tar.bz2 && cd openmpi-4.1.4 && ./configure --prefix=/usr/local/openmpi 2>&1 | tee config.out && make -j 80 all 2>&1 | tee make.out && make install 2>&1 | tee install.out && cd .. && rm -rf openmpi*# install nccl-testsRUN cd ~ && wget https://github.com/NVIDIA/nccl-tests/archive/refs/tags/v2.10.1.tar.gz && tar -zxvf v2.10.1.tar.gz && cd nccl-tests-2.10.1 && make -j40 MPI=1 MPI_HOME=/usr/local/openmpi CUDA_HOME=/usr/local/cuda NCCL_HOME=/usr/lib/x86_64-linux-gnu# add envRUN sed -i '1i\export PATH=/usr/local/openmpi/bin:$PATH' ~/.bashrc && sed -i '1i\export LD_LIBRARY_PATH=/usr/local/cuda/lib64:/usr/lib/x86_64-linux-gnu:/usr/local/openmpi/lib:$LD_LIBRARY_PATH' ~/.bashrc && mkdir /run/nvidia-topologyd && mkdir ~/.ssh
- Press the Esc key to exit edit mode, enter :wq, and then press Enter to save and exit the file.
- Execute the following command to build the container image. Replace [Image name] and [Image version] with the information of the image to be built.
- docker build [Image name]/ -t [Image name]:[Image version]
- Execute the following command to query the container image ID.
- docker images
- The following output is displayed. Record the image ID.
-
Step 4: Upload the image
This step provides two methods for uploading the image. You may choose either method based on your needs.
Method 1: Upload to the container registry
You can upload the image to the VolcanoEngine container registry. For more information, see Pushing and pulling images.
Method 2: Upload to Docker Hub
You can follow the steps below to upload the image to your own repository on Docker Hub.
- Visit the Docker Hub official website and register or log in to your Docker Hub account.
- Execute the docker login command to log in to your Docker account on the HPC-optimized instance. This command requires you to enter your Docker Hub username and password.
- Execute the following command to add a tag to the image you created. <YOUR_DOCKERHUB_NAME> is your Docker Hub username, and [Image name] and [Image version] are the information of the image to be uploaded.
- docker tag myimage:1.1 <YOUR_DOCKERHUB_NAME>/[Image name]:[Image version]
- Execute the following command to push the image file.
- docker push <YOUR_DOCKERHUB_NAME>/[Image name]:[Image version]
Step 5: Test the multi-instance collective communication capability
Use two HPC-optimized instances to test the collective communication capability of the container image you created. Collective communication capability is a metric for evaluating communication performance that bridges network bandwidth and AI training scenarios.
- Refer to Purchasing HPC-optimized instances to create two hpcpni2 instances, A and B.
- On instances A and B, install Docker and the created image. For more information, see Installing Docker.
- If you uploaded the image to the VolcanoEngine container registry in Step 4, refer to Pulling images to complete the operation.
- If you uploaded the image to Docker Hub in Step 4, execute the following command to install the image. <YOUR_DOCKERHUB_NAME> is your Docker Hub username. [Image name] and [Image version] are the information of the image to be installed.
- docker pull <YOUR_DOCKERHUB_NAME>/[Image name]:[Image version]
- Execute the following command separately on instances A and B to start the container. <IMAGE ID> is the container image ID.
tip
If your instance uses the latest self-developed DPU architecture from VolcanoEngine, that is, the 3rd-generation instance type, you do not need to execute the -v and subsequent parts of the following command.
- nvidia-docker run --gpus all --network host --ipc host --privileged -it -v /run/nvidia-topologyd/virtualTopology.xml:/run/nvidia-topologyd/virtualTopology.xml:ro <IMAGE ID> bash
- In the container of instance B, perform the following operations:
- Execute the vim /etc/ssh/sshd_config command, press "i" to modify the following configuration, press Esc to exit edit mode, and then enter :wq and press Enter to save and exit the file.
- Port 2222PermitRootLogin yes
- Execute the /etc/init.d/ssh restart command to restart the SSH server.
- Execute the passwd command to specify the root login password.
- Execute the following command separately in the containers of instances A and B to start SSH.
- ssh-keygen -t rsa -N "" -f ~/.ssh/id_rsachmod 600 ~/.ssh/id_rsa
- In the container of instance A, execute the following command to configure passwordless mutual trust login to the container of instance B. This command requires you to enter the password you specify for the container of instance B.
- scp -P2222 ~/.ssh/id_rsa.pub root@192.XX.XX.205:~/.ssh/authorized_keys #Replace with the private IP address of instance B after root@
- In the container of instance A, execute the following command to check the cluster performance. Make sure that port 2222 of instance A is opened, and replace the two host IP addresses in the command with the IP addresses of the primary VPC network interface (eth0) of instances A and B, respectively.
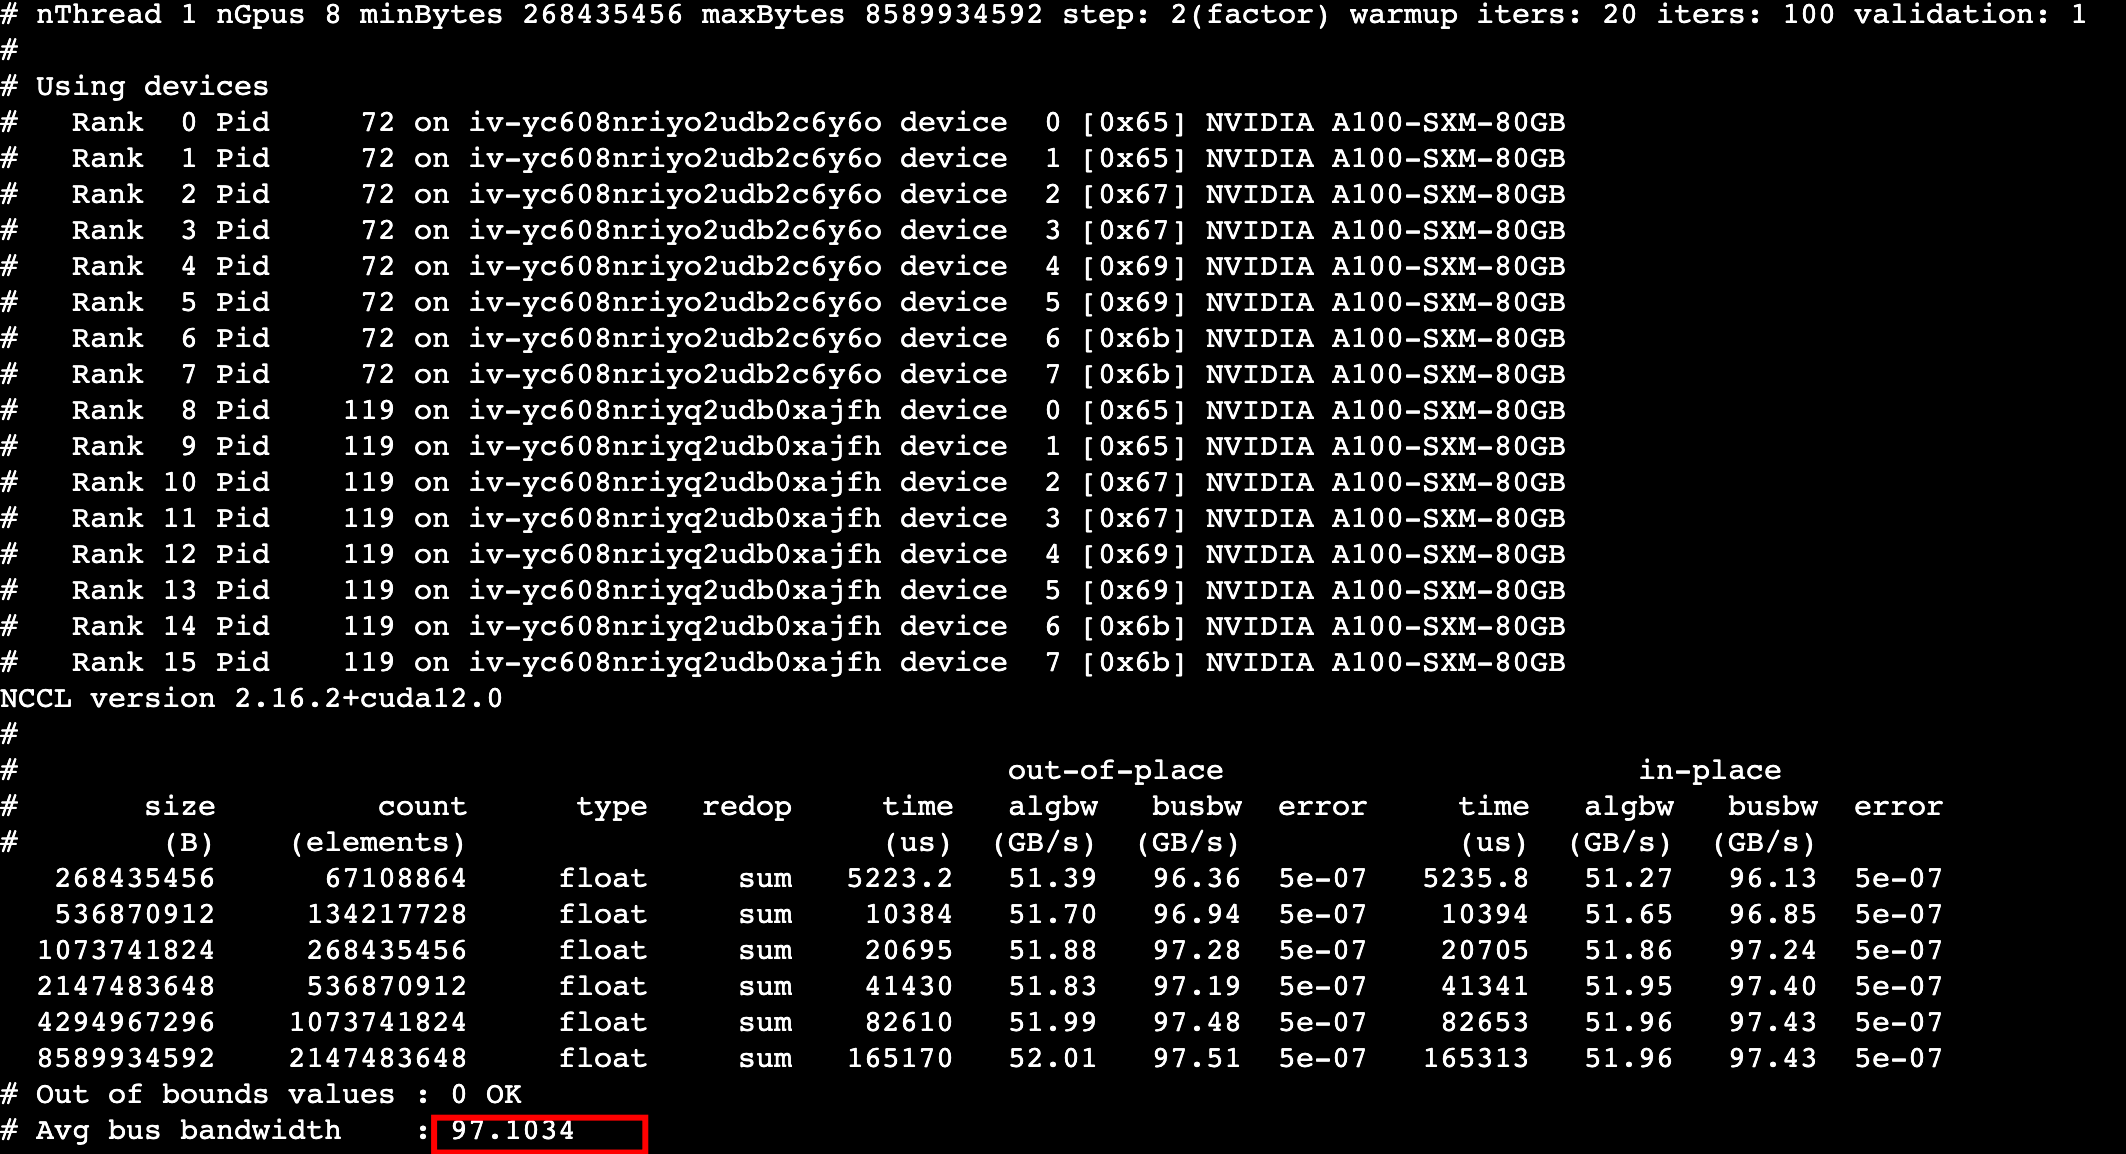
- mpirun --oversubscribe --allow-run-as-root -mca plm_rsh_args "-p 2222 -q -o StrictHostKeyChecking=no" \-n 16 -N 8 -H 192.xxx.xxx.111:1,192.xxx.xxx.104:1 \-bind-to socket -map-by slot -mca pml ob1 -mca btl ^openib -mca orte_base_help_aggregate 0 \-mca btl_tcp_if_include eth0 -mca coll_hcoll_enable 0 -x NCCL_DEBUG=INFO -x NCCL_PXN_DISABLE=1 \-x NCCL_SOCKET_IFNAME=eth0 -x NCCL_IB_DISABLE=0 -x NCCL_NET_GDR_LEVEL=1 -x NCCL_IB_HCA=mlx5_1:1,mlx5_2:1,mlx5_3:1,mlx5_4:1 -x NCCL_IB_GID_INDEX=3 \ ~/nccl-tests-2.10.1/build/all_reduce_perf -b 256M -e 1G -f 2 -g 1 -c 1 -n 100
- The following output is displayed. The Allreduce bandwidth of collective communication between instances A and B is 97 GB/s, and this metric can represent the communication capability of the system.
-
Last updated: 2026.02.06 15:51:40
All rights reserved © Beijing Volcano Engine Technology Co., Ltd2024
