GPU Compute Service
GPU Compute Service


Document

- Documentation
 GPU Compute ServiceGPU Compute ServiceUser GuideInstalling NVIDIA driversInstalling NVIDIA GRID driversInstalling GRID drivers manually
 Copy page
 Download PDF
Installing NVIDIA GRID drivers
Installing GRID drivers manually
Copy pageDownload PDFInstalling GRID drivers manually
Scenario
If you need OpenGL graphics and image processing capabilities for GPU Accelerated instances equipped with T4, A10, or L-Series graphics cards, manually install the NVIDIA GRID driver and purchase the GRID license officially released by NVIDIA.
This topic describes how to apply for a license, configure the license server, and install the GRID driver.
tip
- NVIDIA supports applying for a 90-day license for trial.
- This topic is for reference only. If you have any issues when purchasing a license, please contact NVIDIA.
- You can also use GPU Rendering instances with the NVIDIA GRID driver installed. In this case, you do not need to follow the installation steps described in this topic. This instance type is in Beta. If you need a trial, please contact your account manager to apply.
- If provided driver versions can not meet your business requirements, you can uninstall the GRID driver and then install a new one.
Prerequisites
A GPU Accelerated instance equipped with T4, A10, and L-Series graphics cards is created and has internet access. For detailed operations, refer to Creating GPU Accelerated instances.
Software version
- GRID driver versions:
- T4, A10: v13.1
- L-Series: v16.1
- License server version: v2.0.0
- Docker version: v20.10.17
- Docker-compose version: v2.6.0Version
Step 1: Apply for GRID license
- Go to NVIDIA Enterprise Account, register an account, and apply for a trial license.
- After successfully submitting your application, you are prompted to check your email at the specified email address within 2 days. If the application is approved, you will receive the following two emails.
-
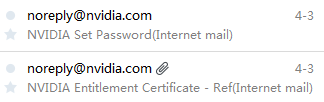
- Open the email "NVIDIA Set Password", as shown in the picture below.
-
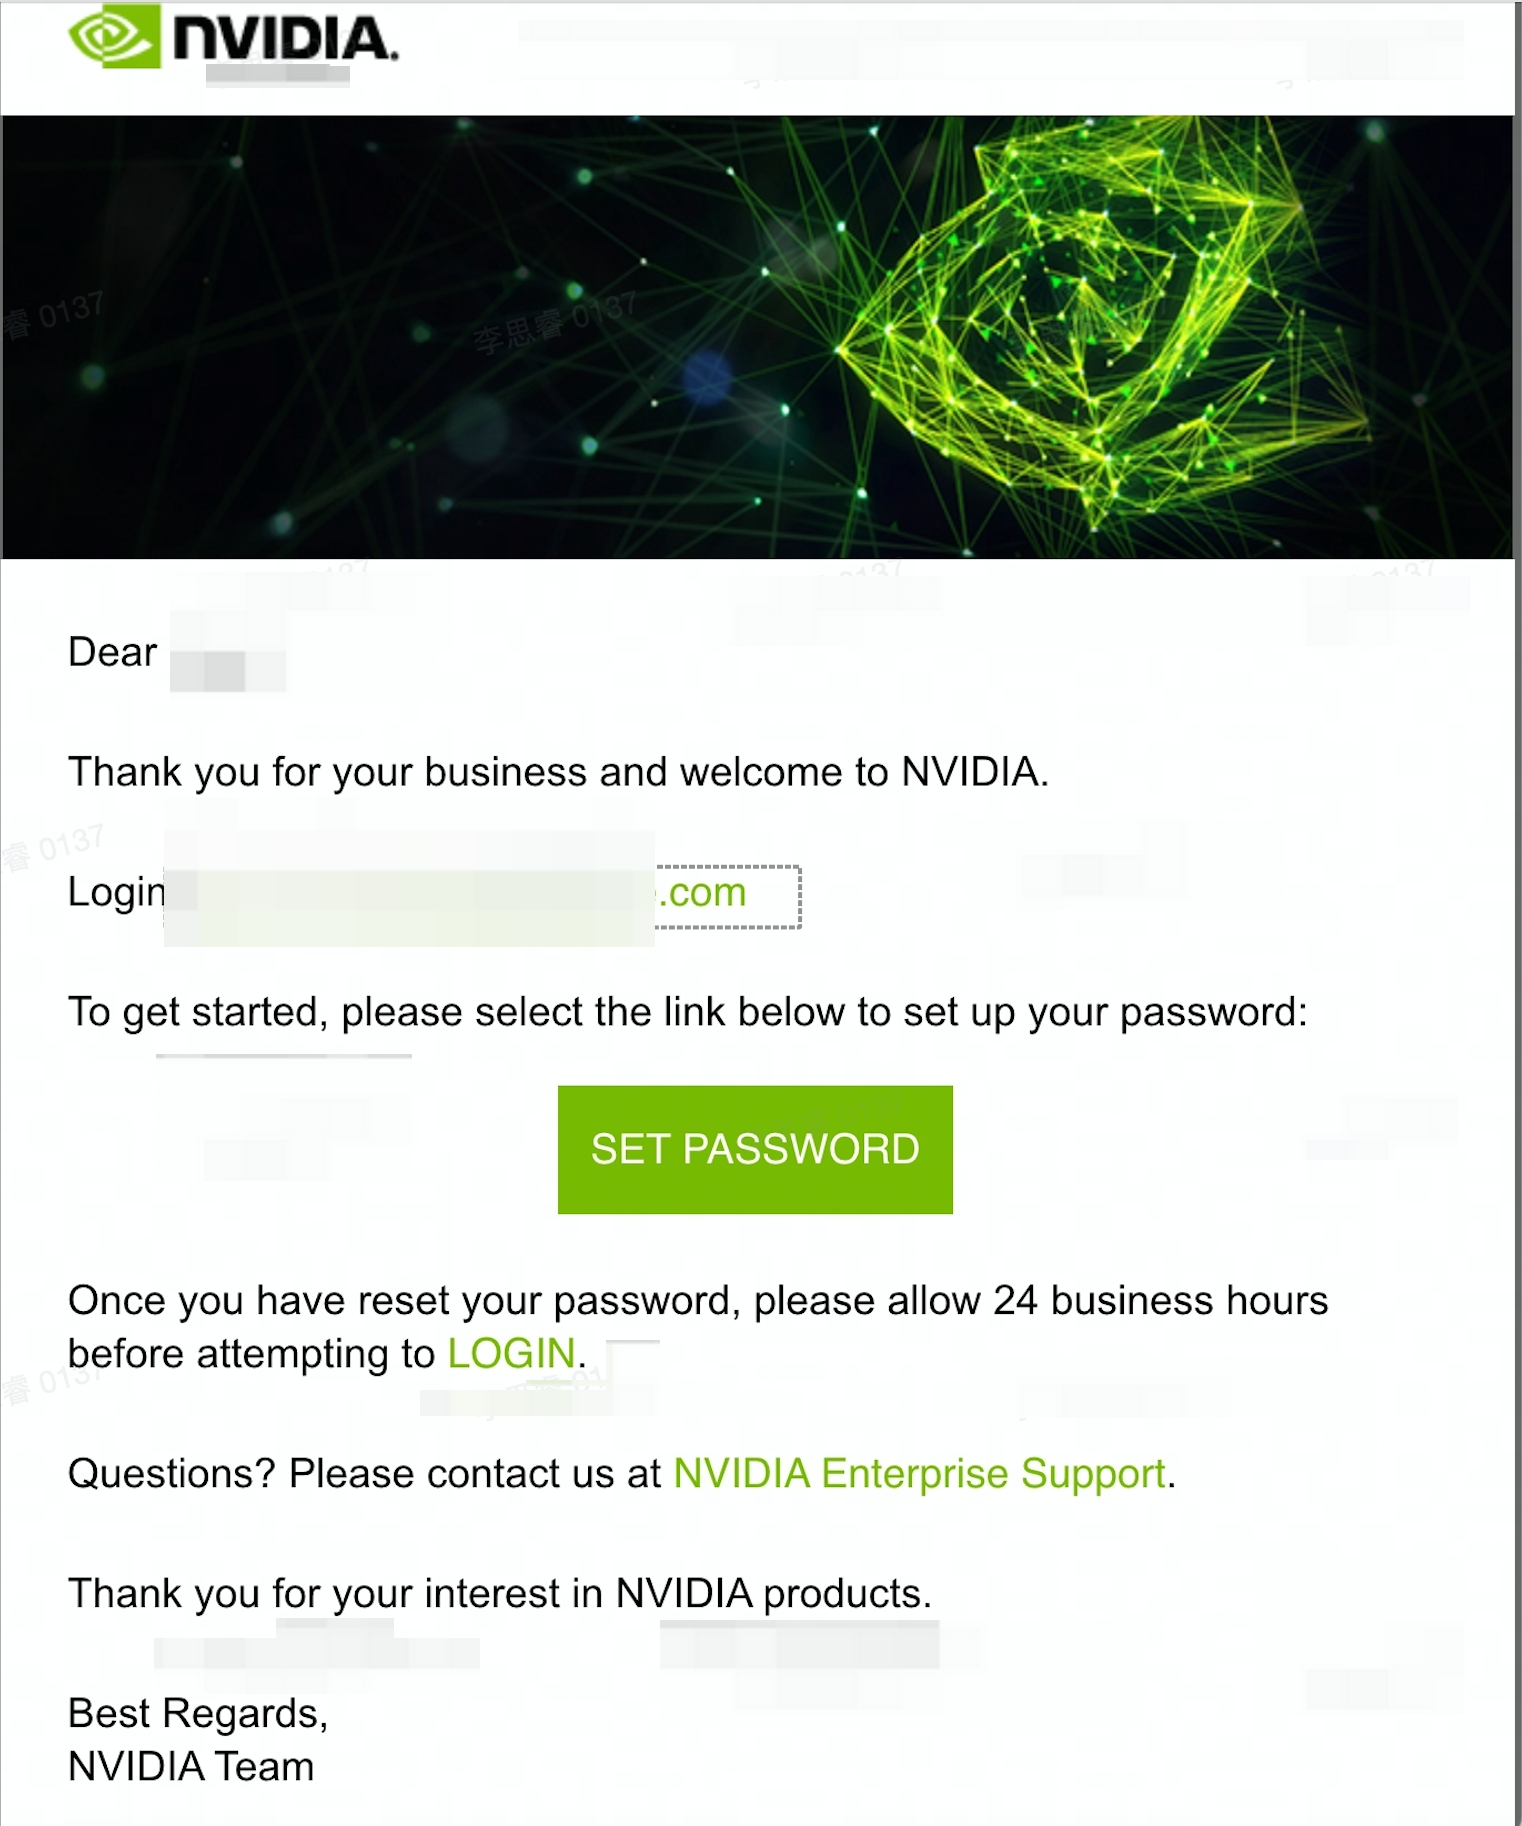
- Click the "SET PASSWORD" button to set the initial password. Once the initial password is set, click the "LOGIN" button to log in to your NVIDIA enterprise account.
- You can also access the NVIDIA license Portal for login.
Step 2: Deploy DLS local service
To set up a local DLS server for license authorization in the enterprise private network, follow these steps:
1) Download software
Download the containerized DLS server package
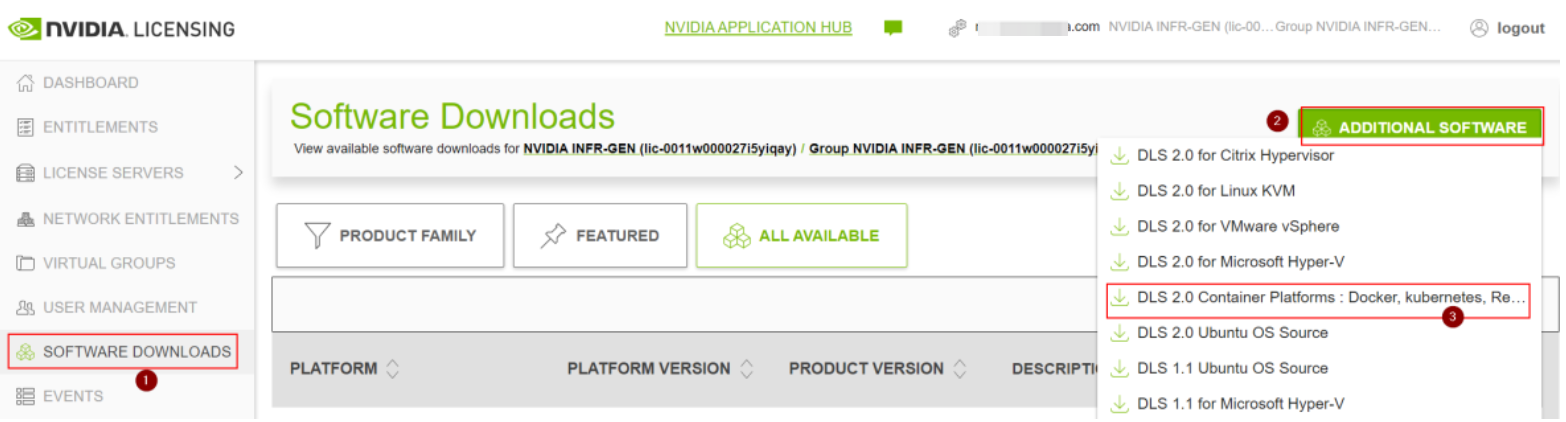
- Access the NVIDIA License Portal, select "SOFTWARE DOWNLOADS" in the left navigation pane to enter the "Software Downloads" page, and click the "ALL AVAILABLE" button.
- Select the required software package for download.
-
Download GRID driver
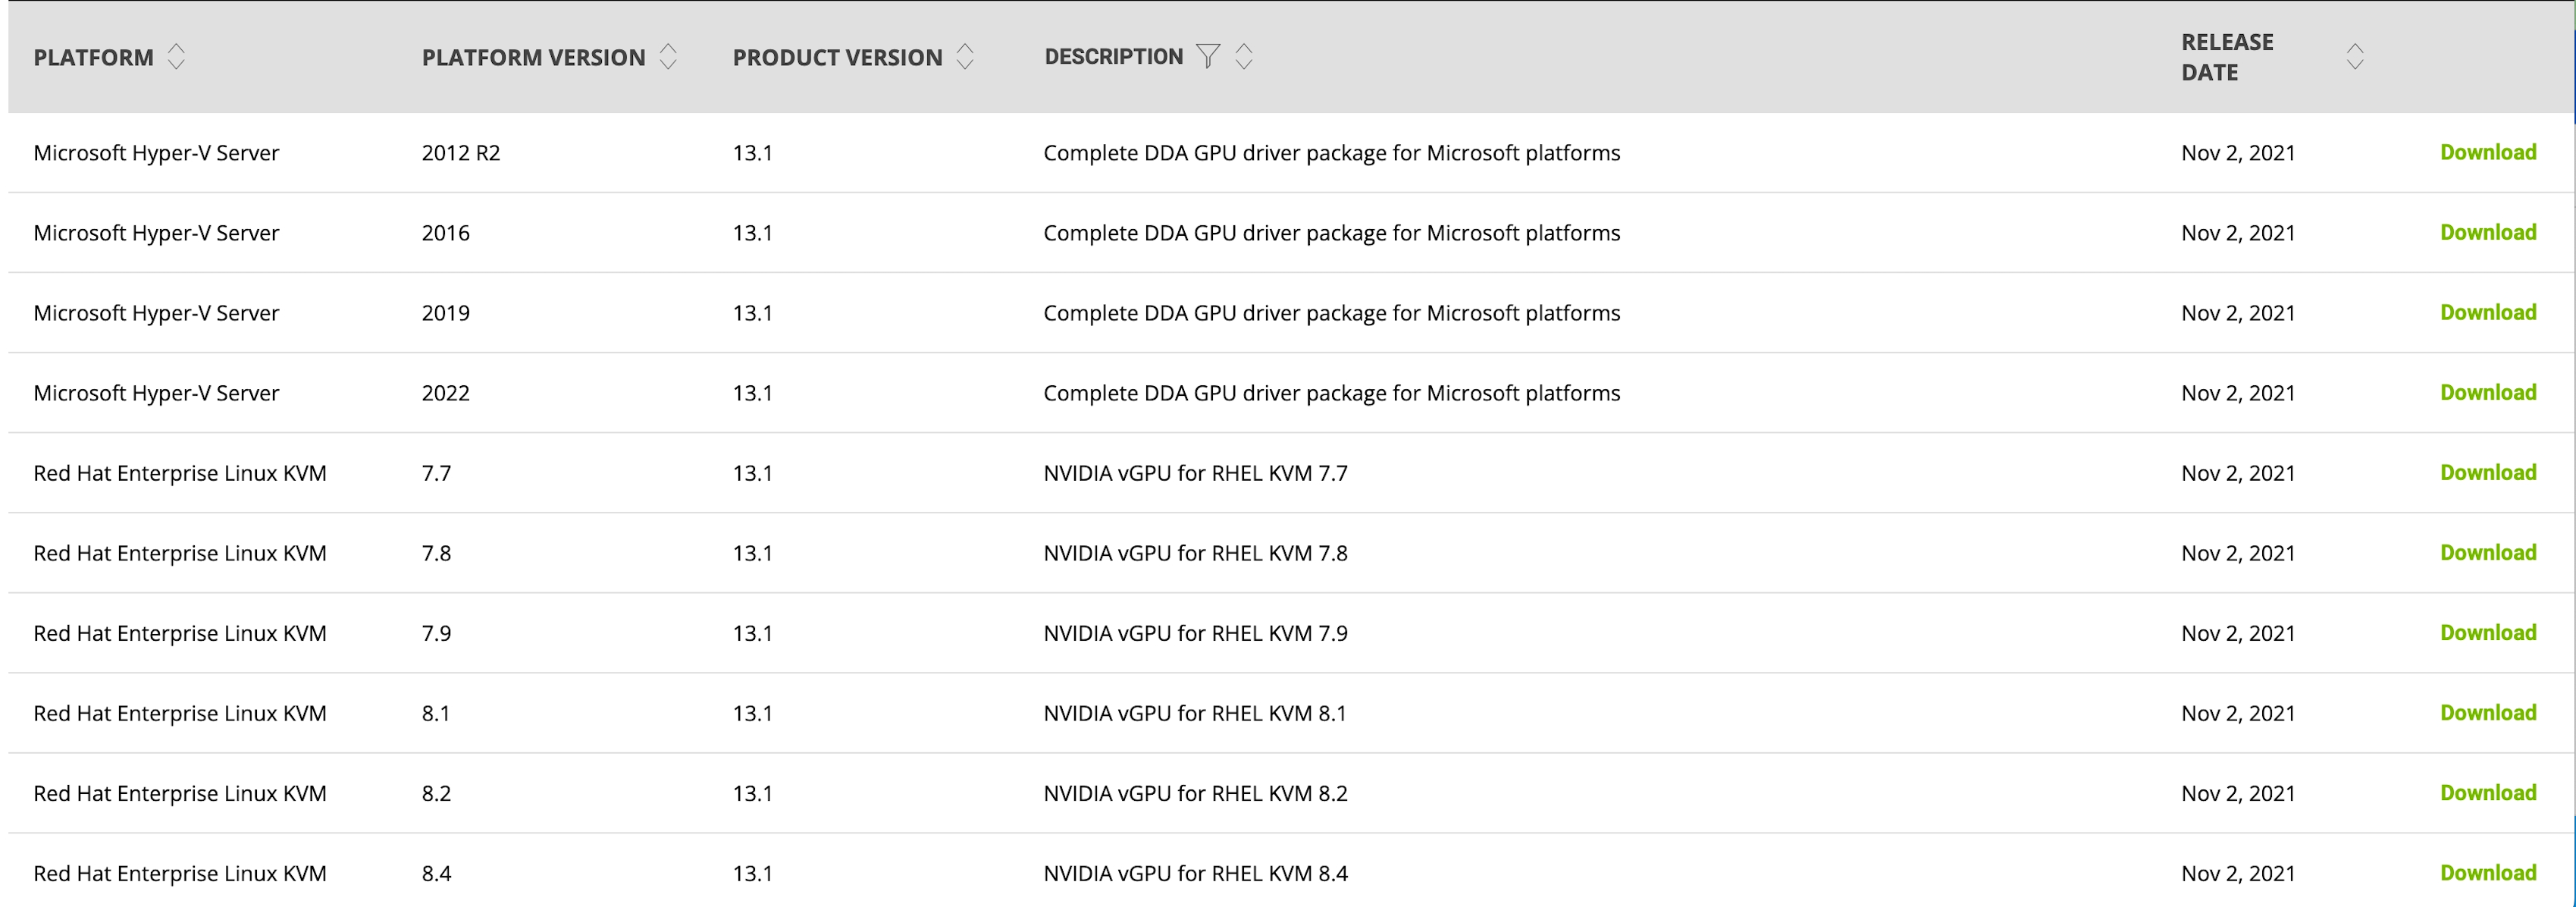
On the "Software Downloads" page, click the "Download" button to the right of the software package for download.
2) Install Docker and Docker-compose
- Remotely connect to and log in to the ECS instance. For more information, see Logging in to instances.
- Execute the following commands to prepare for installation. In this topic, Ubuntu 20.04 is used as an example, and commands are executed as the root user.
- apt-get update # Update package listapt-get remove docker docker-engine docker.io containerd runc # Uninstall installed packages (retain configuration files)apt-get install -y ca-certificates curl gnupg unzip lsb-release # Install new packages
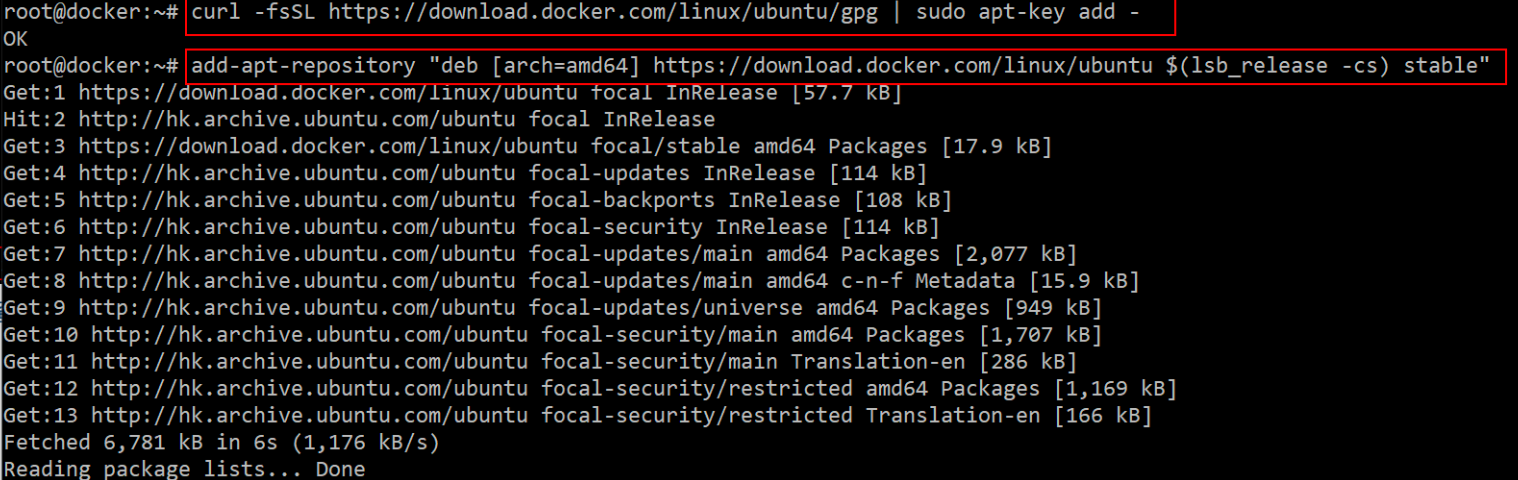
- Execute the following commands to add the official GPG key of Docker and the software source.
- curl -fsSL https://download.docker.com/linux/ubuntu/gpg | sudo apt-key add - #Import GPG Keyadd-apt-repository "deb [arch=amd64] https://download.docker.com/linux/ubuntu $(lsb_release -cs) stable" #add Docker APT repository
-
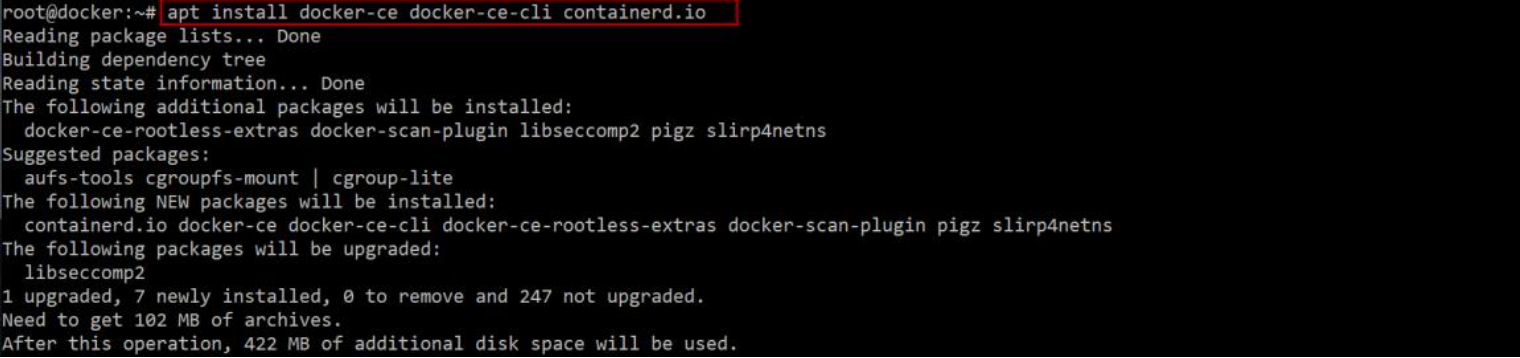
- Execute the following command to install Docker.
- apt install -y docker-ce docker-ce-cli containerd.io
-
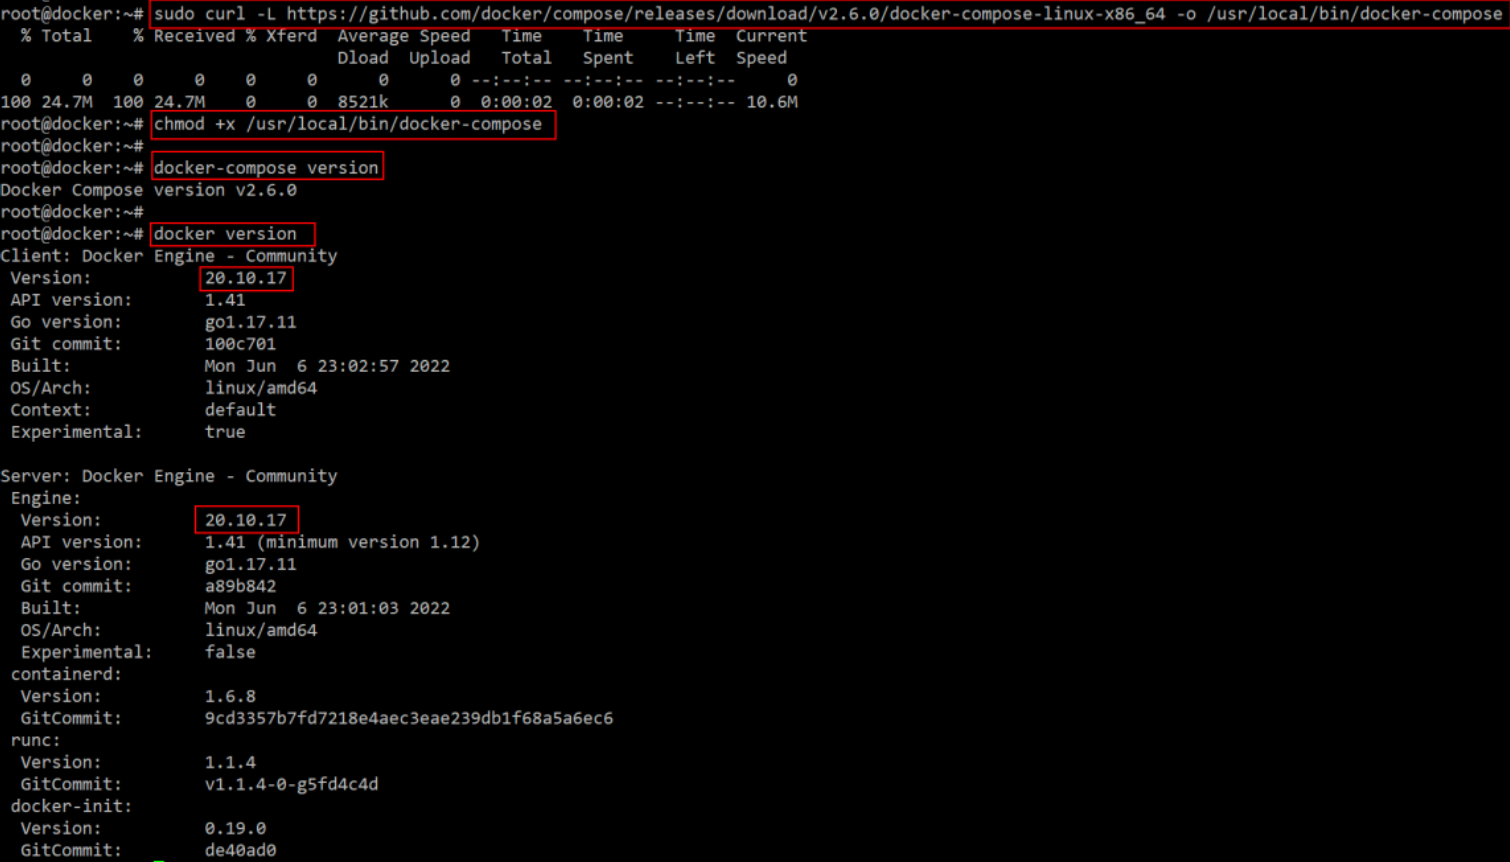
- Execute the following commands to download Docker-compose and grant the execute permission.
- Download Docker-compose:
- curl -L https://github.com/docker/compose/releases/download/v2.6.0/docker-compose-linux-x86_64 -o /usr/local/bin/docker-compose
- Add the executable permission to the binary file:
- sudo chmod +x /usr/local/bin/docker-compose
- If the following output is displayed, the installation is successful.
-
3) Deploy license 2.0 image
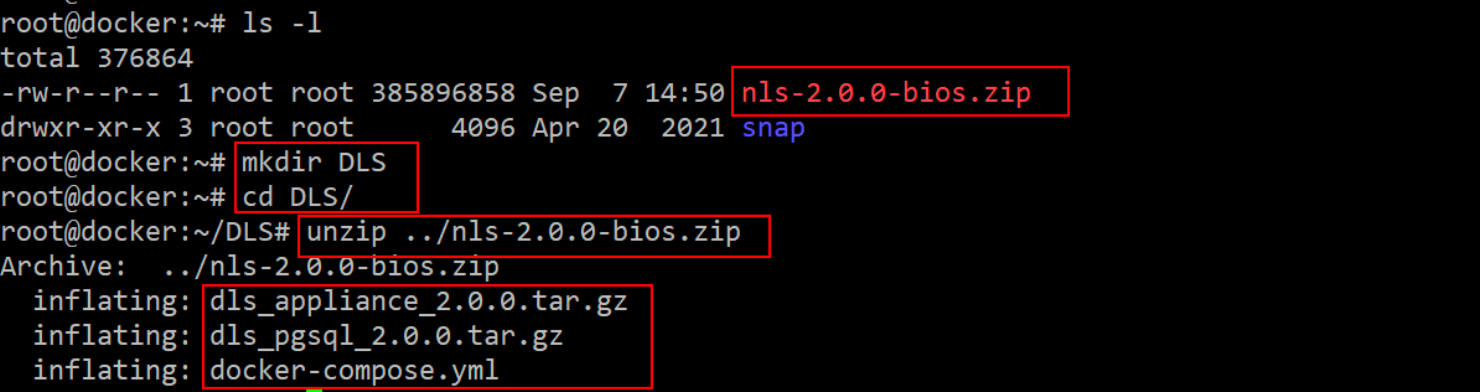
- Execute the following commands to decompress the package nls-2.0.0-bios.zip into the DLS folder.
- ls -l mkdir DLS cd DLS/ unzip ../nls-2.0.0-bios.zip
-
- Execute the following commands to load the container images.
- docker load --input dls_pgsql_2.0.0.tar.gz
- docker load --input dls_appliance_2.0.0.tar.gz
-
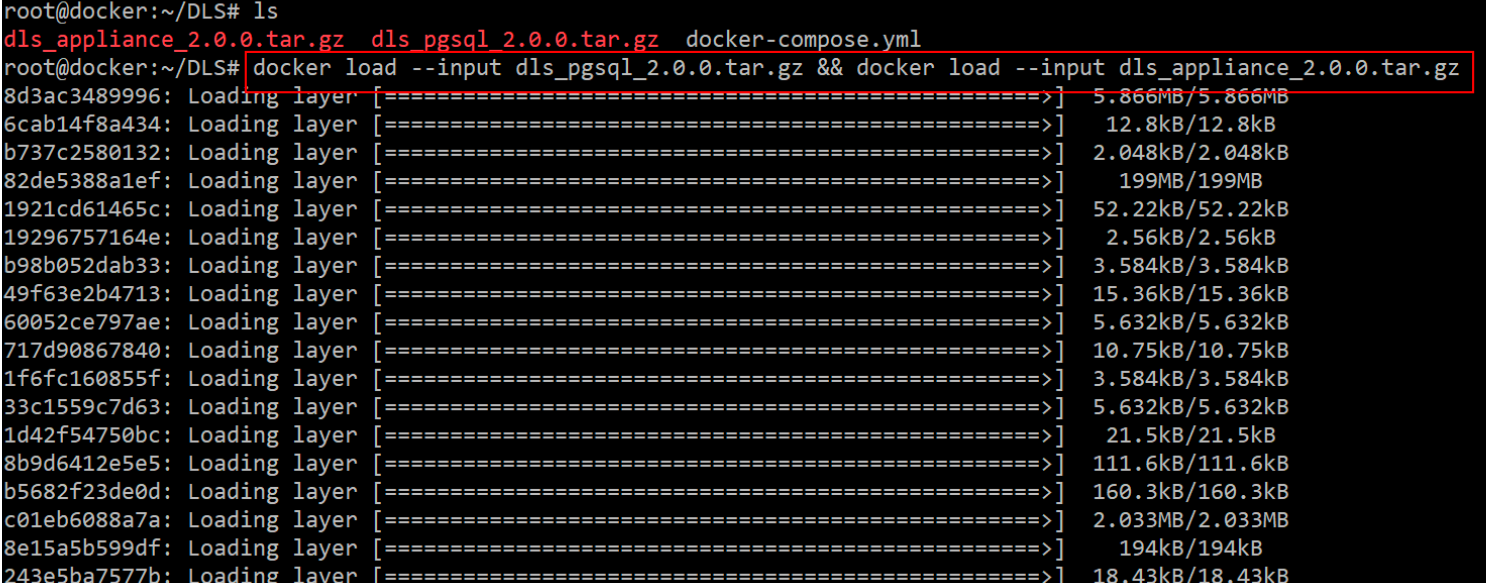
- Modify the host address of Docker container service and start the license service.
- DLS_PUBLIC_IP='192.168.xx.xx' docker-compose up
-
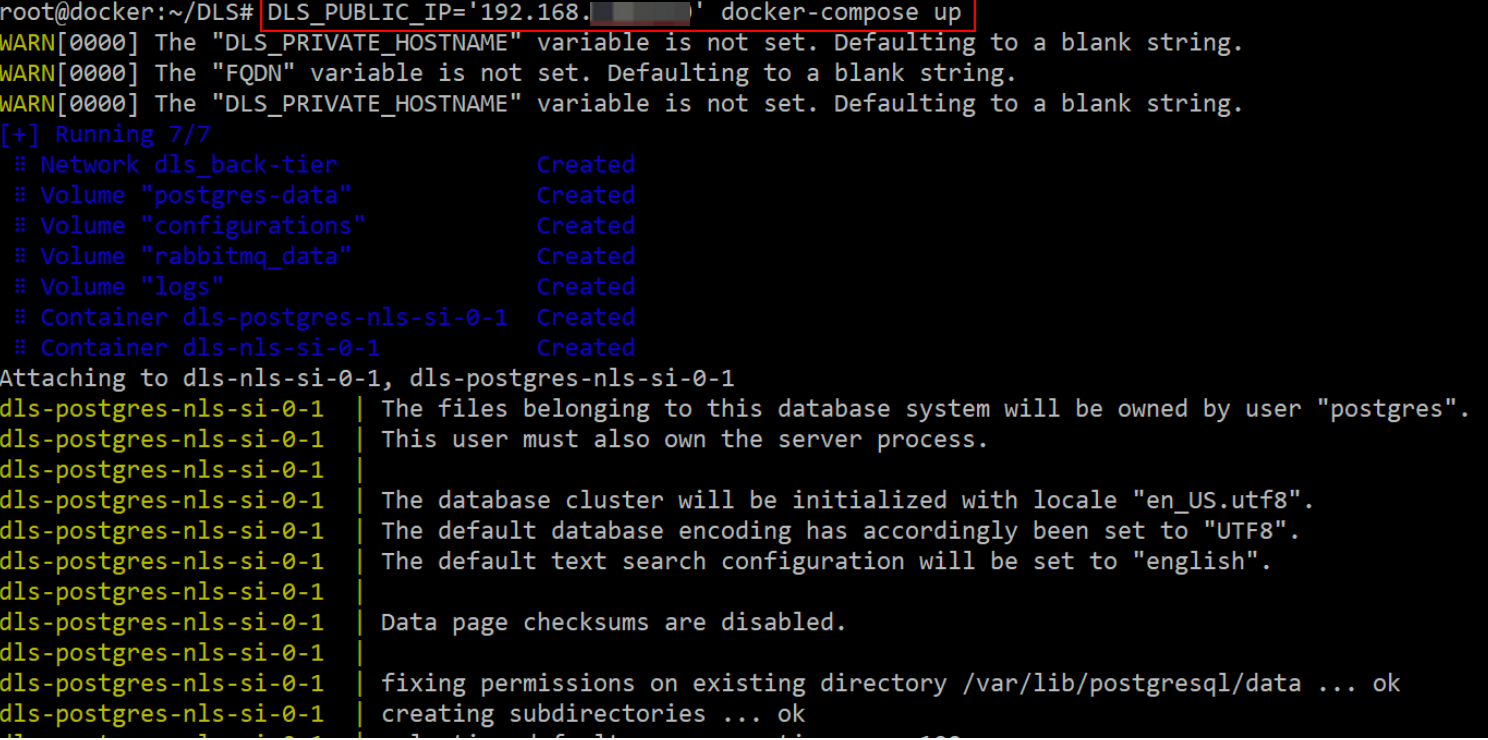
You can also use the -d parameter to run the container service in the background by executing the command: DLS_PUBLIC_IP='192.168.xx.xx' docker-compose up -d.
- During the first run, the database is initialized. The output displayed for the subsequent run is as follows.
-
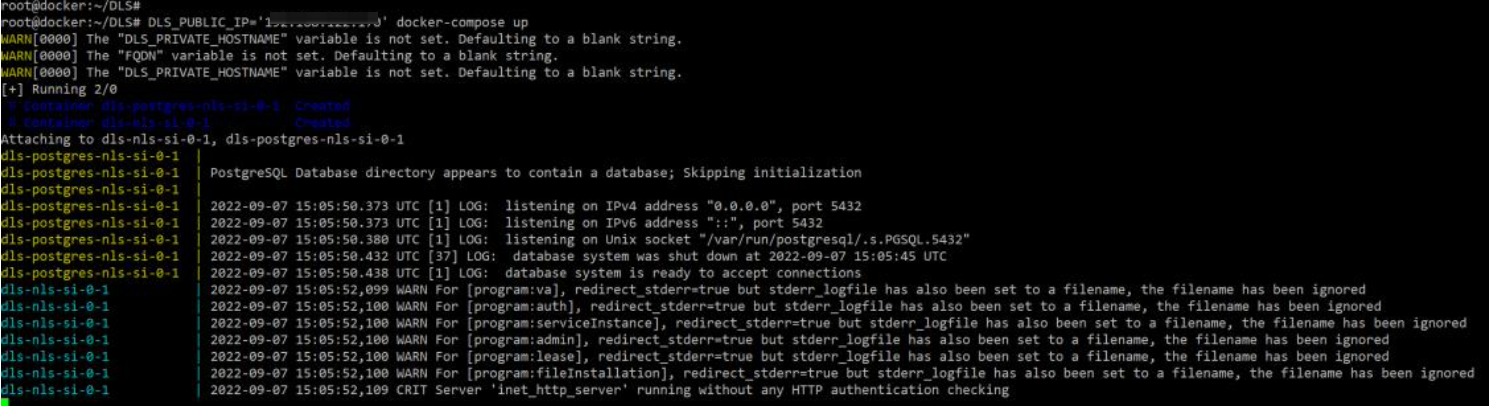
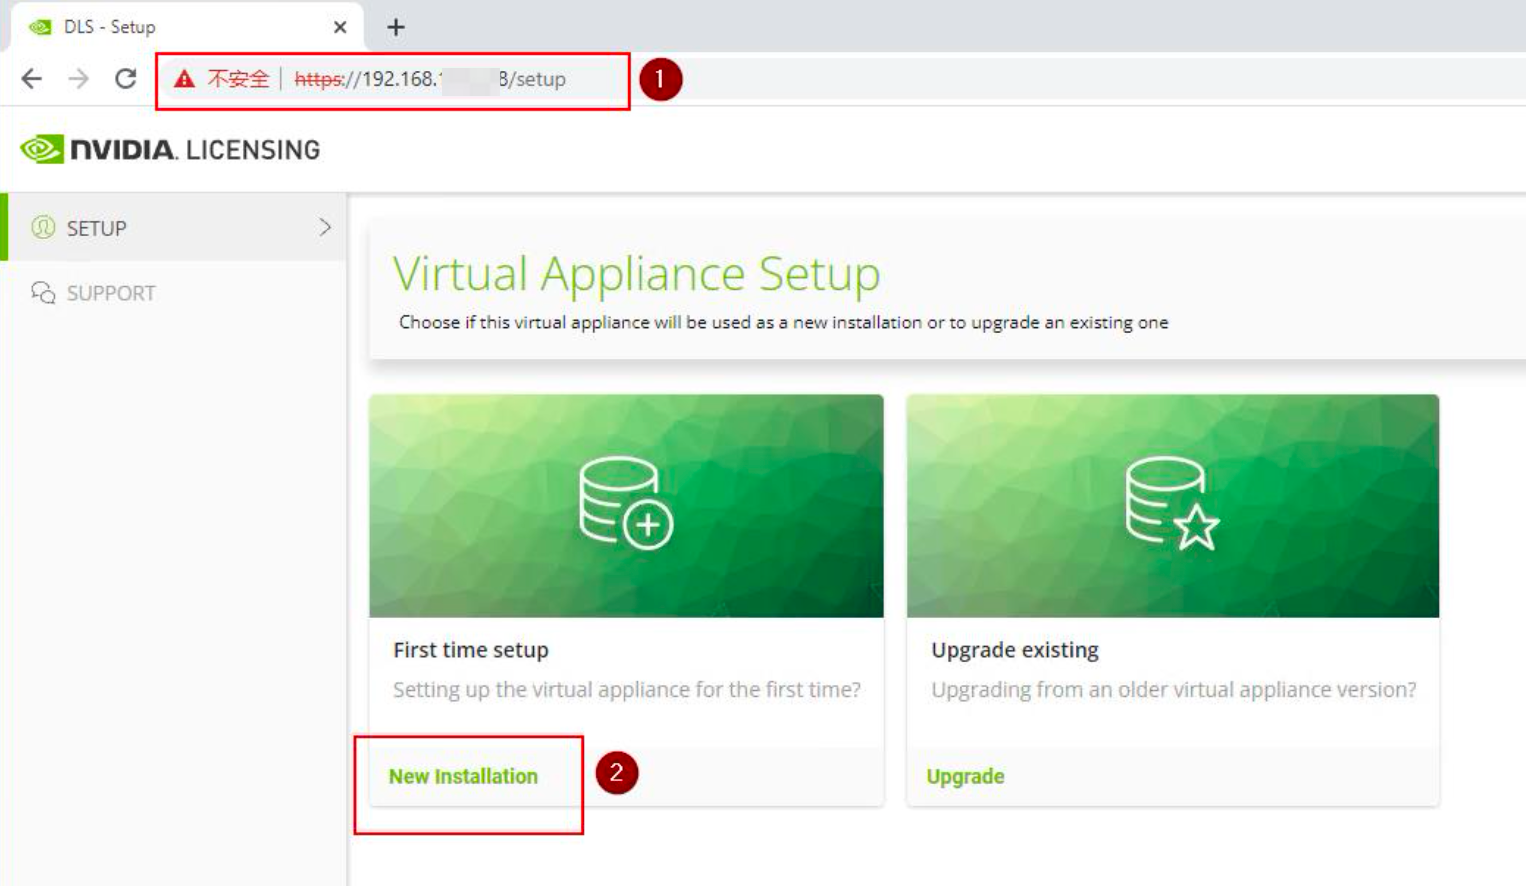
4) Configure DLS service
- Access the DLS console via the modified Docker host address https://192.168.xx.xx, and select "New Installation".
-
- Set the login name and password. The login name is dls_admin.
-
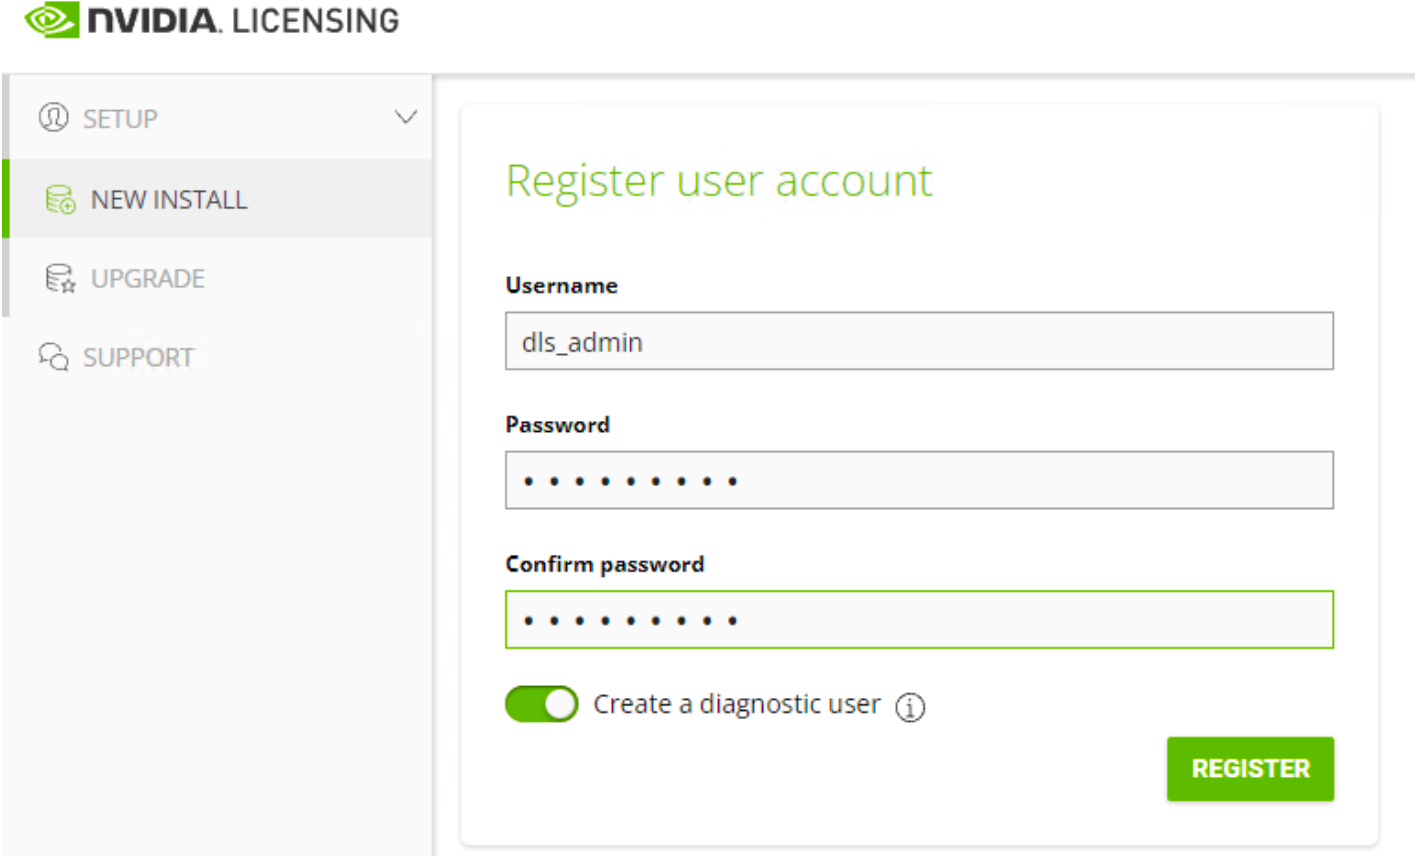
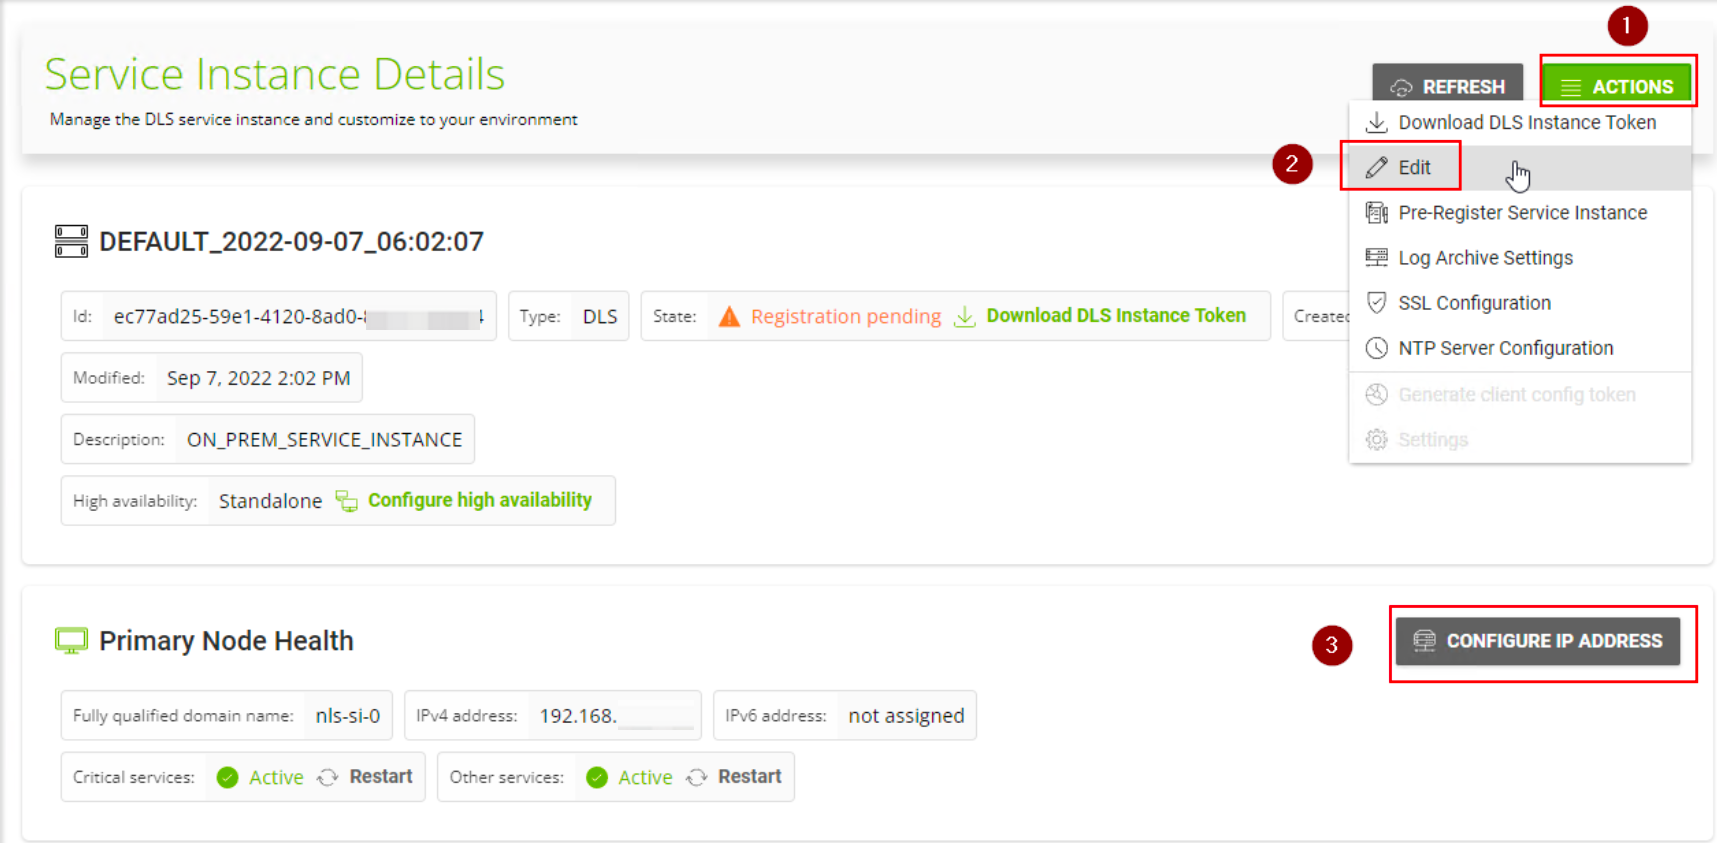
- After successful login, you can view the created DLS instance. You can modify the IP address and name of the instance based on your needs. After the modification, you need to log in again using the new IP address.
-
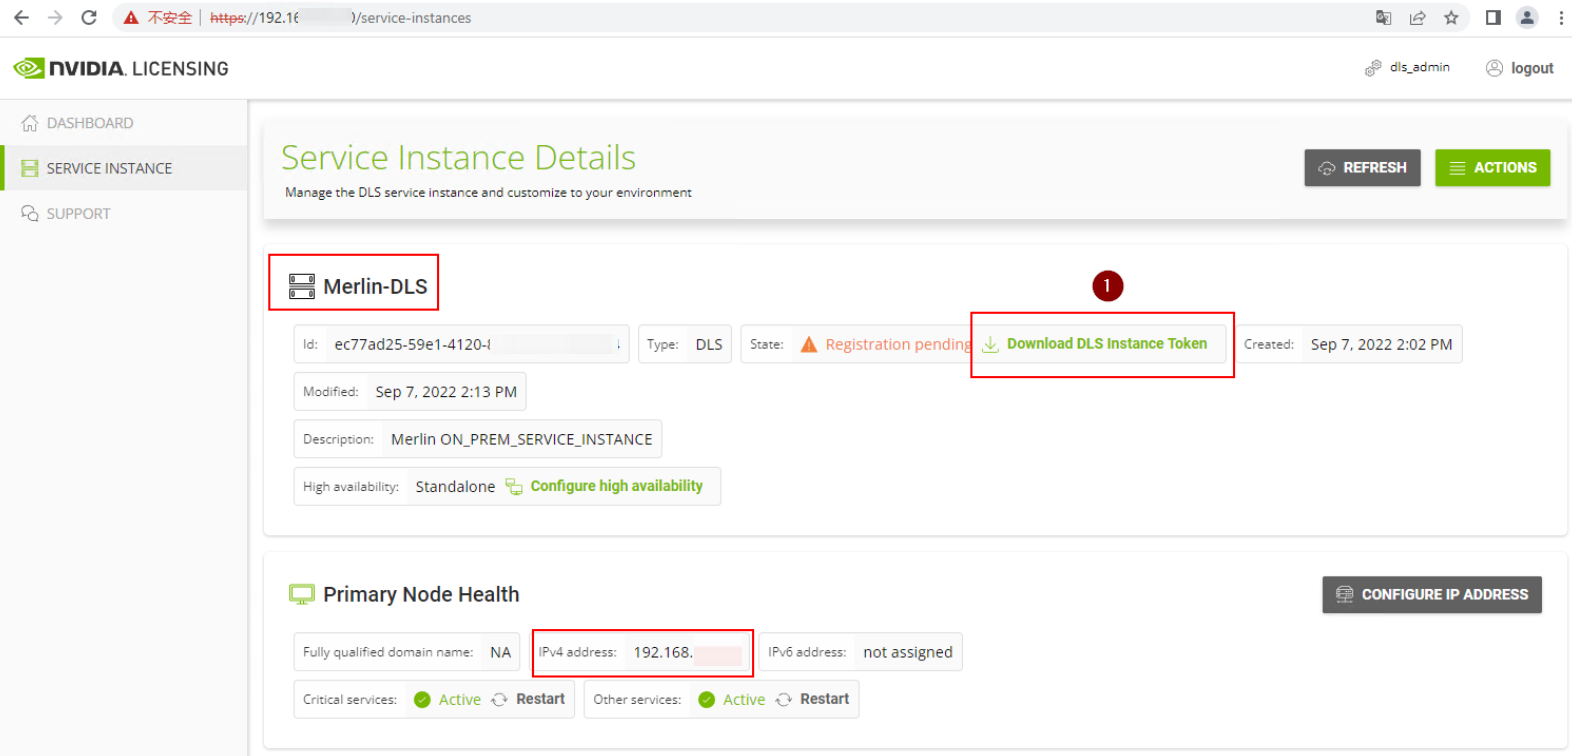
- After you confirm that the information is correct, click the "Download DLS Instance Token" button to download the token authorization file. Then, prepare to submit this file to the NVIDIA Portal.
-
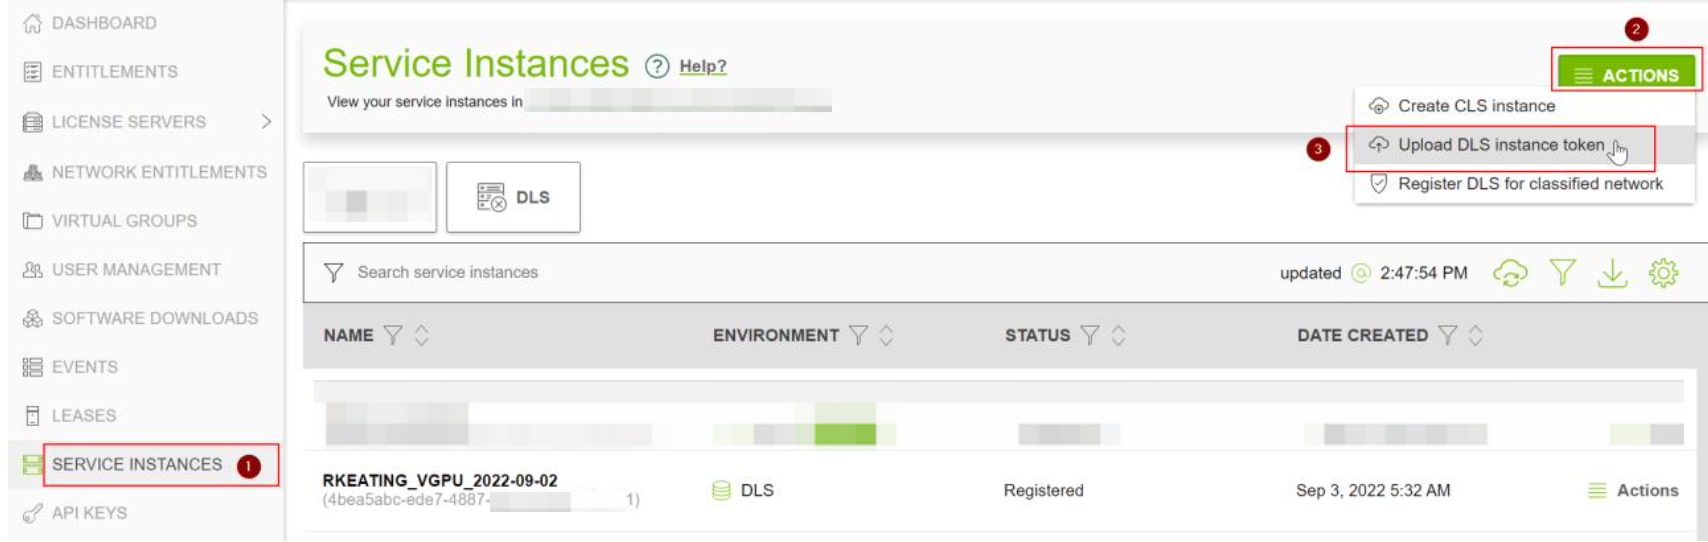
- Return to the NVIDIA Portal, select "SOFTWARE INSTANCES" from the left navigation pane, and enter the "Software Instances" page.
- Click the "ACTIONS" button in the upper right corner. Then, select "Upload DLS instances token" to upload the token file obtained in the previous step and register the DLS instance.
-
-
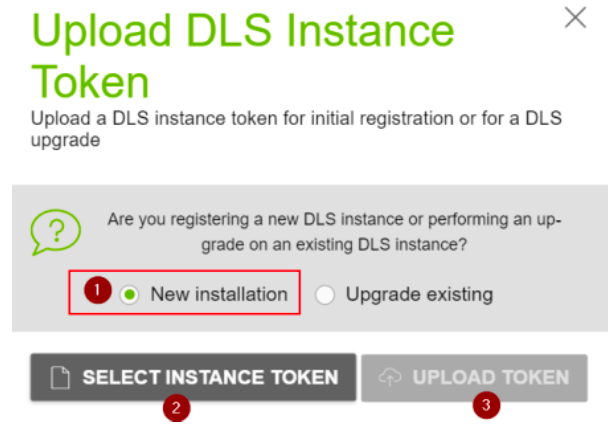
- After the token file is uploaded successfully, you can see the registered DLS instance.
-
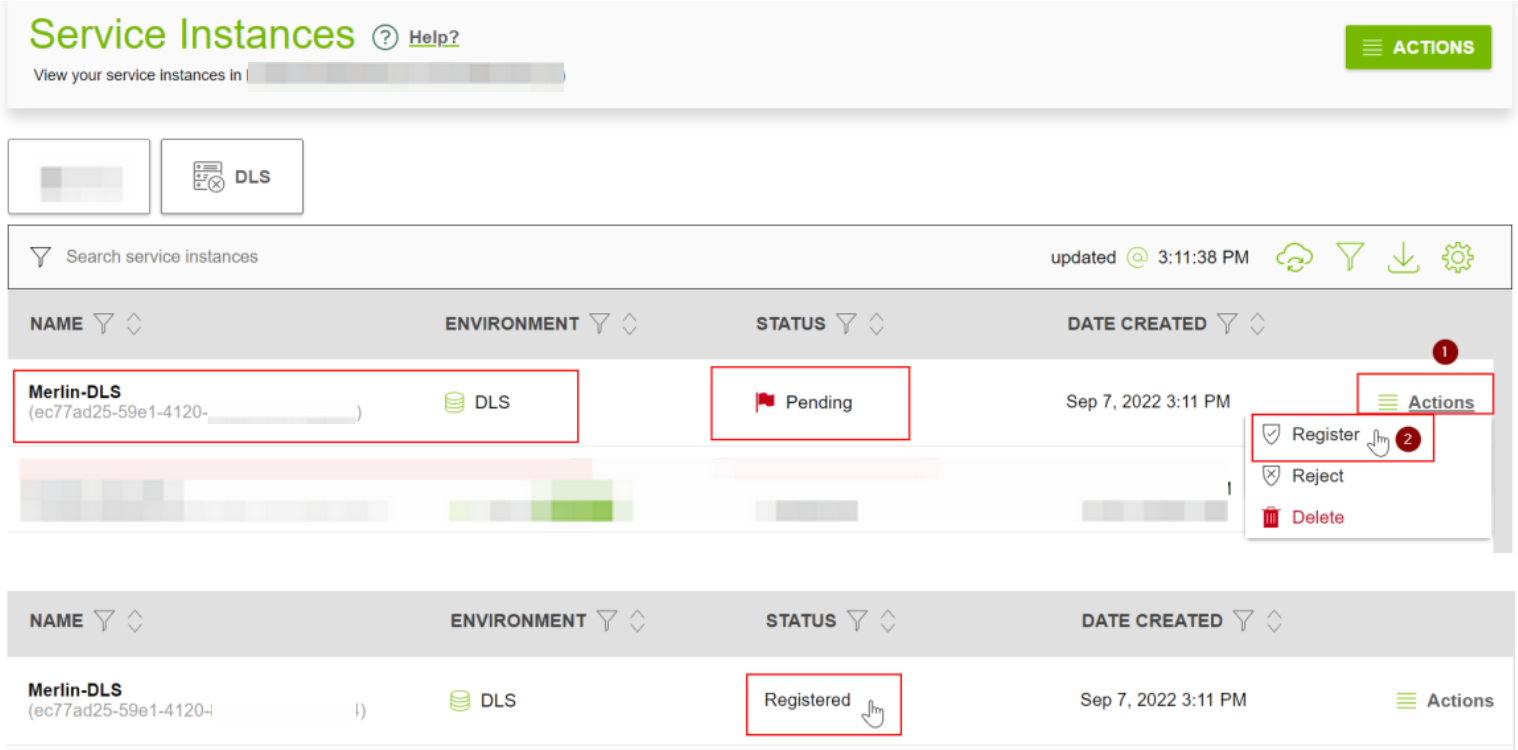
5) Create license server
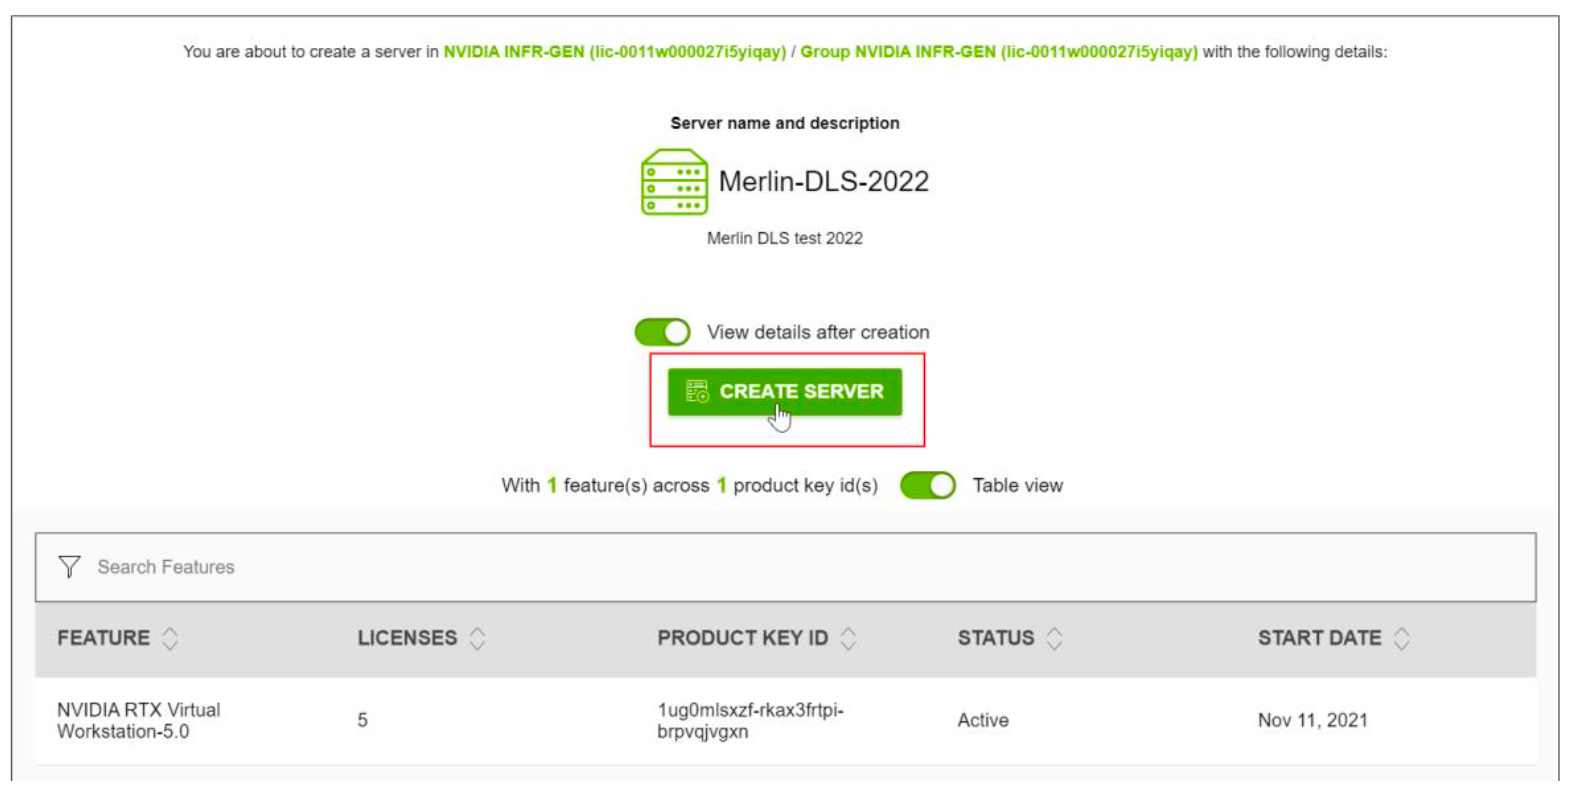
- Select "CREATE SERVERS" in the left navigation pane to enter the "Create License Server" page, specify the service name, add the required license type and quantity, and then click the "CREATE SERVER" button to create the server.
-
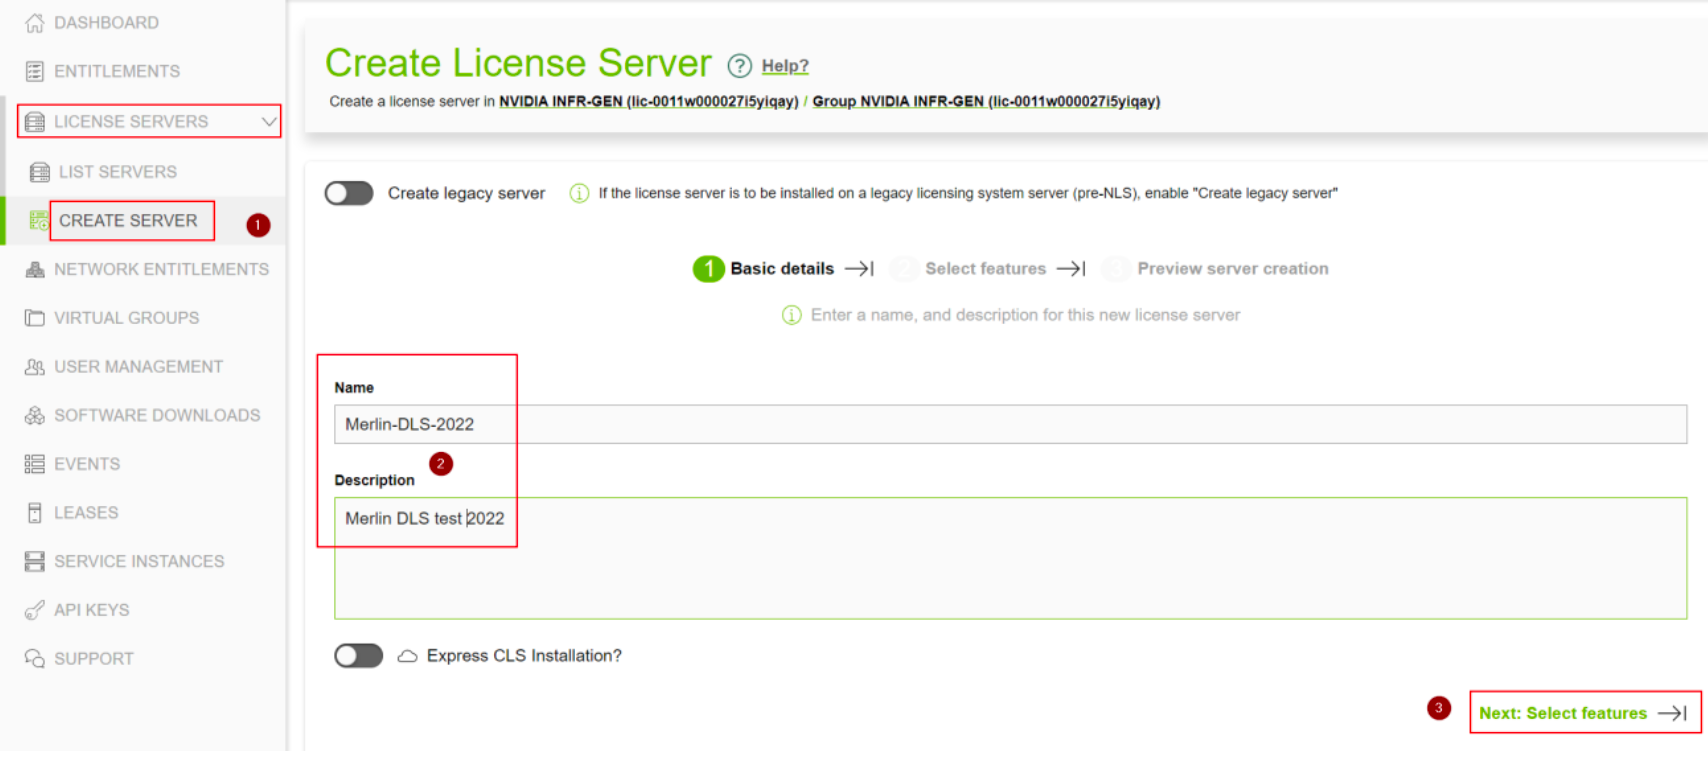
-
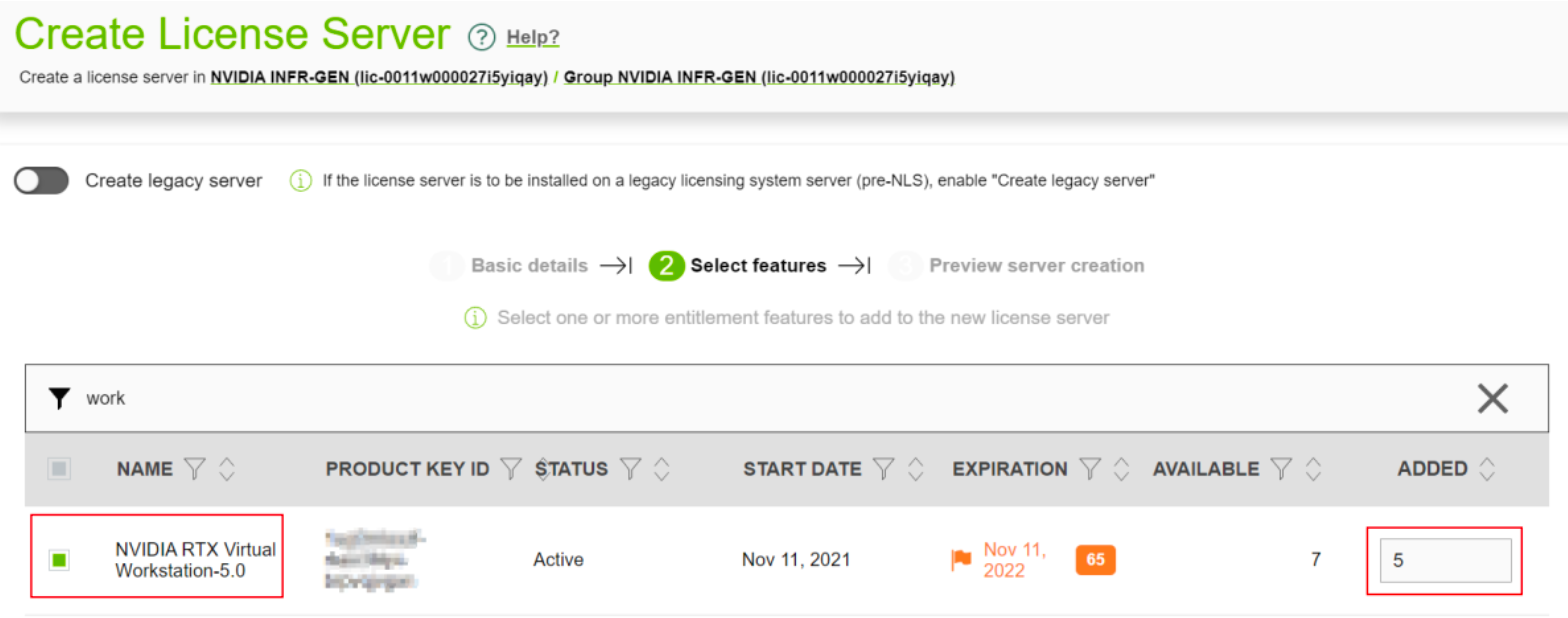
-
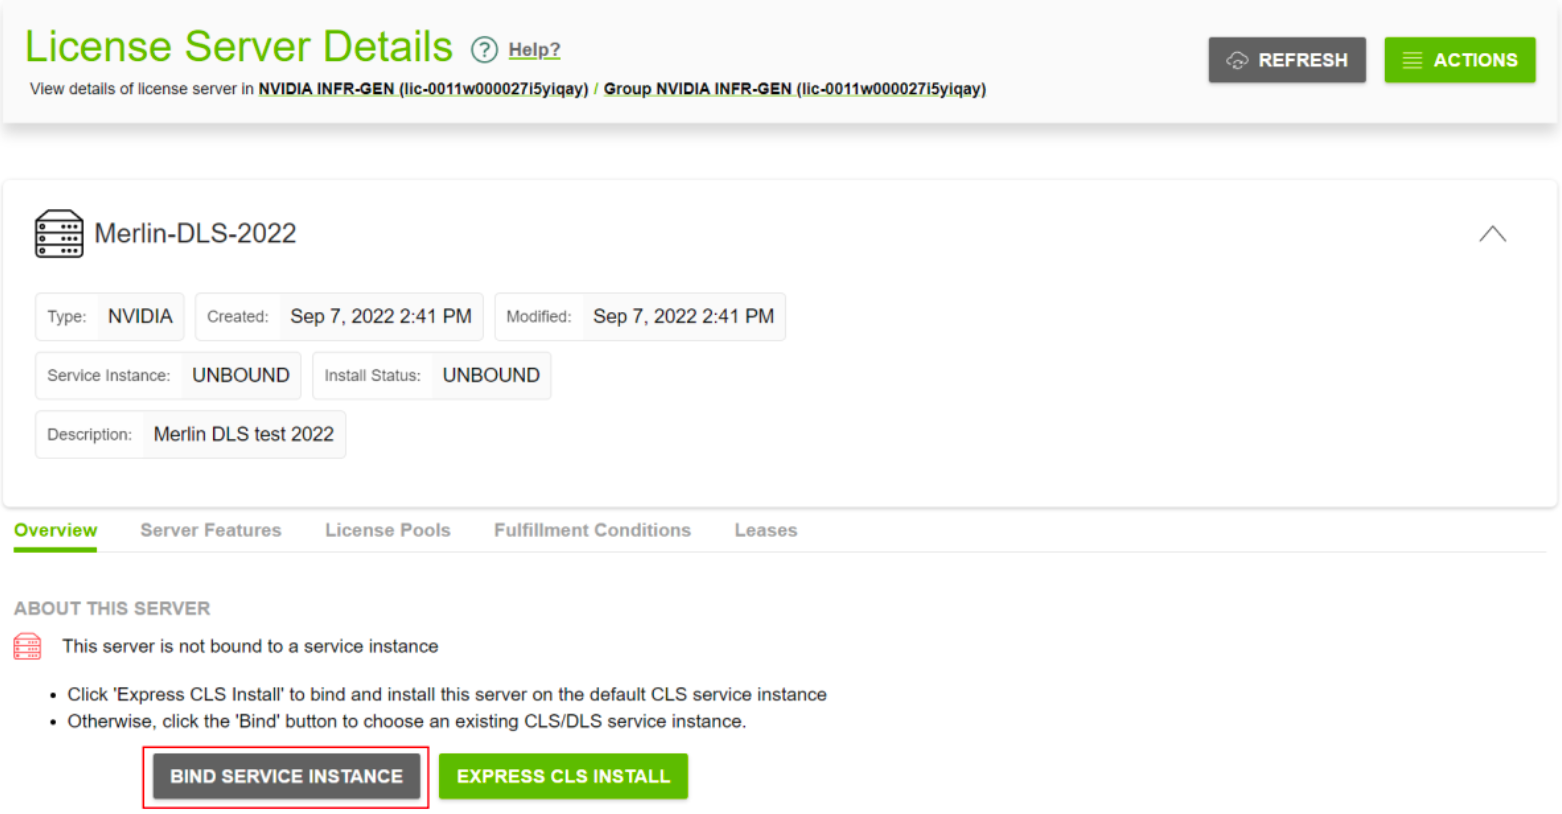
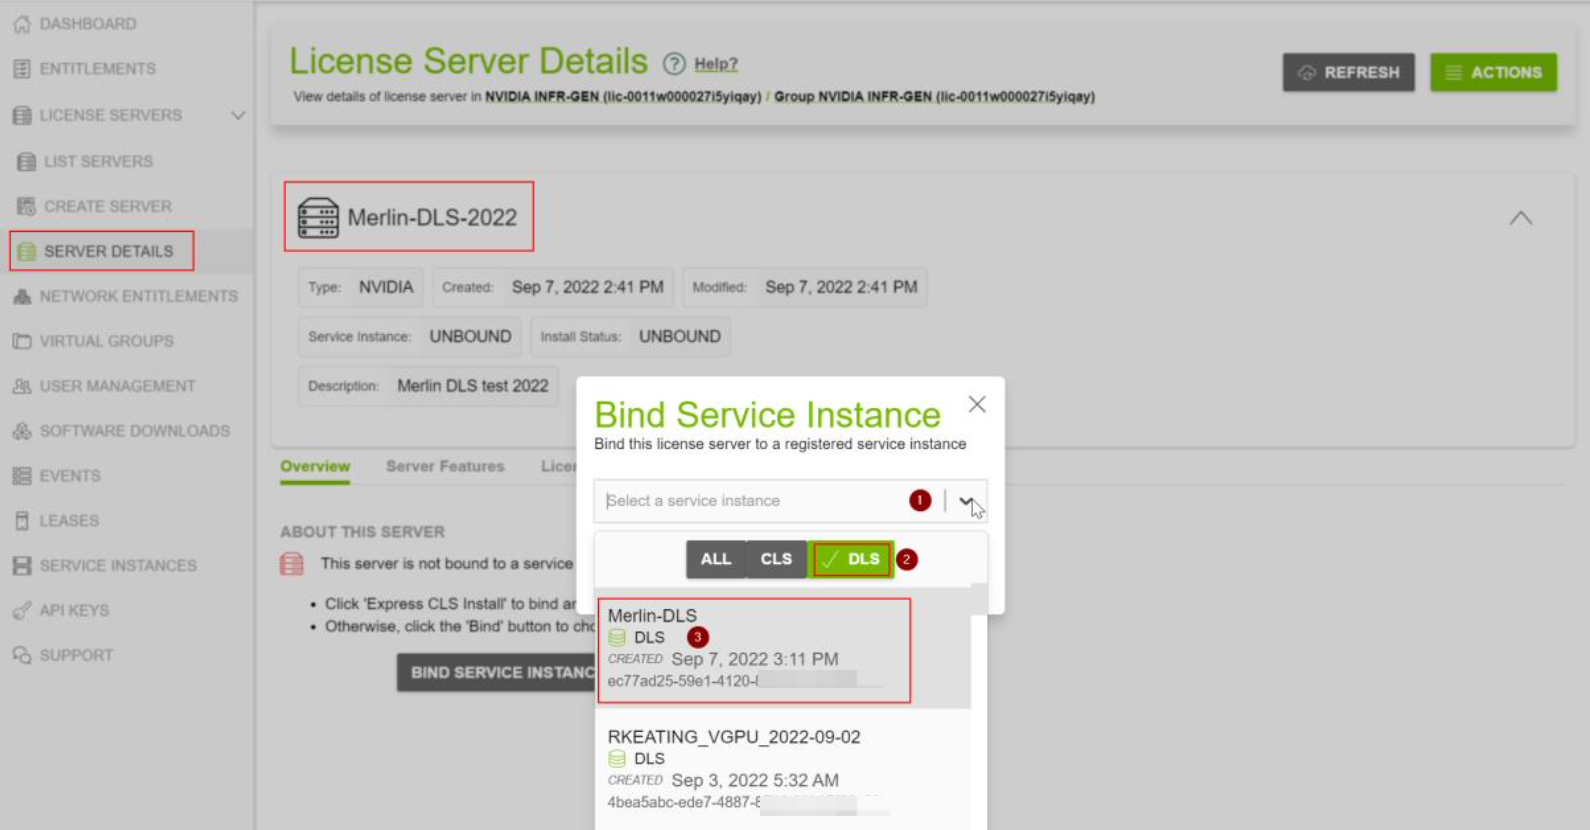
- Select "SERVER DETAILS" in the left navigation pane to enter the "License Server Details" page. Click the "BIND SERVICE INSTANCE" button to associate the license server with the registered DLS instance.
-
-
- After successful association, select "ACTIONS > Download" in the upper right corner to download the bin file for transferring license configurations.
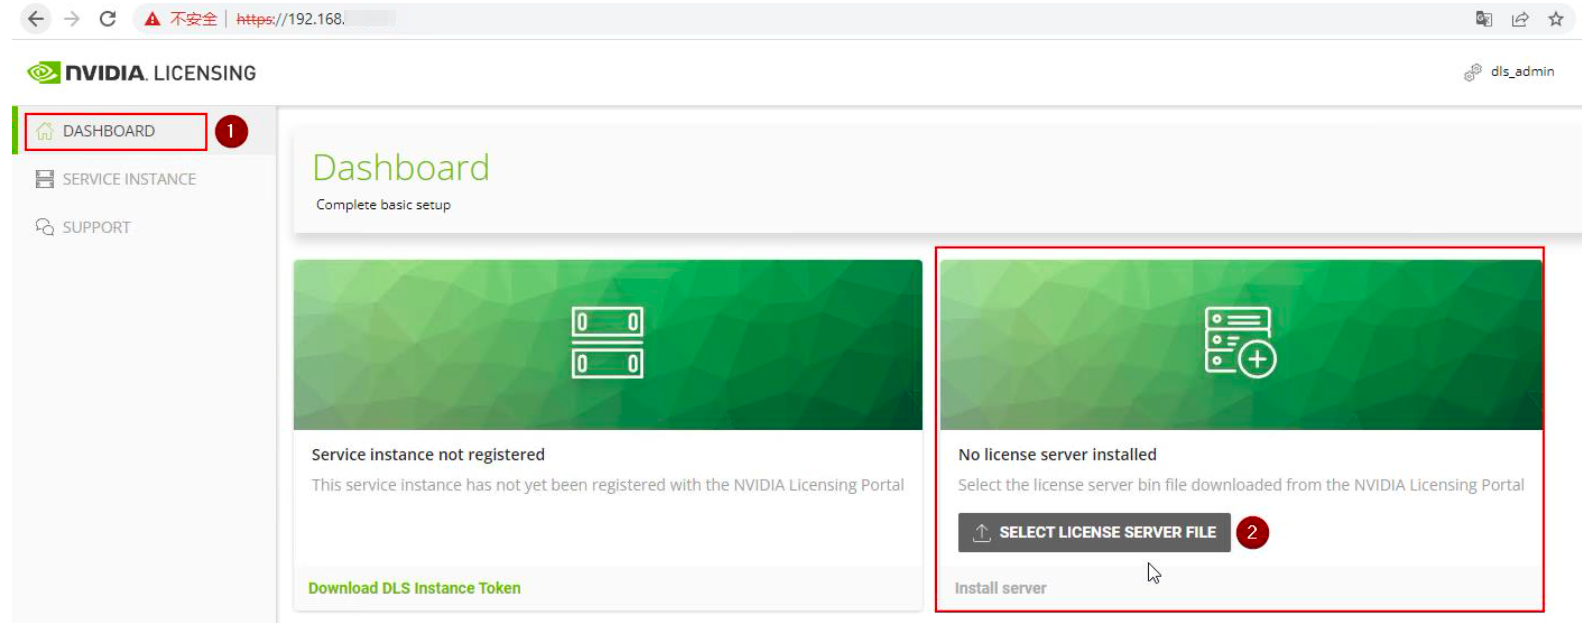
- Return to the local DLS console and upload the bin file to DLS to complete the license transfer.
-
-
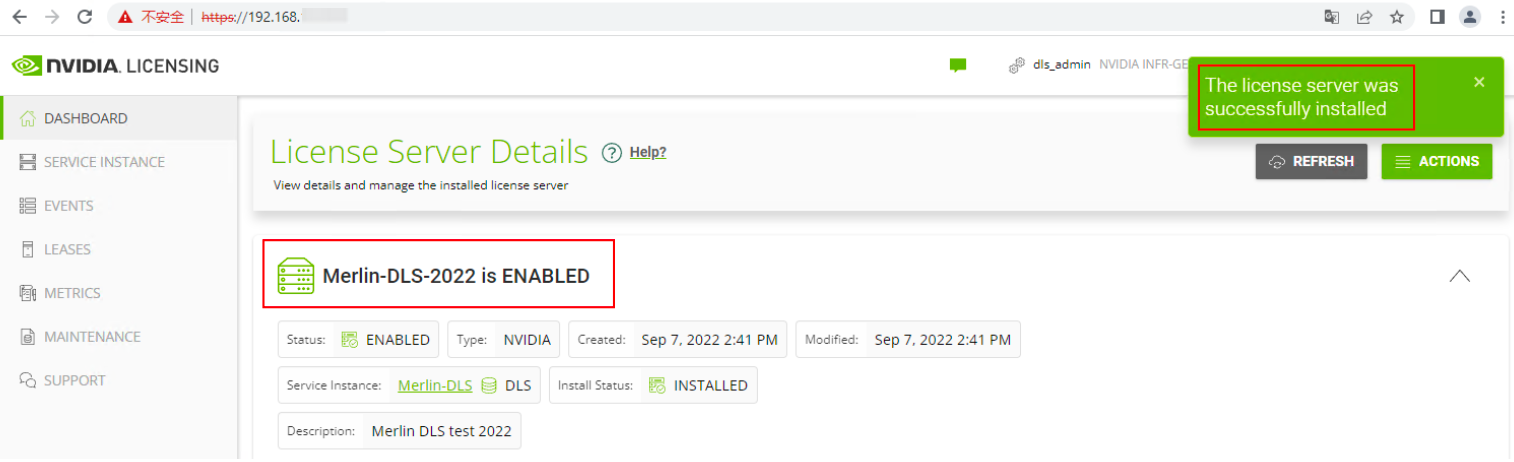
-
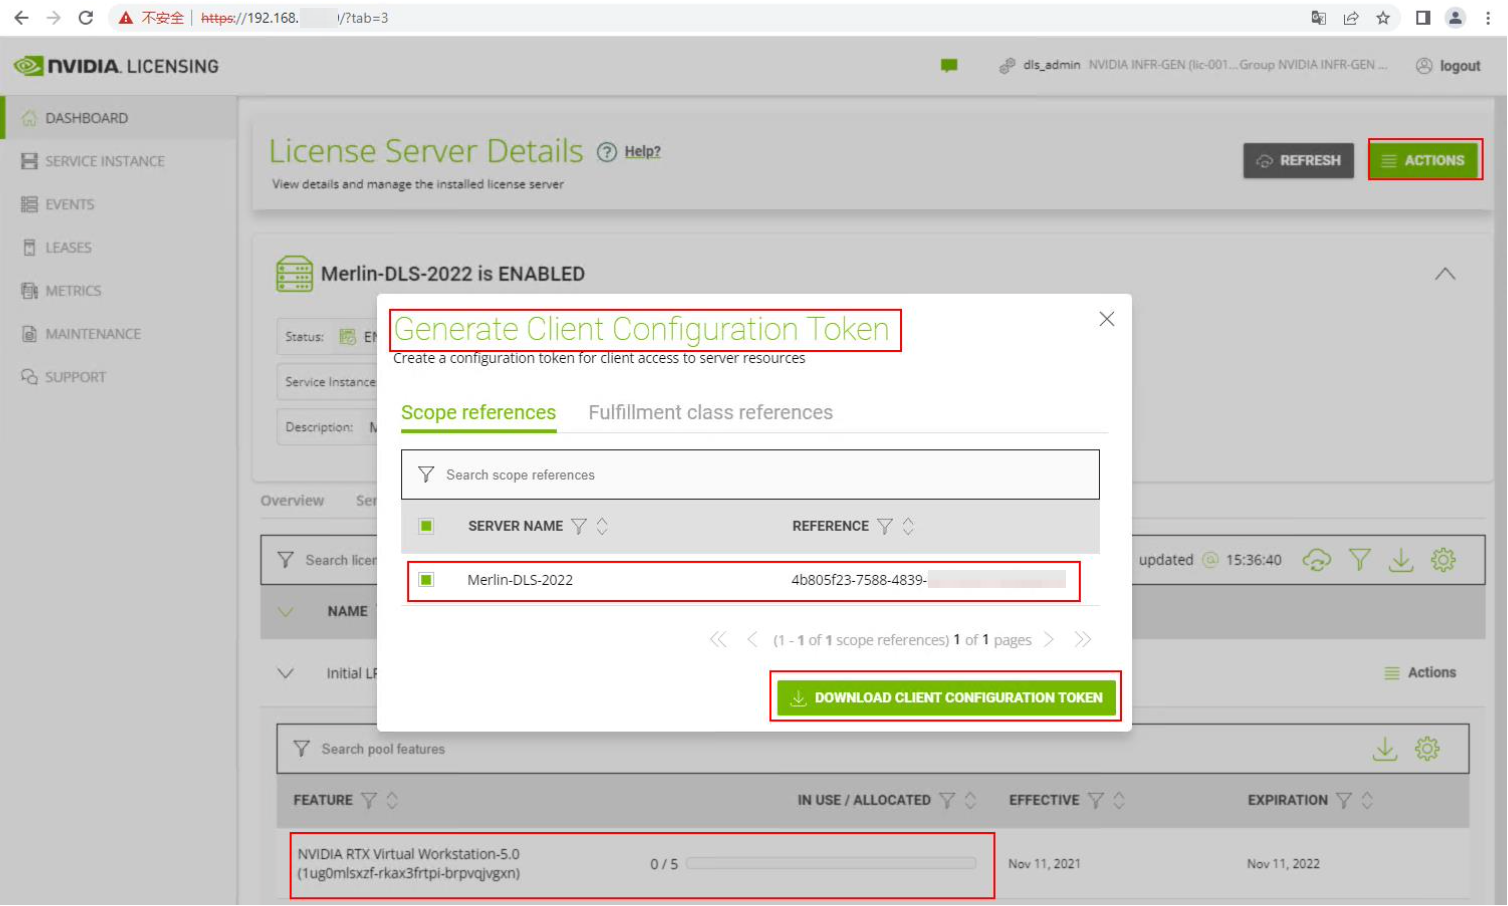
- After the bin file is uploaded successfully, the local DLS is granted license authorization permission (token file-based). You need to download the .tok token file generated by the local DLS and upload it to the GPU instance.
6) Download token file for authorization
- On the home page of the DLS console, select "ACTIONS > Generate client config token" to generate the token file.
-
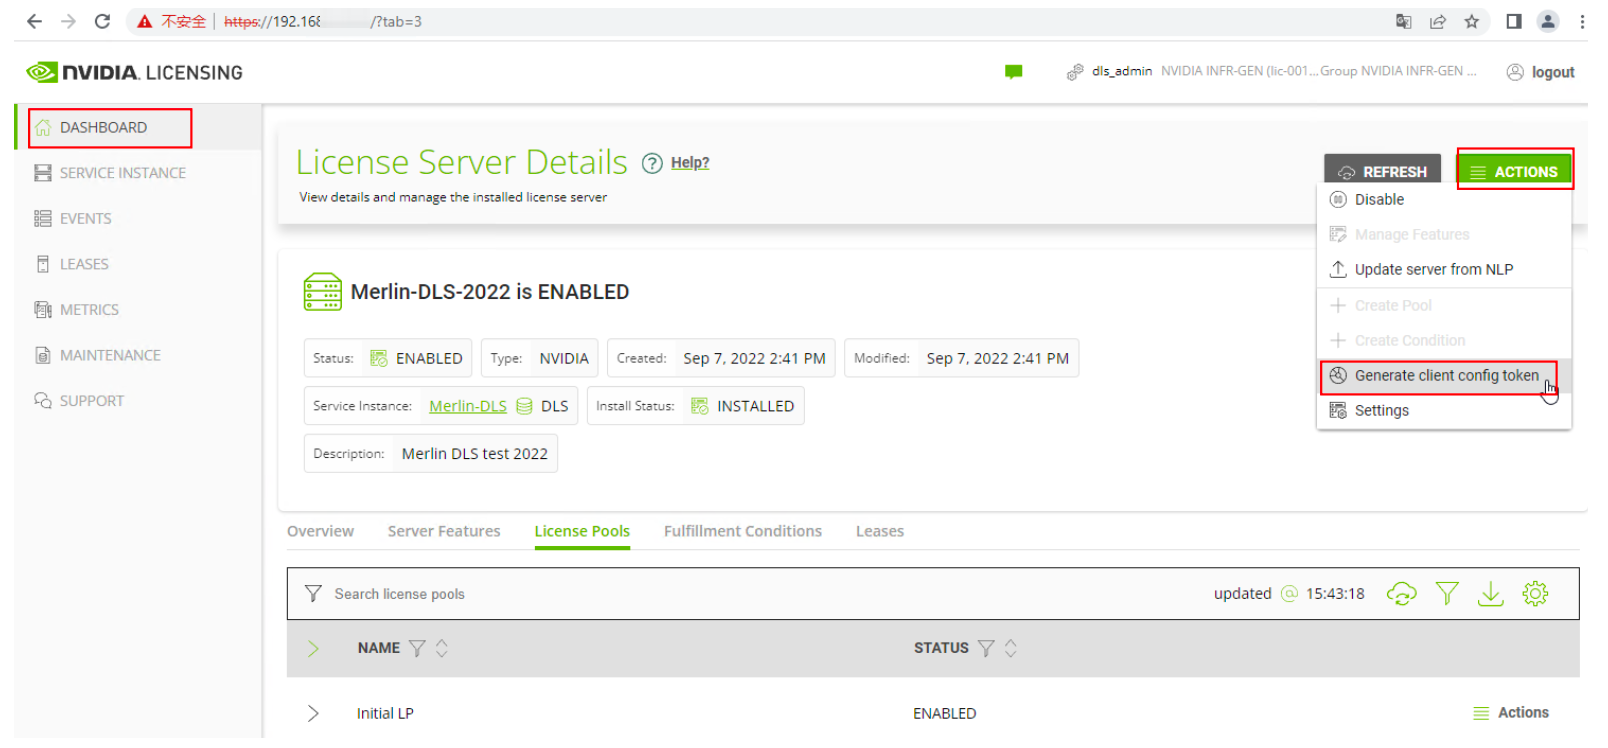
-
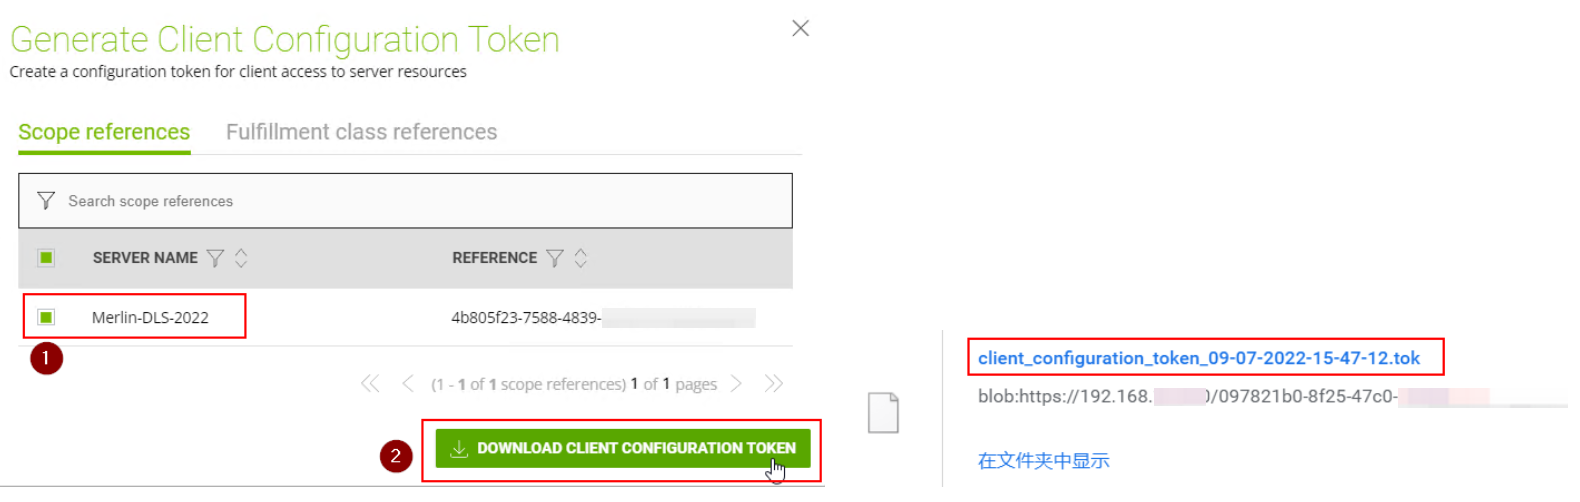
- Transfer the downloaded token file to the GPU instance. To upload data, refer to Overview of local data upload.
Step 3: Install GRID driver
Windows
tip
- This operation applies to Windows instances with the GPU driver not installed.
- The following public images with preinstalled GPU drivers do not currently support installing the GRID driver.
- Windows Server 2019 Datacenter Edition 64-bit Chinese (GPU)
- Windows Server 2016 Datacenter Edition 64-bit Chinese (GPU)
- Install the obtained GRID driver.
- Double-click the installation program, and in the prompted dialog box, click the "OK" button. During installation, the program is automatically decompressed.
- After extraction is complete, in the pop-up "NVIDIA Installer" dialog box, click the "Agree and Continue (A)" button.
- Keep the default installation options, and click the "Next (N)" button.
- After installation is complete, click the "Close" button.
- Check whether the GRID driver is successfully installed.
- Click the "Start" button. In the "Recently Added" section, if "NVIDIA RTX Desktop Manager" and "NVIDIA Corporation" are displayed, the installation succeeds.
- Configure and activate the license service.
- Copy the obtained .tok file into the following directory.
- C:\Program Files\NVIDIA Corporation\vGPU Licensing\ClientConfigToken
- Set the value of FeatureType to 2.
- Right-click "Start > Run", enter "regedit", and click the "OK" button to open the Registry Editor.
- Locate Computer\HKEY_LOCAL_MACHINE\SOFTWARE\NVIDIA Corporation\Global\GridLicensing or Computer\HKEY_LOCAL_MACHINE\SYSTEM\CurrentControlSet\Services\nvlddmkm\Global\GridLicensing.
- Create a value item.
- Select GridLicensing, and then choose "Edit > New > DWORD (32-bit) Value (D)" in the upper left corner.
- Select the value item, click the "Edit > Modify" button in the upper left corner, and modify the value name to FeatureType and the value data to 2.
- Restart the NvDisplayContainer service.
- Right-click "Start > Search" and enter "Services". In the pop-up "Services" dialog box, right-click "NvDisplayContainer" and select "Restart (E)".
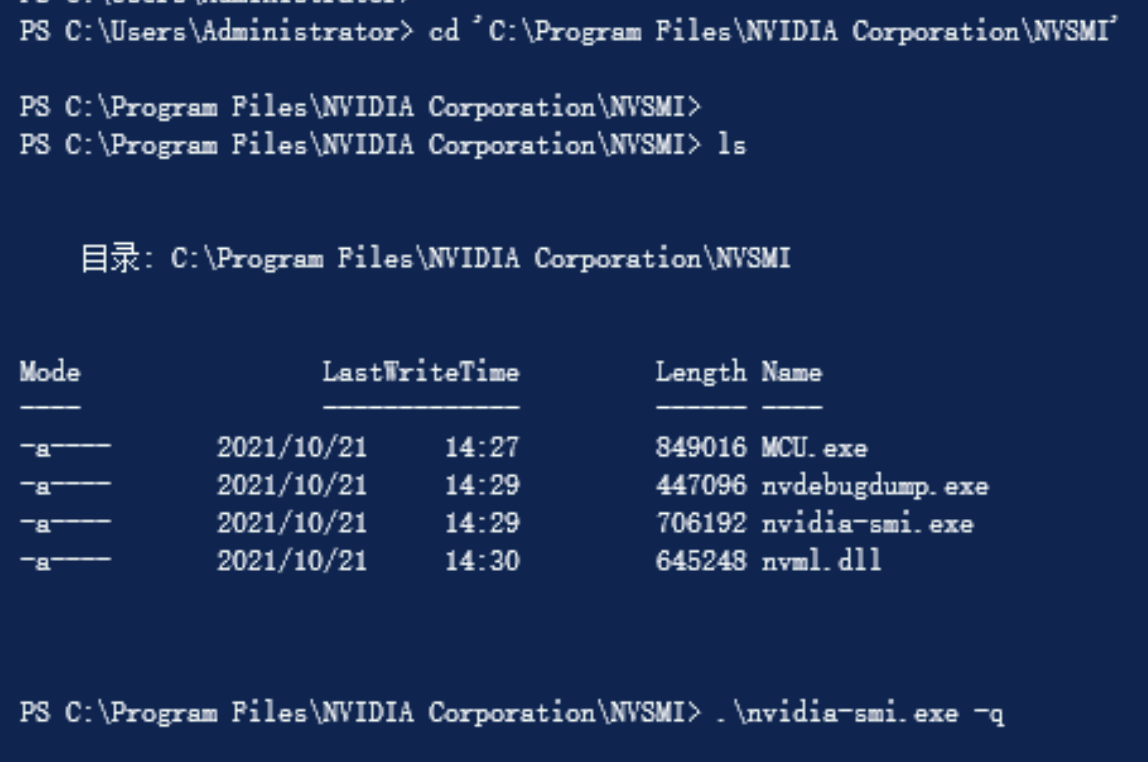
- View license status.
- C:\Program Files\NVIDIA Corporation\NVSMI\nvidia-smi.exe -q
-
-

Linux
- Install the obtained GRID driver.
- Execute the following commands to install the GRID driver.
- chmod +x NVIDIA-Linux-x86_64-470.82.01-grid.run./NVIDIA-Linux-x86_64-470.82.01-grid.run
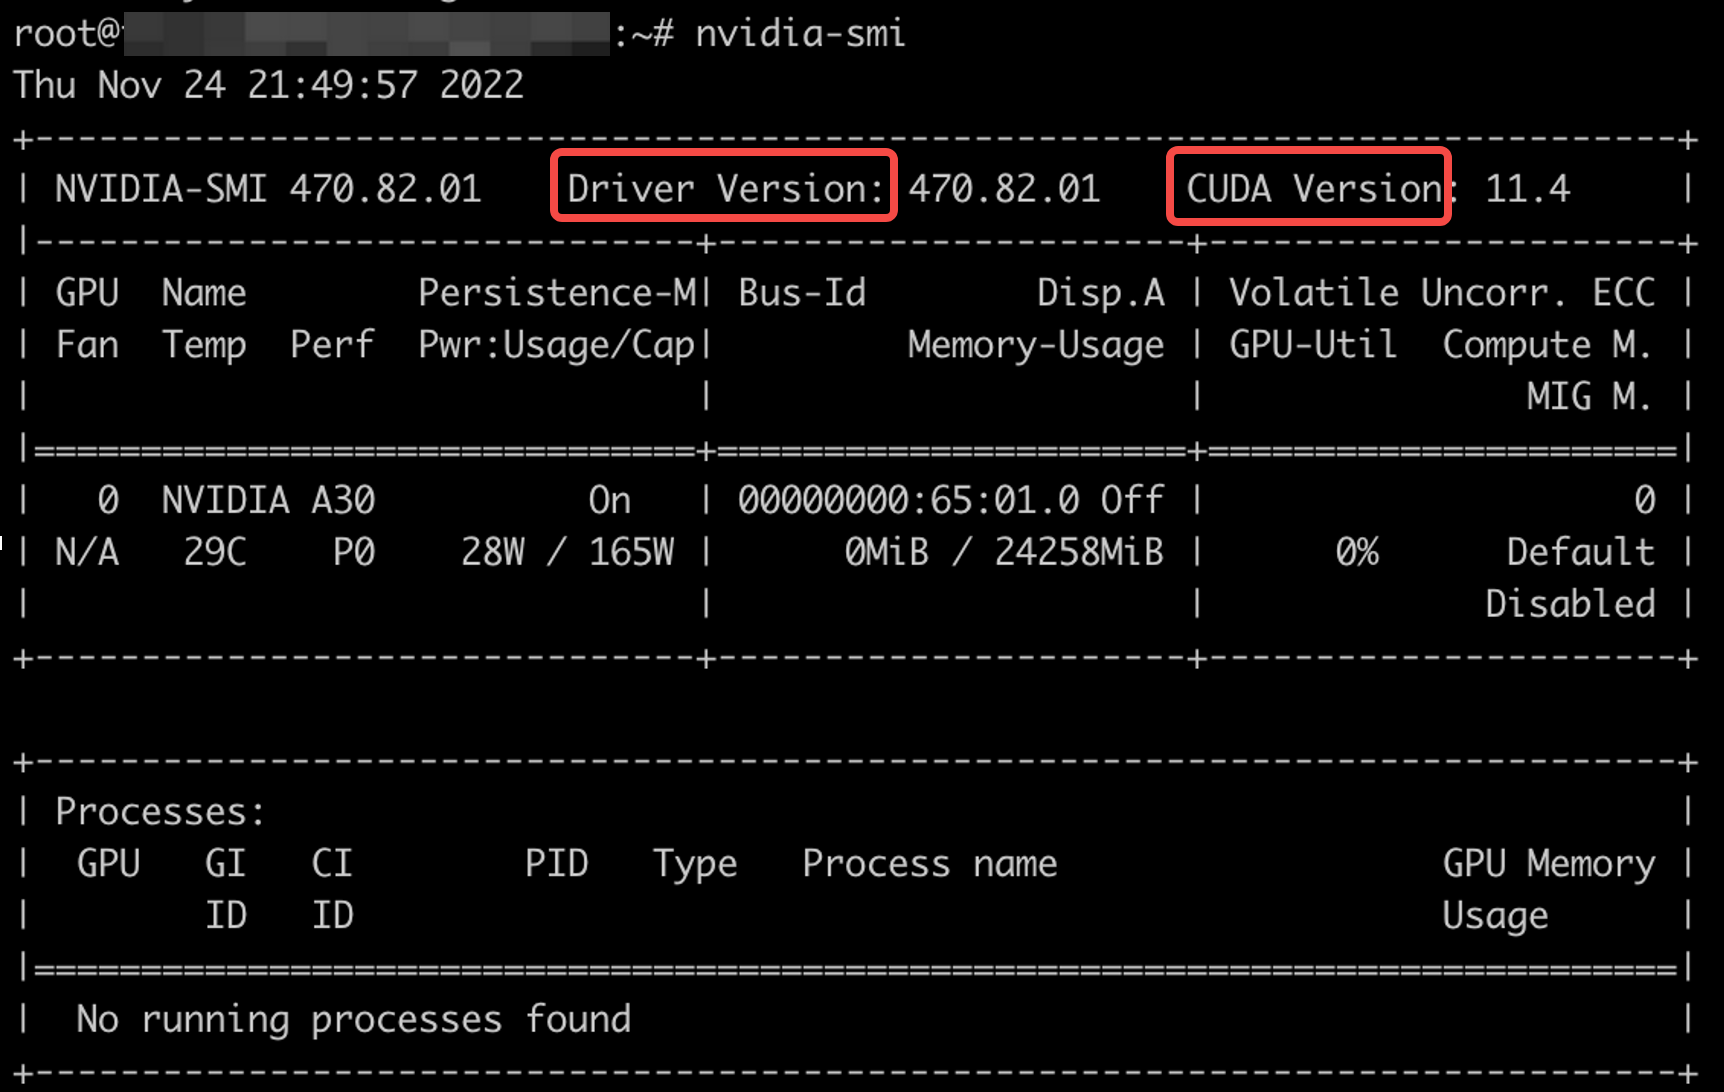
- Execute the nvidia-smi command to check whether the GRID driver is successfully installed.
- If the following output is returned, the installation succeeds.
- Driver Version indicates the current GRID driver version, and CUDA Version indicates the maximum supported version of the GRID driver.
-
- Configure and activate the license service.
- Execute the cd /etc/nvidia command to switch to the /etc/nvidia directory.
- Execute the following command to create the gridd.conf file.
- cp gridd.conf.template gridd.conf
- Execute the vim gridd.conf command to open the gridd.conf file, and press i to enter edit mode.
- Set the value of FeatureType to 2, and keep other configurations as default.
- Press the Esc key to exit edit mode, enter :wq, and then press Enter to save and exit the file.
- Execute the following command to copy the obtained .tok file to the /etc/nvidia/ClientConfigToken directory.
- cp <.tok file path> /etc/nvidia/ClientConfigToken/
- Execute the following command to restart the nvidia-gridd service.
- systemctl restart nvidia-gridd.service
- View license status.
- Method 1: Execute the nvidia-smi -q command. If the following output is displayed, license activation is successful.
-

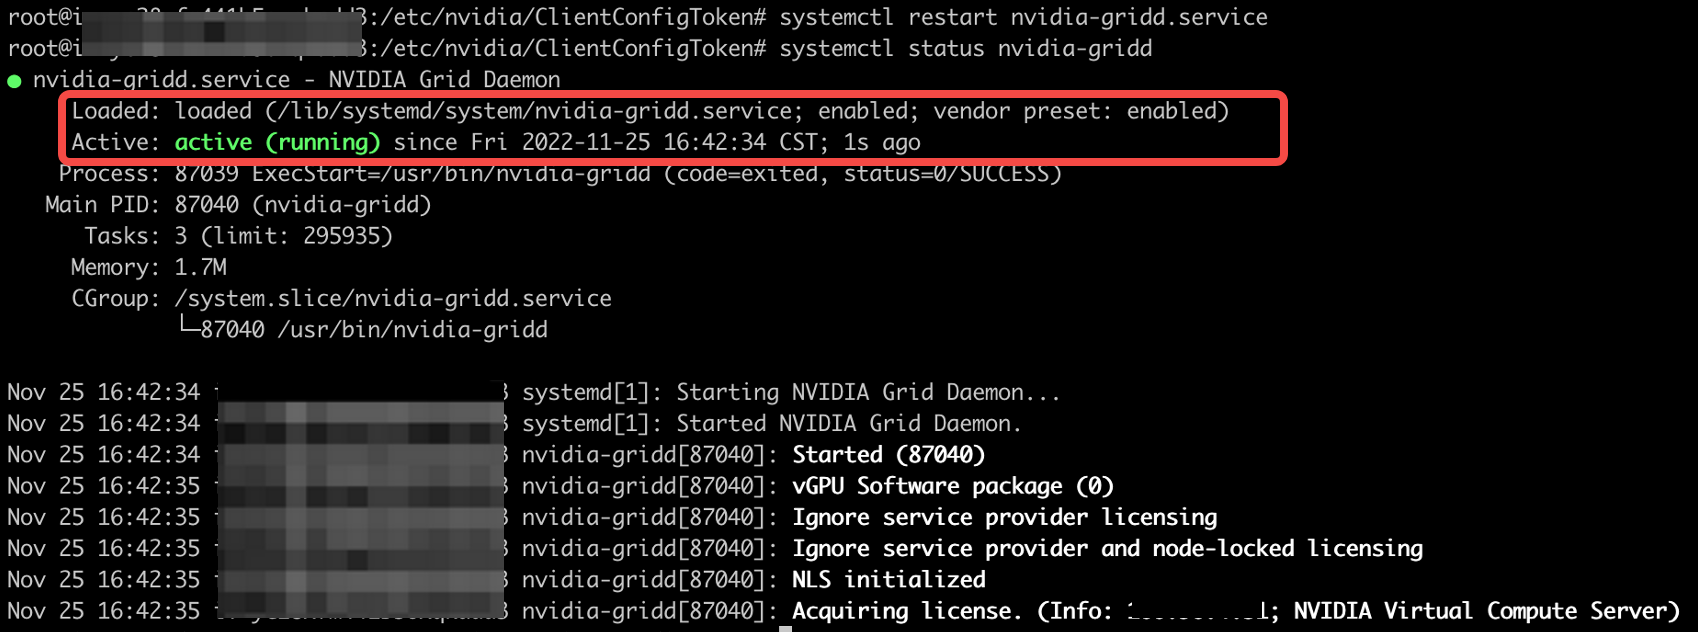
- Method 2: Execute the systemctl status nvidia-gridd.service command. If the following output is displayed, license activation is successful.
-
Last updated: 2025.12.03 17:23:12
All rights reserved © Beijing Volcano Engine Technology Co., Ltd2024
