Transit Router
Transit Router


Document

- Documentation
 Transit RouterUser GuideTR instancesIntra-region attachmentCreating a VPC attachment
 Copy page
 Download PDF
Intra-region attachment
Creating a VPC attachment
Copy pageDownload PDFCreating a VPC attachment
Scenarios
Establish a connection between a Virtual Private Cloud (VPC) and a Transit Router (TR), enabling intercommunication between VPCs' and TRs' private networks.
Prerequisites
- Ensure you have created a TR instance. For procedure, see Creating a Transit Router instance.
- Ensure your VPC to be connected contains at least one subnet and one available IP address in the required availability zone.
- Before creating a cross-account intra-region network instance attachment, ensure you have accepted a sharing invitation. The target TR instance is not suspended due to overdue payment.
- If the VPC to be connected requires IPv6 communication via the TR, ensure that IPv6 is enabled on the VPC instance and that the IPv6 feature is activated for the TR.
tip
The TR IPv6 feature is in the beta stage. If you need a trial, please contact your account manager.
Instructions
- By default, a single TR instance supports a maximum of 200 VPC attachments. If this quota is insufficient, you can request an increase through the Quota Center, up to an absolute upper limit of 1,000 attachments.
- You can attach the same VPC to five TR instances concurrently.
- After the TR forwards traffic to a VPC, the VPC's routing subsystem performs a second route lookup. This lookup queries the route table of the specific subnet where the attachment point resides. The subsystem then applies the Longest Prefix Match (LPM) rule to select the most specific route from that subnet's route table.
Precautions
- Enabling path consistent mode may change the availability zone attachment point selected when forwarding traffic to the VPC, which could affect the traffic. Proceed with caution.
- Enabling route learning at the VPC CIDR granularity will forward traffic belonging to the VPC CIDR block but not to any subnet within that VPC to the TR, causing changes in traffic forwarding paths. Carefully assess and decide.
Procedure
- Log in to the Transit Router console.
- Click the name of the target TR instance.
- In the section below Basic information, select the Intra-region attachment tab.
- Click Create attachment, and complete the basic configuration based on the table below.
- ParameterDescriptionExampleBasic informationTRDefaults to the selected TR instance, requiring no manual configuration.tr01RegionDefaults to the same region as the TR instance. No manual configuration required.China (Guangzhou)Fee payerDefault to the same fee payer as the TR instance. No manual configuration required. This parameter is displayed only when the TR instance is shared.Network instance accountNameThe name for the network instance attachment to be created.attach-vpc01Network instanceNetwork instance typeSelect the type of network instance. This example only demonstrates configuration parameters for VPC attachments.VPCVPCSelect the VPC instance to be attached based on the project.vpc01IPv6Specify whether to enable IPv6. If you need to achieve IPv6 communication between VPCs through a TR, enable IPv6.UncheckedAttachment point configurationAvailability Zone and SubnetSelect the availability zone for the attachment point and specify the subnet. The subnet is used to assign a private IP address to the attachment point (i.e., the network interface).If traffic originating from VPC Availability Zone X cannot be matched to a corresponding zone upon arrival at the TR, it must be forwarded via the default availability zone.For example, if the attachment points of a VPC attachment are configured in Availability Zone A (designated as default) and Availability Zone B, traffic from VPC Availability Zone A is forwarded via TR Availability Zone A; traffic from VPC Availability Zone B is forwarded via TR Availability Zone B; and traffic from VPC Availability Zone C is forwarded via the default availability zone (i.e., Availability Zone A).tip
- We recommend configuring attachment points in multiple availability zones for higher availability.
- After enabling IPv6, all selected subnets must have IPv6 CIDR blocks.
Availability Zone A, subnet01Specify whether to enable path consistent mode.After enabling, TR will use the same availability zone attachment point to forward both the request and response traffic when routing to this VPC attachment. For example, traffic from vpc01 to vpc02 is forwarded by the transit router to vpc03 for security protection. The specific traffic path is shown in the figure below.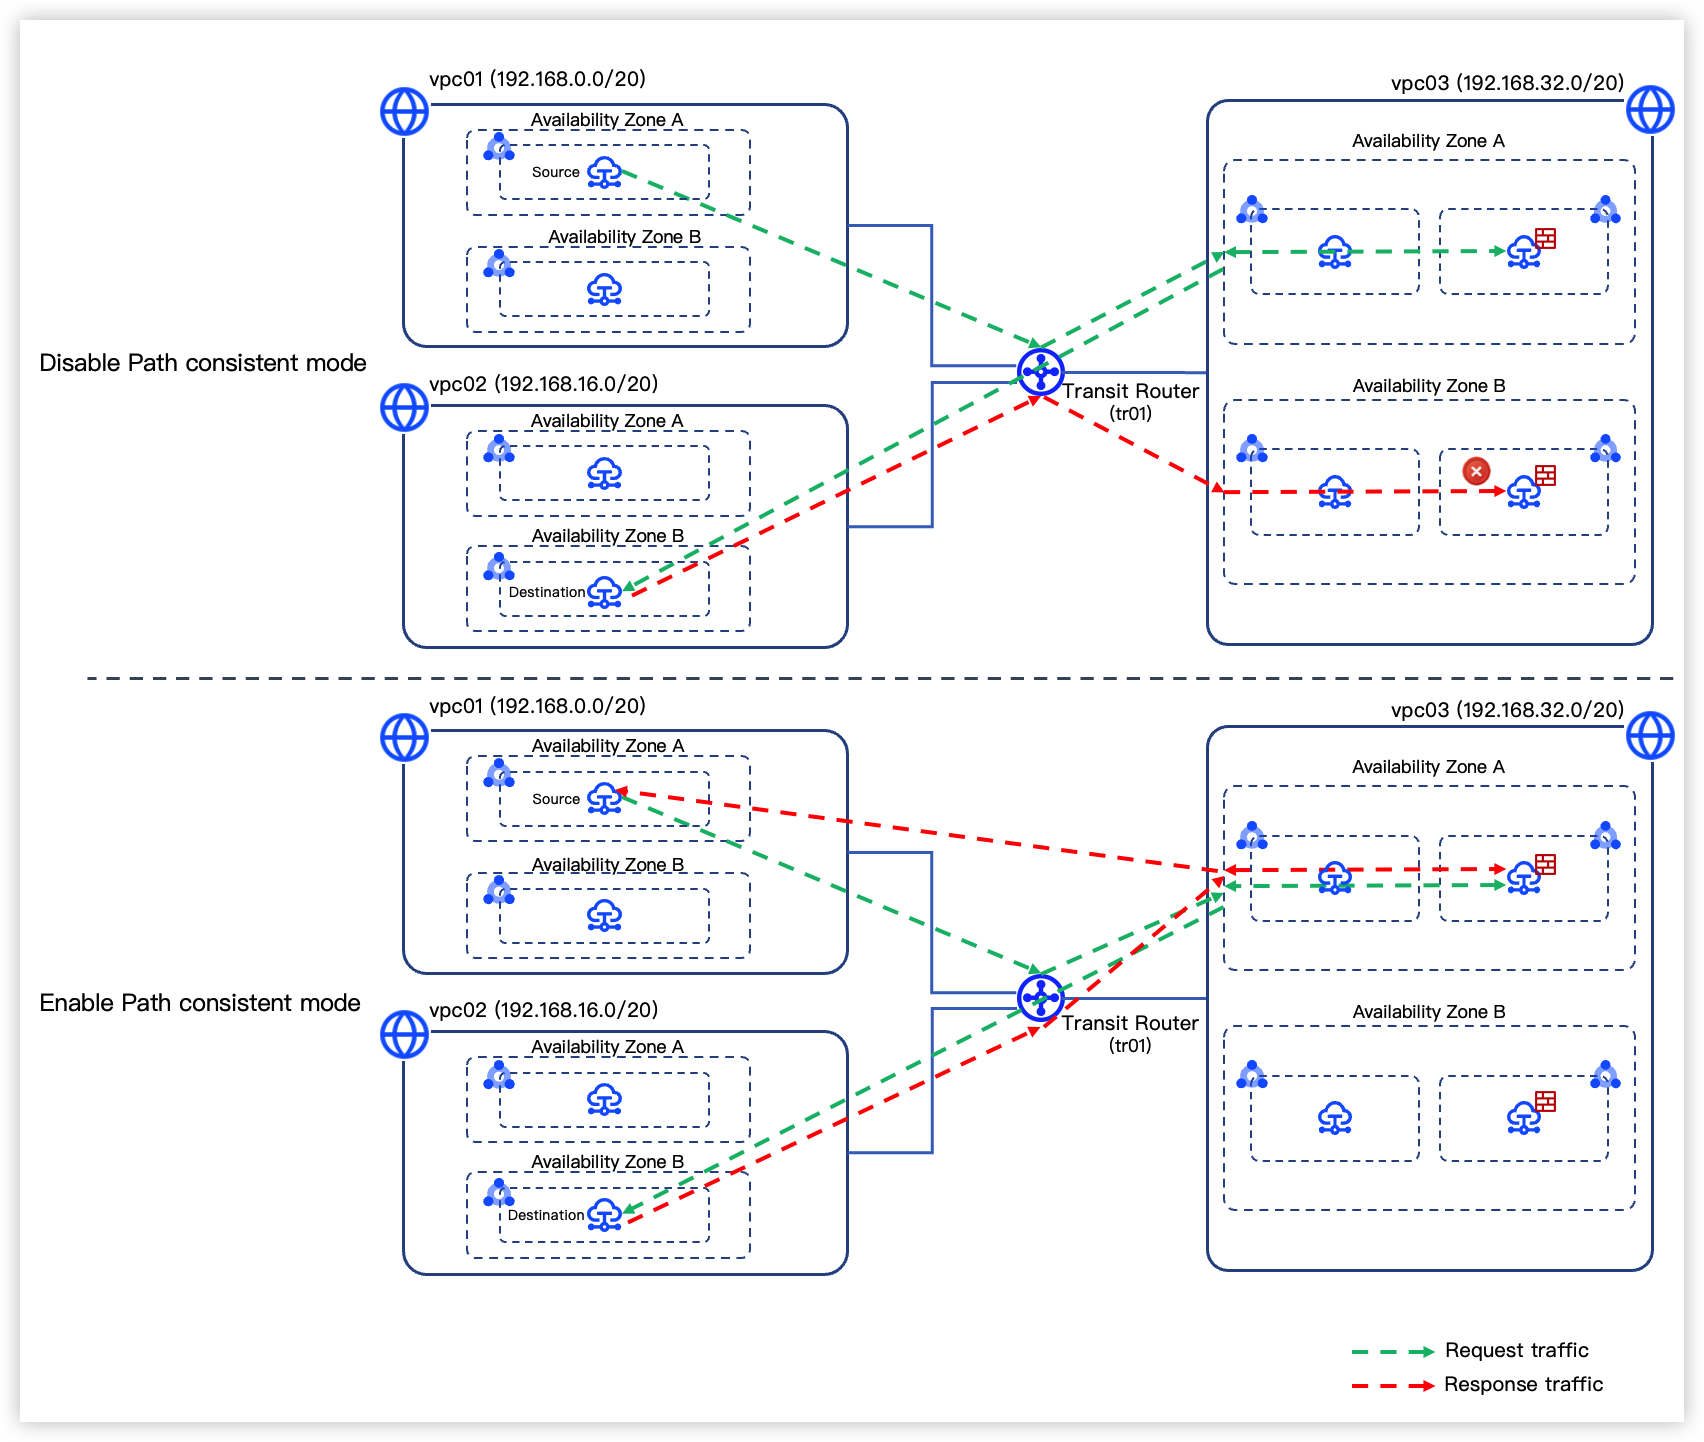
- Complete the route configuration and advanced options based on the table below.
-
- Click Buy now to complete the action.
Related documentation
Last updated: 2026.09.01 11:37:12
All rights reserved © Beijing Volcano Engine Technology Co., Ltd2024
