Elastic Compute Service
Elastic Compute Service


Document

- Documentation
 Elastic Compute ServiceElastic Compute ServiceUser GuideInstancesBuying ECS instancesPurchasing an instance by following the wizard
 Copy page
 Download PDF
Buying ECS instances
Purchasing an instance by following the wizard
Copy pageDownload PDFPurchasing an instance by following the wizard
Scenarios
If you need to purchase one or multiple ECS instances, this topic is for your reference.
Procedure
- Log in to the ECS console.
- In the left-side navigation pane, select "Instances & Images > Instances".
- In the top menu bar, select the region and project.
tip
After you select a project, ECS instances that you create can be associated only with the selected project. If you select "All Resources", ECS instances that you create can be associated with any project under the current account.
- Select "Create instance > Custom purchase" to start purchasing an ECS instance.
- Then, you can follow the page wizard to complete the Basic configuration, Network configuration, and Custom configuration in sequence. The configuration description below is for your reference.
- After you configure parameters, click "Next" to go to the Confirm page. On this page, confirm the instance configuration and enter the purchase information.
- Quantity: the number of ECS instances to be purchased this time.
- Purchase time and Automatic renewal (only for instances with the "Subscription" billing method): Select a subscription duration for the subscription-based instance, and then set whether to "Enable automatic renewal". Once you enable automatic renewal, the system automatically deducts the renewal fee before the instance expires.
- Agreement: follow the console instructions to review and confirm the legal agreements.
- Configuration fee: Hover over the question mark next to the configuration fee at the bottom of the page. Then, you can view cost details and discount amounts, such as fees for instance type, system volume, data volume, and EIP.
- (Optional) If you need to save the selected configuration as a launch template, click the "Save as Template" button in the upper right corner.
- Select to save the configuration as "Template" or "Version". If you need to save it as the template, specify the template name. If you need to save it as the latest version of an existing template, select the name of that existing template.
- Click the "Save" button to complete the operation.
- If you need to continue instance creation, click "Return to Create Instances" to go back to the Confirm page.
- If you need to view the newly created template or version, click "View new template/version" to go to the "Launch Templates" page.
- After you verify that the information is correct, click "Buy now" to navigate to the submission page. Then, you can check whether the instance is created.
- Click "Go to the console" to view the ECS instance on the "Instances" page.
Configuration item description
Basic information
Parameter | Description | Sample value | Screenshot |
Basic information | | | 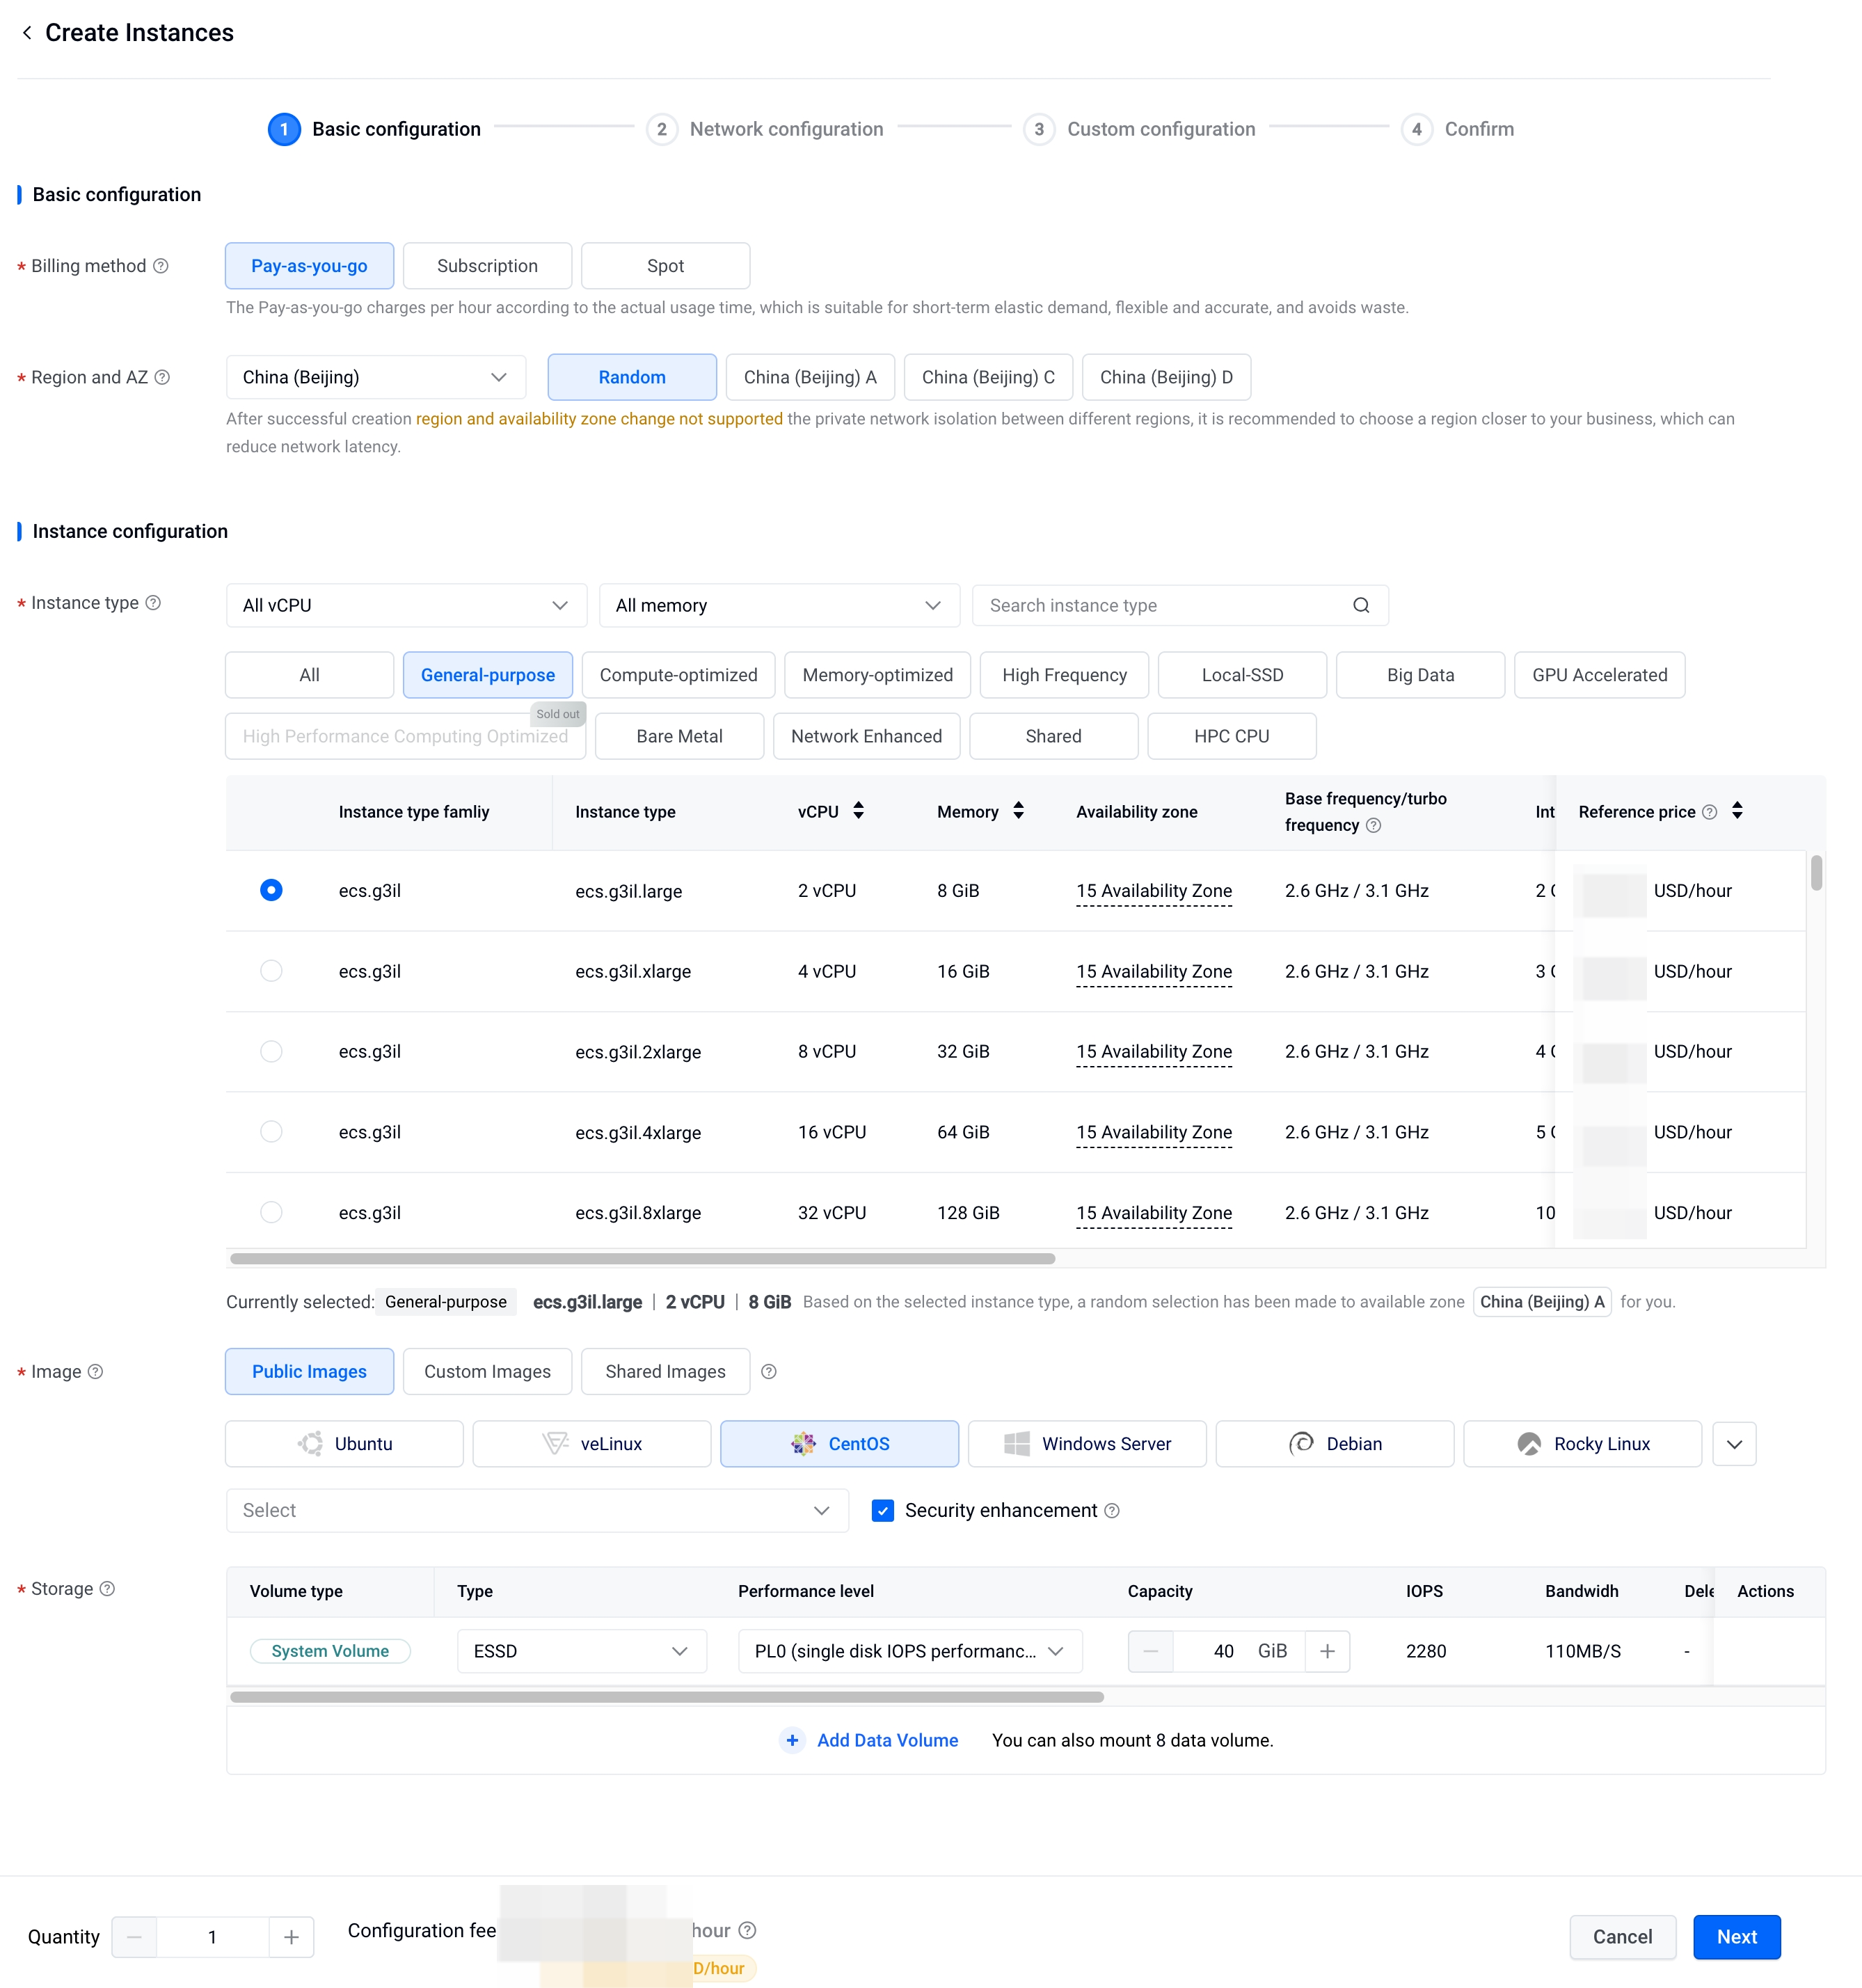 |
Billing method |
tip Besides the above methods, the platform supports other billing methods for different business scenarios. After learning the billing logic of each billing method, you can select the instance billing method based on your needs. | Pay-as-you-go | |
Region and AZ |
tip
| China (Beijing) B | |
Instance configuration | | | |
Instance type | ECS instances of different types offer different network and storage rate limiting capabilities. You can choose an instance type based on your business requirements.
| General-purpose g3i | |
Enable Hyper-Threading | If you set instance type to "HPC CPU", enable or disable hyper-threading based on your needs (disabled by default). Hyper-Threading (HT) technology allows two threads to run concurrently on each physical CPU core. A thread can be considered as a vCPU, meaning one physical core contains two vCPUs and can handle different software threads.
tip This feature is in Beta. If you need a trial, please contact your account manager. | - | |
HPC cluster | If the instance type is HPC-related, you also need to select an HPC Cluster. An HPC cluster is used to logically isolate HPC-optimized instances. If no HPC cluster is available, you can create an HPC cluster. | - | |
Image | Images provide operating systems and essential application data for ECS instances. You can choose different images based on different regions and instance types. You can also select an image based on the image platform and image version.
tip
| CentOS Stream 9 | |
| Acknowledgment: Certain instance types require the image you select to have the Virtio 1.1 driver installed. Please refer to Installing the Virtio driver to understand the relevant requirements, and install the driver for your selected custom or shared image as instructed. | - | |
| Install cloud assistant agent on startup: Cloud assistant is a native tool used for automated O&M. With cloud assistant agent, you can perform batch operation commands on ECS instances. You do not need to input passwords, log in, or use a jump server. tip Currently, this feature is only available for instances created from Linux-based public images. Image versions earlier than CentOS 6.9 do not support this feature. | - | |
| Security enhancement: This feature is free of charge. You can select whether to enable security enhancement for the image. Security enhancement provides host security services such as system vulnerability scanning and unauthorized login alerting. You can manage these services through the Security Center console for the security protection of your host. | - | |
Storage | A system volume is used to store the operating system and is created with the ECS instance. The system volume and the ECS instance have the same lifecycle. For details on available volume types and specifications, refer to Volume specifications. | ESSD, 40 GiB | |
| Data volumes can be used to store application data. The number of data volumes supported by one ECS instance is determined by the instance type. For more information, refer to Instance type and specification. For more information on the available volume types and specifications, refer to Volume specifications. When creating an ECS instance, you can buy and mount data volumes for it. You can also attach volumes for a created ECS instance. tip After creating an instance, you also need to complete initialization of the data volume, such as formatting, partitioning, and creating a file system before you can use the volume. For specific actions, refer to Overview.
| ESSD, 20 GiB | |
| Performance burst enables volumes to exceed their configured baseline performance (IOPS or throughput) for a short period to handle sudden high-load spikes. This feature is ideal for I/O scenarios that are generally stable over long periods but experience short-term extreme spikes. This helps you avoid continuously provisioning high-specification volumes for short-term peaks, thereby effectively reducing storage costs. Description
| -- | |
Network configuration
Parameter | Description | Sample value | Screenshot |
Network | | | 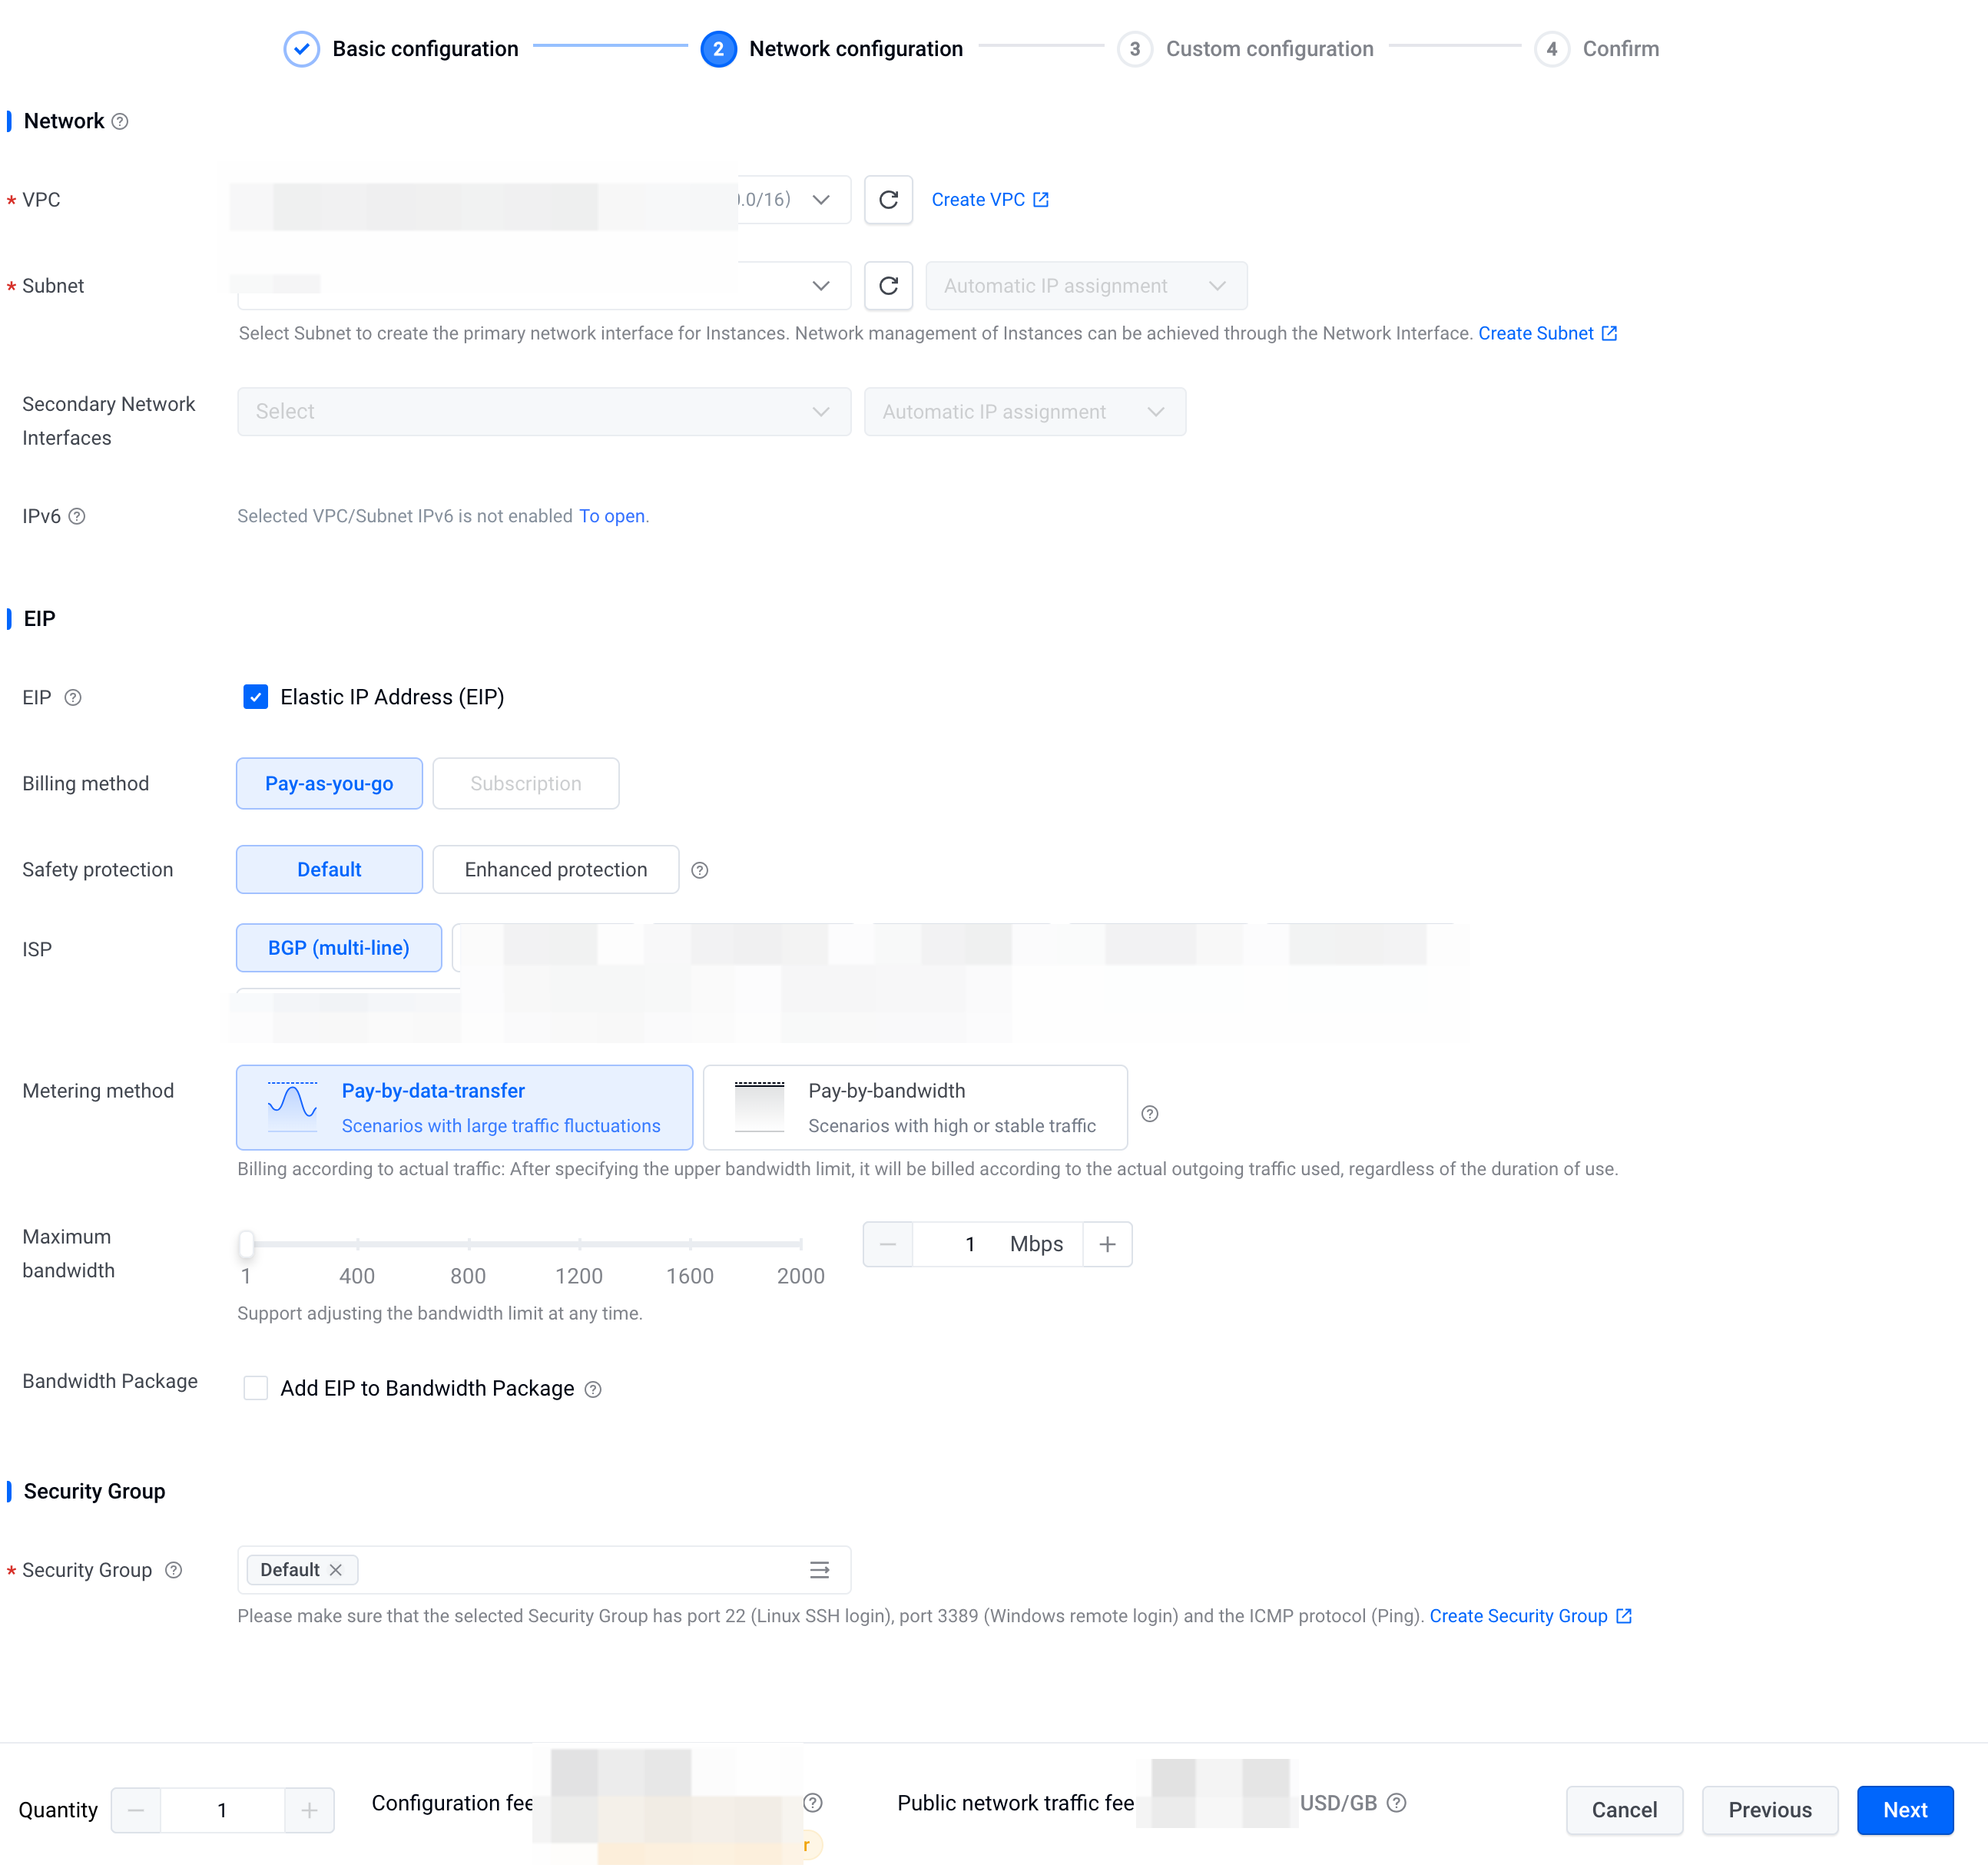 |
Virtual Private Cloud | A VPC builds an isolated virtual network environment for cloud resources. Networks of different VPCs are isolated from each other.
| vpc01 | |
Subnet | Select a subnet to assign a private IP address to the primary network interface of an instance. Therefore, you can manage the instance network through this network interface.
| subnet01 | |
Security group | A security group is used to control the outbound and inbound traffic at the ECS network interface. You must associate an ECS instance with a security group. For details, refer to Security group overview.
| Default | |
Secondary network interface | You need to select a subnet to assign a secondary network interface to the ECS instance. After you create the instance, enable the secondary network interface, then configure routes for the secondary network interface. For detailed actions, refer to Configuring a network interface and a private IP address. | - | |
Jumbo frames | After the "Enable jumbo frames" feature is selected, with the same data volume, jumbo frames transmit larger data blocks per operation than standard Ethernet frames. This reduces the frequency of packet fragmentation and reassembly by the CPU and lowers the CPU processing load. Additionally, jumbo frames generate fewer packets. This reduces network protocol overhead, queuing delays, and switching/forwarding times, which thereby shortens the overall network processing time. tip Only certain instance types support the jumbo frame feature. For details, refer to instance types supporting jumbo frames. | - | |
IPv6 | After you enable "Free allocation of IPv6 addresses", the system automatically assigns an IPv6 address to the primary network interface of the instance. By default, only private network communication is available. To access the IPv6 public network communication, refer to Configuring an IPv6 gateway to enable IPv6 access to Internet.
| - | |
EIP | | | |
Select Elastic IP (EIP) | When you create an ECS instance, an EIP is automatically assigned by default. The EIP is associated with the primary private IP of the primary network interface. This enables the instance to be accessed via Internet. After creating the instance, you can also associate an EIP with the instance based on your needs. If an ECS instance can not connect to the Internet after you associate an EIP to the instance, refer to Why can't an ECS instance associated with an EIP connect to the Internet? | Select Elastic IP (EIP) | |
Billing method | EIPs support pay-as-you-go and subscription billing methods. For more information, refer to Billing overview. tip If the billing method of the ECS instance is pay-as-you-go, you can not select the subscription billing method for the EIP on this page. If you need to associate a subscription-based EIP with a pay-as-you-go instance, manually associate an EIP after you create the instance. | Pay-as-you-go | |
Security protection | After choosing "Pay-as-you-go" as the billing method, you need to select a security protection mode for the EIP.
tip
| Enhanced protection | |
Security protection | If you choose the "Enhanced Protection", your instance will be secured with DDoS Native Protection (Enterprise Edition). | ddos-xx | |
ISP | BGP (Multi-ISP) is supported. | BGP (Multi-ISP) | |
Billing method | When the EIP billing method is "Pay-as-you-go", you need to specify the metering method for the EIP. You can choose Pay-by-bandwidth or Pay-by-data-transfer. | Pay-by-data-transfer | |
Bandwidth upper limit | Set the maximum bandwidth measured in Mbps for EIP. After creation, you can change the maximum bandwidth of EIP at any time. For the specific range, refer to Performance limits. tip Bandwidth is divided into inbound and outbound bandwidth. By default, outbound bandwidth is the same as the maximum bandwidth you set. The inbound bandwidth performs differently based on whether your maximum bandwidth is above 10 Mbps. For more details, refer to Regional bandwidth limitations. | 5Mbps | |
Add EIP to Bandwidth Package | You can choose to add the EIP to a Shared Bandwidth Package. This allows multiple EIPs to share one bandwidth, which can help you reduce usage costs of Internet bandwidth. After you add the EIP to the Shared Bandwidth Package, the original maximum bandwidth of the EIP is invalid. The EIP shares the bandwidth of the Bandwidth Package. The billing items of bandwidth fee and traffic fee then become invalid. You only need to pay the IP configuration fee. For more information, refer to What is Bandwidth Package. If you want to associate an EIP with a Shared Bandwidth Package, the following conditions must be met:
| - | |
Release settings | If you associate a pay-as-you-go EIP with the instance that is being created, you can enable "Release with instance" or not. If you enable the option, the EIP is released synchronously when the instance is deleted or unsubscribed. If not, the EIP is automatically retained. And you can associate the EIP with other instances.
| Released with instance | |
Custom configuration
Parameter | Description | Sample value | Screenshot |
Login method | | | 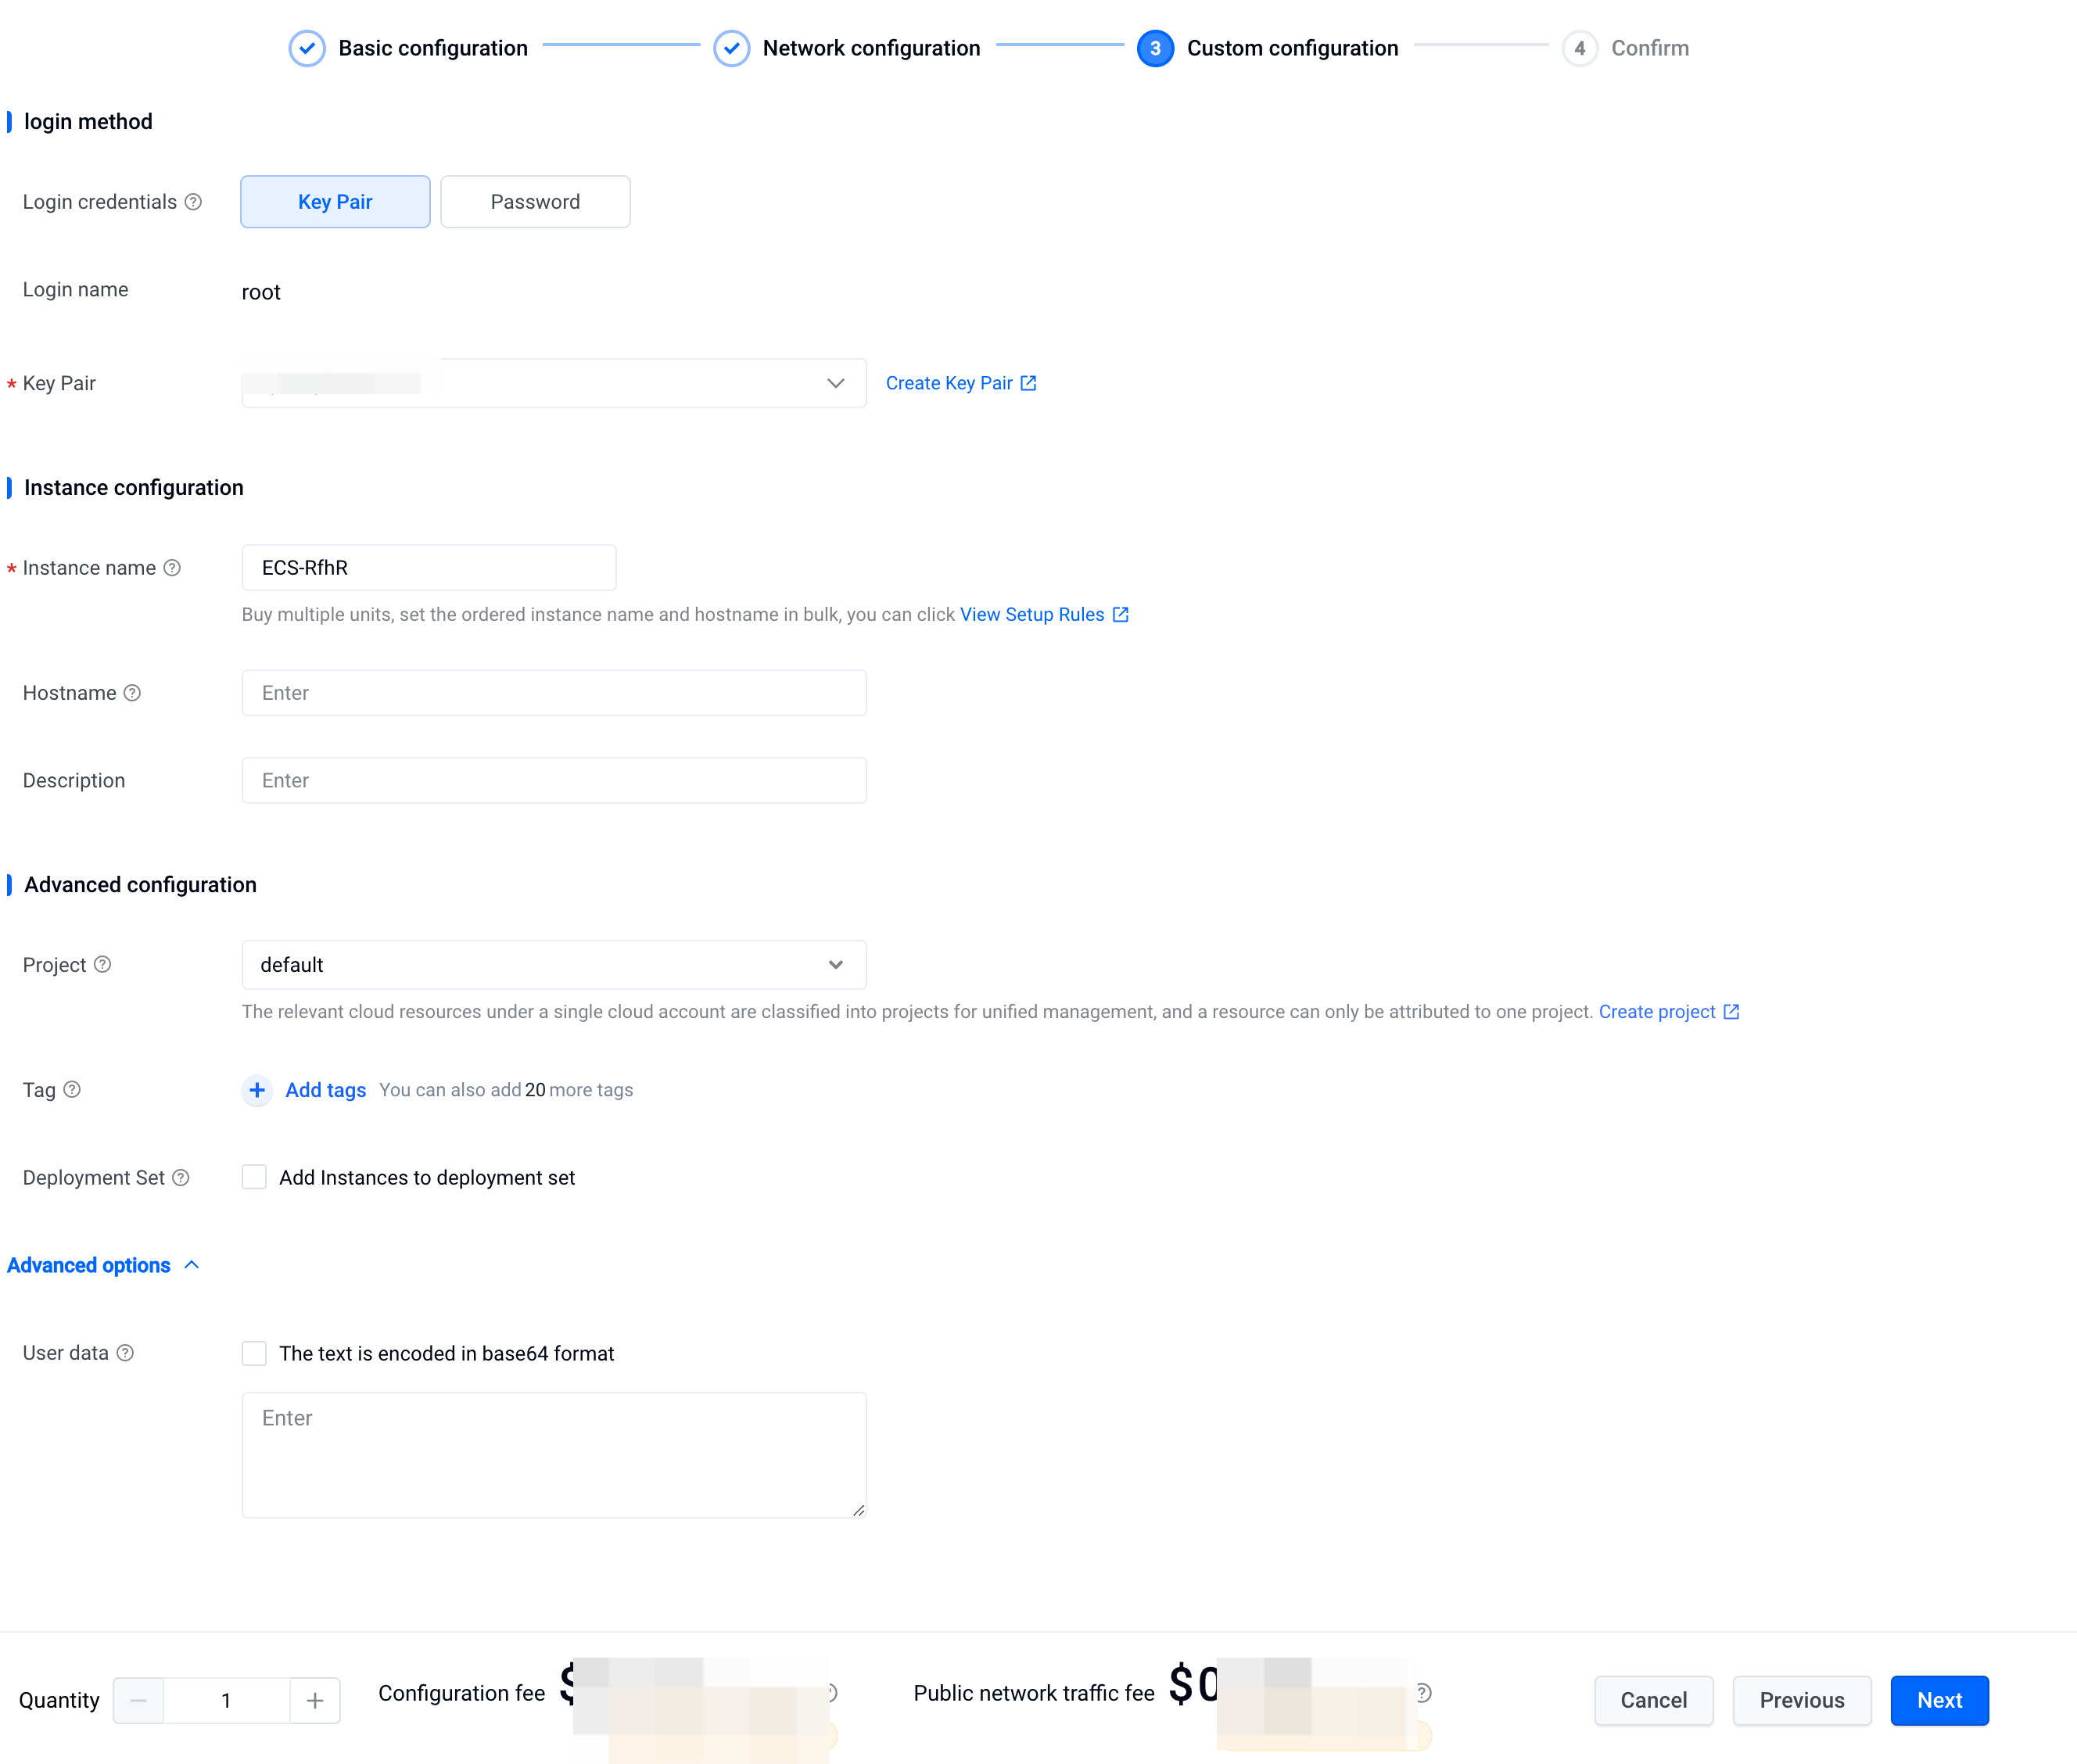 |
Login credentials | Login credentials that are used to log in to the ECS instance. "Password", "Key Pair", and "Keep image settings" are available for your option.
tip You cannot select "Key pair" for a Windows image.
tip
| Key Pair | |
Instance configuration | | | |
Instance name | The name of the ECS instance. By default, the system automatically generates instance names based on the product name. You can also change the name based on your needs. You can specify sequential hostnames for ECS instances that are created in a batch. For more information, refer to Batch configuring sequential instance names or hostnames. | ECS-u2kg | |
Host name | The internal computer name of the operating system. Each hostname identifies a computer on a network. We recommend that you specify a hostname for each ECS instance. If you do not specify a hostname, the system generates a name based on the ID of the ECS instance for you.
| - | |
Instance deletion protection | You can enable this feature to prevent the instance from being deleted by mistake. By default, this feature is disabled. After enabling this feature, you can not delete the instance through the console or API. Learn more | - | |
Advanced configuration | | | |
Associated project | A project is a collection of resources. You can add the new instance to a project and manage it centrally at the project level, which helps keep resources independent and maintain data security. For more information on projects, refer to Managing projects.
| default | |
Tag | A tag is a key-value pair used to identify cloud resources. Tags help you categorize cloud resources based on different dimensions, such as purpose, owner, or environment. This allows you to search and aggregate your cloud resources. Click "  Add tags" and select existing tags or enter new tags to associate tags with the instance. For more information, refer to Managing tags. Add tags" and select existing tags or enter new tags to associate tags with the instance. For more information, refer to Managing tags.If you associate an ECS instance with a tag, sub-resources created along with the ECS instance are also associated with this tag. Such resources include system and data volumes, primary network interface, and EIP associated with the primary network interface. If you associate an ECS instance with a tag after the instance is created, the tag will not be synchronized to related sub-resources. | Key1:Value1 | |
Deployment set | Deployment sets allow you to distribute instances across different physical servers. This ensures the underlying disaster recovery and high availability of your services. When creating an instance, you can check the "Add instances to deployment set" option and select a deployment set. This allows you add the instance to an existing deployment set. If no deployment sets are available, you can click "Create Deployment Set" option to create one. The region of the ECS instance should be the same as that of deployment set. For more information, refer to Deployment set management. | - | |
Advanced option | Set custom data for the instance. You can use instance custom data to make the system automatically configure the instance or pass in data when the instance starts up. If the custom data of the instance is encoded in Base64 format, select "The text is encoded in Base64 format". You can also enter custom data that are not encoded in Base64 format. After you upload custom data, the custom data is automatically encoded in Base64 format. For more information, refer to Configuring user data. | - | |
| Configure the metadata access mode. The metadata refers to the basic information of an ECS instance on the cloud platform. You can use metadata to configure or manage your instances.
tip
| Normal Mode and Security Hardening Mode | |
Subsequent operations
Related documents
FAQ
Last updated: 2026.07.03 11:18:47
All rights reserved © Beijing Volcano Engine Technology Co., Ltd2024
