Elastic Compute Service
Elastic Compute Service


Document

- Documentation
 Elastic Compute ServiceElastic Compute ServiceUser GuideElastic Block StorageExtending a volumeExtending a volume (Linux)
 Copy page
 Download PDF
Extending a volume
Extending a volume (Linux)
Copy pageDownload PDFExtending a volume (Linux)
Scenarios
Suppose you have an ECS-1 Linux instance with a 40 GiB system volume and a 70 GiB data volume. The data volume has already been partitioned, formatted, and mounted.
The process for extending a system volume is similar to that for a data volume. Therefore, this topic uses a data volume as an example.
Notes
- After you extend a volume, it enters an "Extending" status. The extension takes effect once the volume exits this status.
- For CentOS 6.9, after the initial creation and automatic expansion, a system restart is required. Otherwise, the expanded capacity will not be recognized.
- An extension adds space at the end of a volume. However, if the volume has multiple partitions, only the last one can be extended. Earlier partitions can only be extended into reserved sectors. If no sectors are reserved, the partitions cannot be extended.
- To prevent data loss or damage due to accidental actions, we strongly recommend backing up your data beforehand.
Step 1: Extend a volume in the console
If you want to extend a volume while your ECS instance is "Stopped", first restart the instance. Then, run the mount command to remount the file systems on the volume.
Extending a single volume
From the Instances page
- Log in to the ECS console.
- In the left navigation pane, click "Instances".
- In the top menu bar, select the project and region where the instance resides.
- On the "Instances" page, click the instance you want to manage.
- Click the "Volumes" tab.
- Click "... > Extend volume" in the "Actions" column of the volume you want to manage.
- On the "Extend volume" page, verify the current configuration. Then, enter 70 GiB under "New capacity".
- Click "Extend volume".
- After the extension is complete, click "Go to the console to attach". On the "Extend volume" page, click "Return to the volume list". On the "Volumes" page, click the name of the volume to view its capacity in the "Overview" panel.
From the Volumes page
- Log in to the ECS console.
- In the left navigation pane, click "Volumes".
- In the top menu bar, select the project and region where the volume resides.
- On the "Volumes" page, click "... > Extend volume" in the "Actions" column of the volume you want to manage.
- On the "Extend volume" page, verify the current configuration. Then, enter 70 GiB under "New capacity".
- Click "Extend volume".
- After the extension is complete, click "Go to the console to attach". On the "Extend volume" page, click "Return to the volume list". On the "Volumes" page, click the name of the volume to view its capacity in the "Overview" panel.
Extending volumes in batches
From the "Volumes" page, you can extend multiple volumes at once. You can select multiple volumes across instances, availability zones, billing methods, volume types, and volume specifications.
warning
You can extend up to 50 volumes at once.
- Log in to the ECS console.
- In the left navigation pane, click "Volumes".
- In the top menu bar, select the project and region where the volume resides.
- On the "Volumes" page, select the volumes that you want to extend. Then, click "Extend volume" at the bottom of the page.
tip
Alternatively, navigate to the "Instances" page. Click the name of the instance for which you want to increase the storage capacity, and then click the "Volumes" tab. On this page, select the desired volumes and click "Extend volume". When extending multiple volumes from the "Instances" page, you can only extend volumes attached to that instance.
- On the "Extending volumes in batches" page, set the capacity for each volume separately in the "Target capacity" column, or set the same capacity for all volumes next to "Set extended capacity in batches".
- Once you have finished configuring, click "Extend volume".
- On the "Extending volumes in batches" page, click "Next step" and then click "Return to the volume list". On the "Volumes" page, click the name of the volume to view its capacity in the "Overview" panel.
tip
If your extension batch includes subscription volumes, pay for them by following the instructions after clicking "Extend volume".
Step 2: View information about volume partitions and file systems
- Run this command as the root user to get information about system and data volumes attached to the instance.
-
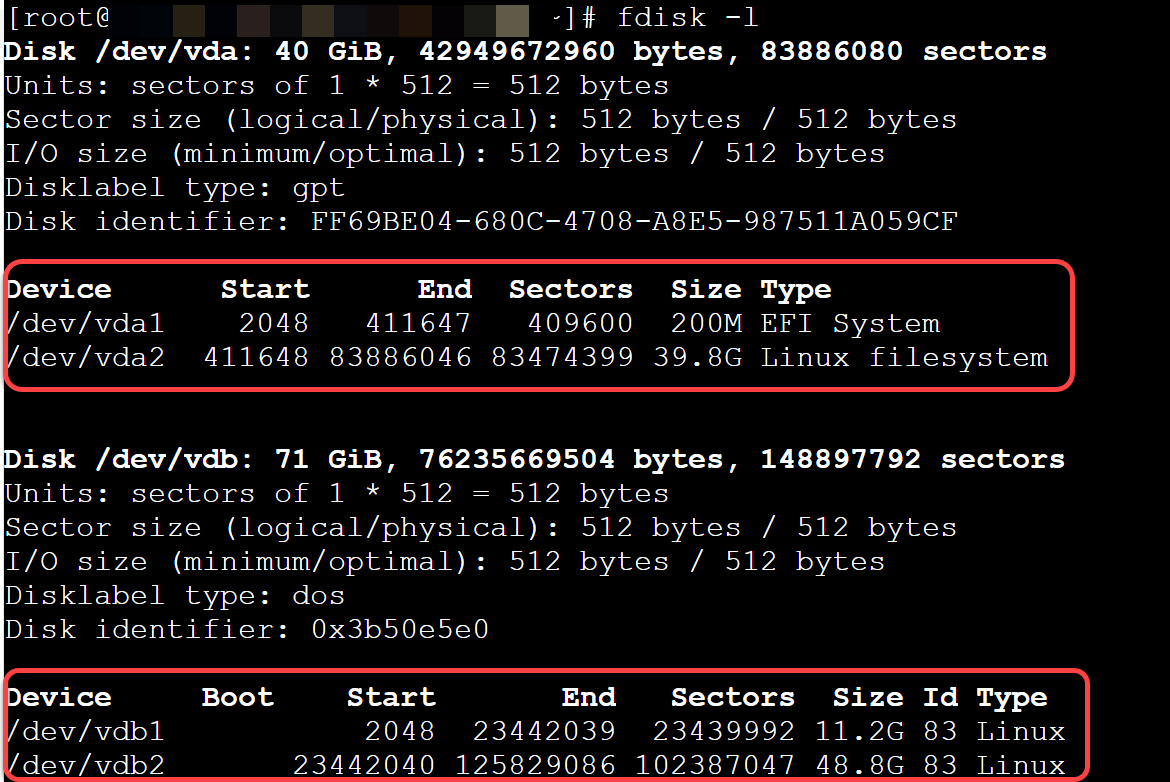
- You will see output similar to the following. The instance has two attached volumes: "/dev/vda" and "/dev/vdb".
- /dev/vda is a system volume, which contains two partitions: /dev/vda1 and /dev/vda2. Of these, /dev/vda1 is used for installing operating system drivers and other files and cannot be extended.
- /dev/vdb is a data volume, which contains two partitions: /dev/vdb1 and /dev/vdb2.
- Disklabel type is dos, meaning the partitioning scheme is MBR. If Disklabel type is gpt, then the partitioning scheme is GPT.
-
- Run this command to see the details of the file systems.
-
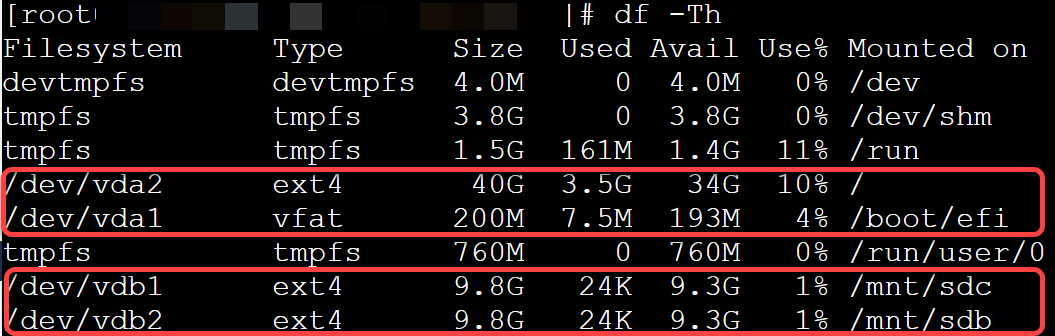
- You will see output similar to the following. You can find out where the file systems are mounted by looking at the Mounted on column.
Step 3: Extend volume partitions and file systems
- If the output in Step 2 indicates that the partitioning scheme is GPT, first run the yum install gdisk -y command, and then move on to the next steps. If the partitioning scheme is MBR, skip this step.
tip
The maximum size of an MBR partition is 2 TiB. To extend an MBR-formatted volume beyond 2 TiB, consider creating and attaching a new data volume. Then, format the new volume using GPT and copy your existing data to it. For more information, see Partitioning and formatting a volume (> 2 TiB).
- Install growpart using the appropriate command for your operating system.
- CentOS 7 or later:
-
- Debian 9 or later, Ubuntu 14 or later:
- Update the software source.
-
- Install cloud-guest-utils.
-
- Run this command to extend the vdb2 partition.
tip
Since no reserved sectors exist between the partitions vdb1 and vdb2, only the last partition, vdb2, can be extended at this time.
-
- LC_ALL=en_US.UTF-8: sets the character encoding to UTF-8.
- /dev/vdb: Volume name.
- 2: Partition number.
- There must be a space between /dev/vdb and 2.
- The output below indicates that the partition was successfully extended.
-

- Extend the file systems using the appropriate commands. The following example shows how to extend an ext4 file system.
- Use this command to extend an ext* file system (e.g., ext4). Replace /dev/vdb2 with the name of the partition to be extended.
-
- Use this command to extend an xfs file system. Replace /media/vdc with the mount point's name
-
- The output below indicates that the file system was successfully extended.
-

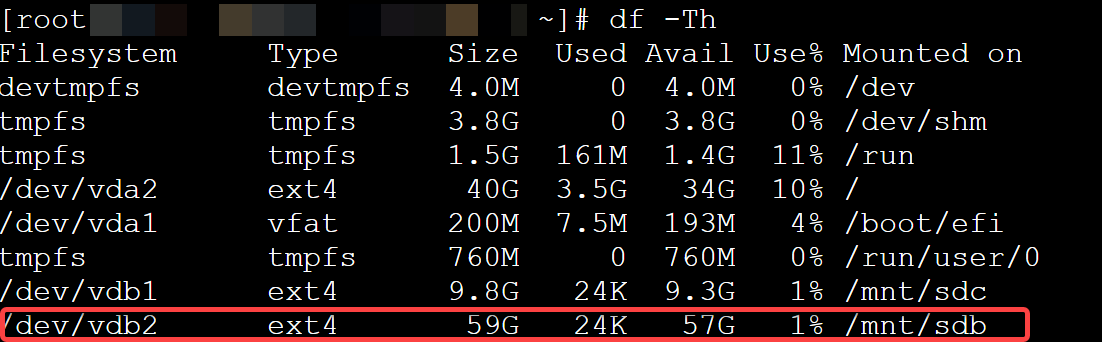
- Run this command to verify the extension result.
-
- The output below indicates that vdb2 was successfully extended.
-
FAQ
- What should I do if the growpart command returns the following error: failed [pt_update:1]pt_update /dev/vdb 5?
-
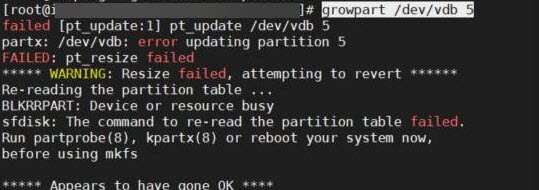
- To resolve this error, first run the partprobe command to reload the partition table information for all devices on the system. Then, run the growpart command again.
- Why can't I see the expanded capacity of the volume after running the df -Th command?
- If your operating system has a kernel version earlier than 3.6.0 (e.g., CentOS 6, Debian 7, or SUSE Linux Enterprise Server 11 SP4), you will need to reboot the system for the partition extension to work.
- Use the uname -a command to check the kernel version. If necessary, run the reboot command to restart the system.
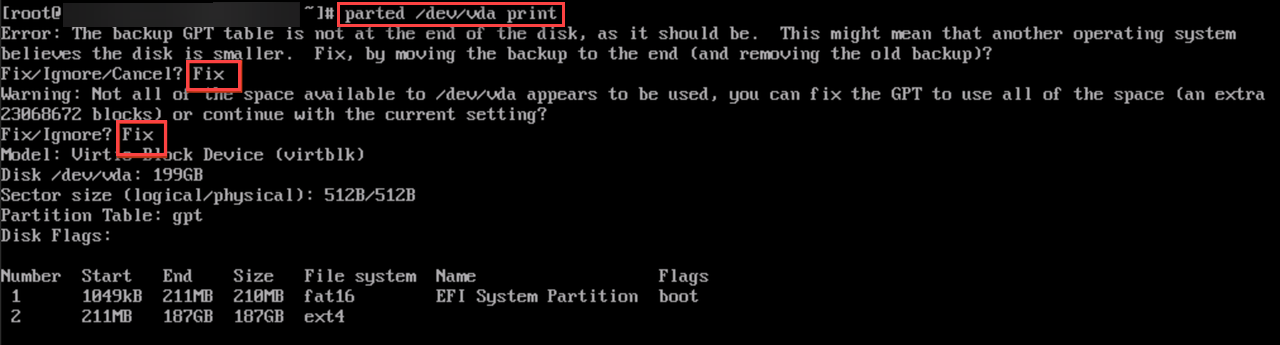
- After expanding the system volume on CentOS 7.X, the fdisk -l command shows that the number of partitions has changed from two to one. Why?
- GPT is used by default for partitioning when you extend a system volume. Due to compatibility issues between fdisk and GPT, the display may appear abnormal.
- To resolve this issue, run the parted <system volume name> print command (e.g., parted /dev/vda print) and then enter Fix twice when prompted.
-
Last updated: 2026.09.23 16:55:11
All rights reserved © Beijing Volcano Engine Technology Co., Ltd2024
