Elastic Compute Service
Elastic Compute Service


Document

- Documentation
 Elastic Compute ServiceElastic Compute ServiceBest PracticesSelf-service website creationBuilding environmentsSetting up an LNMP environment (CentOS 8)
 Copy page
 Download PDF
Building environments
Setting up an LNMP environment (CentOS 8)
Copy pageDownload PDFSetting up an LNMP environment (CentOS 8)
An LNMP environment refers to a web application platform built on a Linux system, consisting of Linux, Nginx, MySQL or MariaDB, and PHP. This topic describes how to deploy an LNMP environment on a CentOS 8.3 instance.
Software versions
- Operating system: In the example provided in this topic, CentOS 8.3 is used.
- Nginx: A high-performance, lightweight web server that supports HTTP and reverse proxy. In the example provided in this topic, Nginx 1.22.0 is used.
- MySQL/MariaDB: A database management system. In the example provided in this topic, MariaDB 15.1 and MySQL 8.0.26 are used.
- PHP: A server-side scripting language embedded in HTML documents. In the example provided in this topic, PHP 7.3.20 is used.
Prerequisites
- A Linux instance is purchased. For more information, see Purchasing ECS instances.
- An EIP is associated with the Linux instance, enabling the instance to connect to the Internet. For information about how to associate an EIP with an ECS instance, see Associating EIPs.
Step 1: Install and configure Nginx
- Remotely connect to and log in to the ECS instance. For more information, see Logging in to Linux instances.
- Execute the following command to install Nginx. In the example provided in this topic, Nginx 1.22.0 is installed.
- dnf -y install https://mirrors.ivolces.com/nginx_all/centos/7/x86_64/RPMS/nginx-1.22.0-1.el7.ngx.x86_64.rpm
- Execute the following command to view the Nginx version.
- nginx -v
- If the following output is displayed, Nginx is installed.
- nginx version: nginx/1.22.0
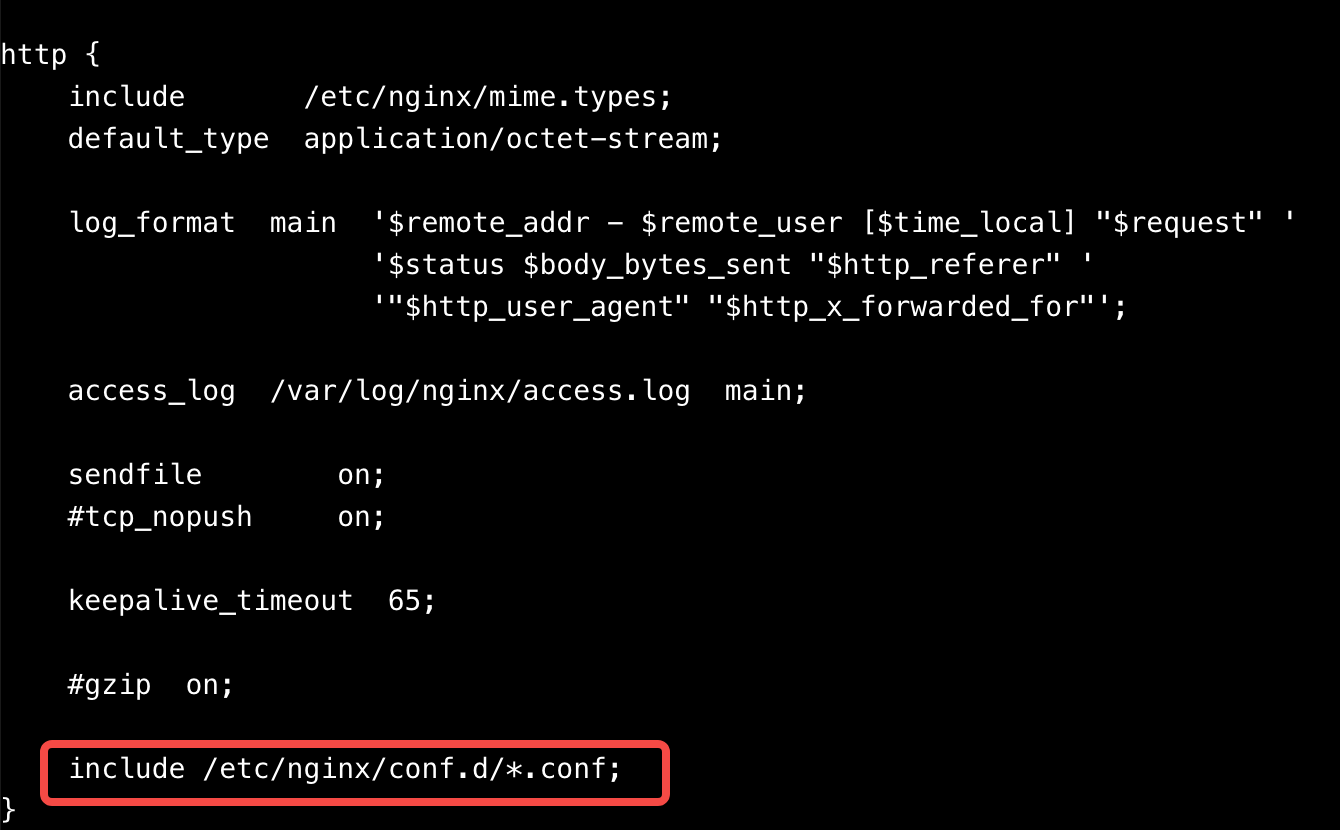
- Execute the following command to view the path of the Nginx configuration file.
- cat /etc/nginx/nginx.conf
- In the following output, the include configuration item indicates the path of the file.
-
- Execute the following command to back up the configuration file in the configuration file directory.
- cd /etc/nginx/conf.d cp default.conf default.conf.bak
- Execute the following command to modify the original configuration file.
- vi default.conf
- Press the i key to enter edit mode and modify the following content in location.
- location / {root /usr/share/nginx/html; #Replace this path with your website root directory. In this document, /usr/share/nginx/html is used as an example. You may reuse this path directly; however, in actual business scenarios, it is recommended that you replace it with your own website root directory.index index.html index.htm index.php; #Add default homepage information index.php.}
- Remove the comment markers # at the beginning of the lines inside the curly braces of location ~ \.php$ and modify the following content.
- location ~ \.php$ { root /usr/share/nginx/html; #Replace this path with your website root directory. In this document, /usr/share/nginx/html is used as an example. You may reuse it directly, but in actual business scenarios, it is recommended to replace it with your own website root directory.fastcgi_pass unix:/run/php-fpm/www.sock; #Change to unix:/run/php-fpm/www.sock. Nginx communicates with PHP-FPM through a UNIX socket, and this configuration is consistent with the listen configuration in the /etc/php-fpm.d/www.conf file.fastcgi_index index.php; fastcgi_param SCRIPT_FILENAME $document_root$fastcgi_script_name; #Change /scripts$fastcgi_script_name to $document_root$fastcgi_script_name.include fastcgi_params;}
- Press Esc, enter :wq, and then press Enter to save the modifications and close the file.
- Execute the following command to start the Nginx service.
- systemctl start nginx
- Execute the following command to specify that the Nginx service automatically starts upon instance startup.
- systemctl enable nginx
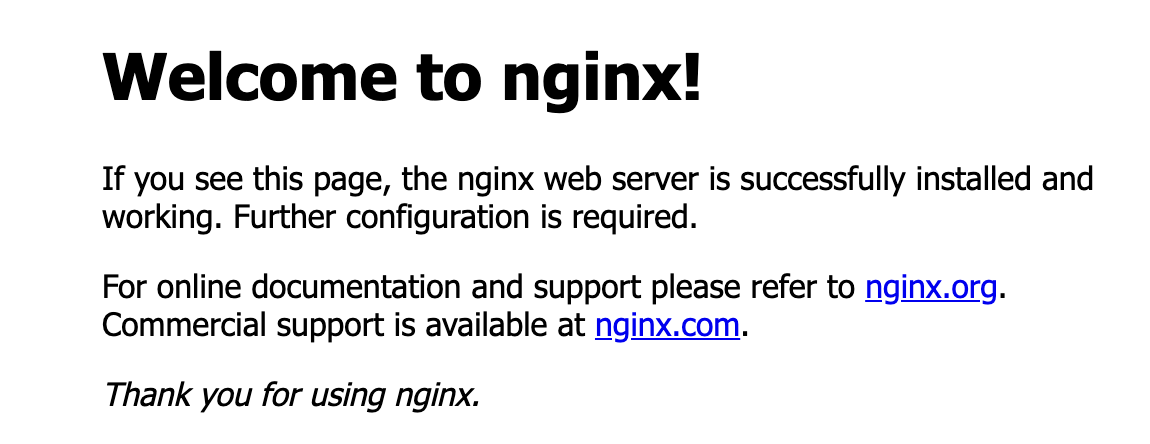
- In the local browser, enter http://<ECS instance EIP>/ to access Nginx.
- The following output indicates that Nginx is set up successfully.
-
Step 2: Install and configure MariaDB/MySQL
Install and configure MariaDB
- Execute the following command to install MariaDB.
- dnf -y install @mariadb
- Execute the following command to view the MariaDB version.
- mysql -V
- If the following output is displayed, MariaDB is installed.
- mysql Ver 15.1 Distrib 10.3.28-MariaDB, for Linux (x86_64) using readline 5.1
- Execute the following command to start the MariaDB service and specify that it automatically starts upon instance startup.
- systemctl enable --now mariadb
- Execute the following command to check whether the MariaDB service is started.
- systemctl status mariadb
- If Active: active (running) is displayed in the output, the MariaDB service is started.
- Execute the following command to perform MariaDB security operations and specify the password.
- mysql_secure_installation
- Press the Enter key to confirm the password.
- Enter y and press the Enter key to confirm modification of the database password for the root user.
- Specify the MariaDB password and press the Enter key. The password you enter is not displayed by default.
- Enter the new password again and press the Enter key to confirm your new password.
tip
Enter a password that meets the strength requirements of the password verification policy.
- Enter y and press the Enter key to remove the anonymous user.
- Enter y and press the Enter key to prohibit remote login by the root account.
- Enter y and press the Enter key to delete the test database and its access permission.
- Enter y and press the Enter key to reload the authorization table.
Install and configure MySQL
- Execute the following command to install MySQL.
- dnf -y install @mysql
- Execute the following command to view the MySQL version.
- mysql -V
- If the following output is displayed, MySQL is installed.
- mysql Ver 8.0.26 for Linux on x86_64 (Source distribution)
- Execute the following command to start the MySQL service and specify that the MySQL service automatically starts upon instance startup.
- systemctl enable --now mysqld
- Execute the following command to check whether the MySQL service is started.
- systemctl status mysqld
- If Active: active (running) is displayed in the output, the MySQL service is started.
- Execute the following command to perform MySQL security operations and specify the password.
- mysql_secure_installation
- Enter y and press the Enter key to start the relevant configuration.
- Select the password verification policy strength, and enter 2 and press the Enter key. We recommend that you select a high-strength verification policy. A value of 0 specifies low strength, 1 specifies medium strength, and 2 specifies high strength.
- Specify the new MySQL password and press the Enter key. The password you enter is not displayed by default.
- Enter the new password again and press y to confirm your new password.
tip
Enter a password that meets the strength requirements of the password verification policy.
- Enter y and press the Enter key to remove the anonymous user.
- Specify whether to allow remote connections to MySQL:
- To prohibit remote connections: Enter y and press the Enter key.
- To allow remote connections: Enter n and press the Enter key.
- Enter y and press the Enter key to delete the test database and its access permission.
- Enter y and press the Enter key to reload the authorization table.
Step 3: Install and configure PHP
- Execute the following command to add and update the EPEL repository.
- dnf -y install epel-releasednf -y update epel-release
- Execute the following command to delete cached unused packages and update the software repository.
- dnf clean all dnf makecache
- Execute the following command to enable the php:7.3 module.
- dnf -y module enable php:7.3
- In the example provided in this topic, php:7.3 is used. If you want to use php:7.4, you need to first install the Remi repository and then start the PHP module. Command for installing the Remi repository: dnf -y install https://rpms.remirepo.net/enterprise/remi-release-8.rpm.
- Execute the following command to install the corresponding PHP modules.
- dnf -y install php php-curl php-dom php-exif php-fileinfo php-fpm php-gd php-hash php-json php-mbstring php-mysqli php-openssl php-pcre php-xml libsodium
- Execute the following command to view the PHP version.
- php -v
- If the following output is displayed, PHP is installed.
- PHP 7.3.20 (cli) (built: Jul 7 2020 07:53:49) ( NTS )Copyright (c) 1997-2018 The PHP GroupZend Engine v3.3.20, Copyright (c) 1998-2018 Zend Technologies
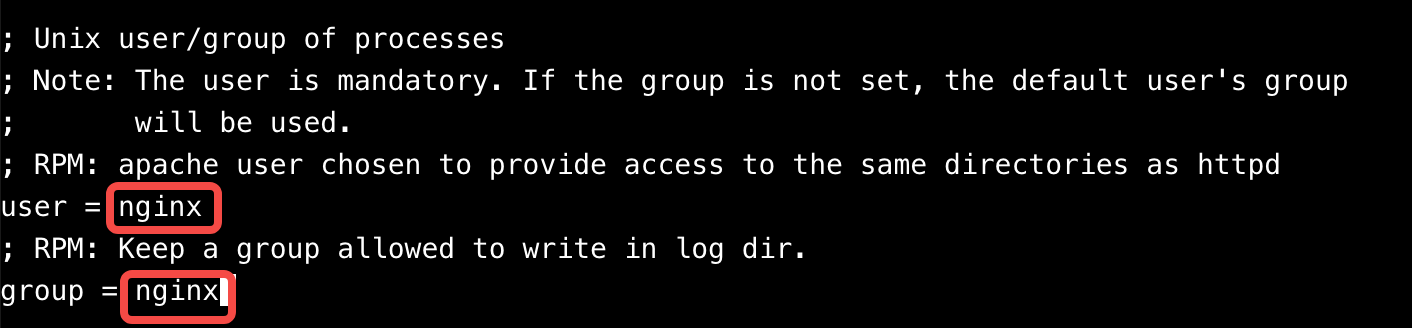
- Execute the following command to open the configuration file.
- vi /etc/php-fpm.d/www.conf
- Press the i key to enter edit mode, and change apache to nginx in user = apache and group = apache.
-
- Press Esc, enter :wq, and then press Enter to save the modifications and close the file.
- Execute the following command to start the PHP-FPM service.
- systemctl start php-fpm
- Execute the following command to specify that the PHP-FPM service automatically starts upon instance startup.
- systemctl enable php-fpm
Step 4: Access LNMP
- Execute the following command to create a test file.
- vim <Website root directory>/phpinfo.php
tip
Replace <website root directory> in the command with the website root directory that you configured in the Nginx configuration file default.conf. In the example provided in this topic, /usr/share/nginx/html is used. The command used in this topic is vim /usr/share/nginx/html/phpinfo.php.
- Press the i key to enter edit mode, and then enter the following content.
- <?php echo phpinfo(); ?>
- Press Esc, enter :wq, and then press the Enter key to save the file and return to the CLI interface.
- In your local browser, enter http://<ECS instance EIP>/phpinfo.php to access LNMP.
Last updated: 2026.06.18 17:48:25
All rights reserved © Beijing Volcano Engine Technology Co., Ltd2024
