Elastic Compute Service
Elastic Compute Service


Document

- Documentation
 Elastic Compute ServiceElastic Compute ServiceBest PracticesImagesKernel fine-tuningUpgrading kernel version of Linux operating system
 Copy page
 Download PDF
Kernel fine-tuning
Upgrading kernel version of Linux operating system
Copy pageDownload PDFUpgrading kernel version of Linux operating system
If the kernel of the server operating system cannot meet your business needs, you can upgrade the kernel version, which can meet business requirements with less impact (compared with changing the operating system).
Applicable scenario
- Improve system performance
- New kernel versions may provide performance optimizations, for example, faster file system operations, lower latency, or higher throughput.
- Support new hardware devices
- When the server is equipped with a new hardware device that is not supported by the current kernel, it may be necessary to upgrade the kernel to support the new hardware.
- Fix security vulnerabilities
- New kernel versions may fix some security vulnerabilities found in older kernel versions.
- Obtain support for more features
- New kernel versions may introduce new features, such as new file systems, virtualization technologies, and containerization capabilities.
Usage notes
- Upgrading the system kernel may lead to compatibility, stability, and security issues. We recommend that you back up data before you upgrade the kernel.
- Kernel upgrade actions require root permission.
CentOS OS
If you only need to upgrade the minor version of the kernel, you can use the official Yum repository.
tip
In the example provided in this section, the CentOS 7.9 kernel version is upgraded from 3.10.0-1160.102.1.el7 to 3.10.0-1160.119.1.
- Execute the following command to view the current kernel version.
-
- Sample output:
-

- Execute the following command to upgrade the system package list.
-
- Execute the following command to view the installable kernel versions.
-
- Sample output:
-
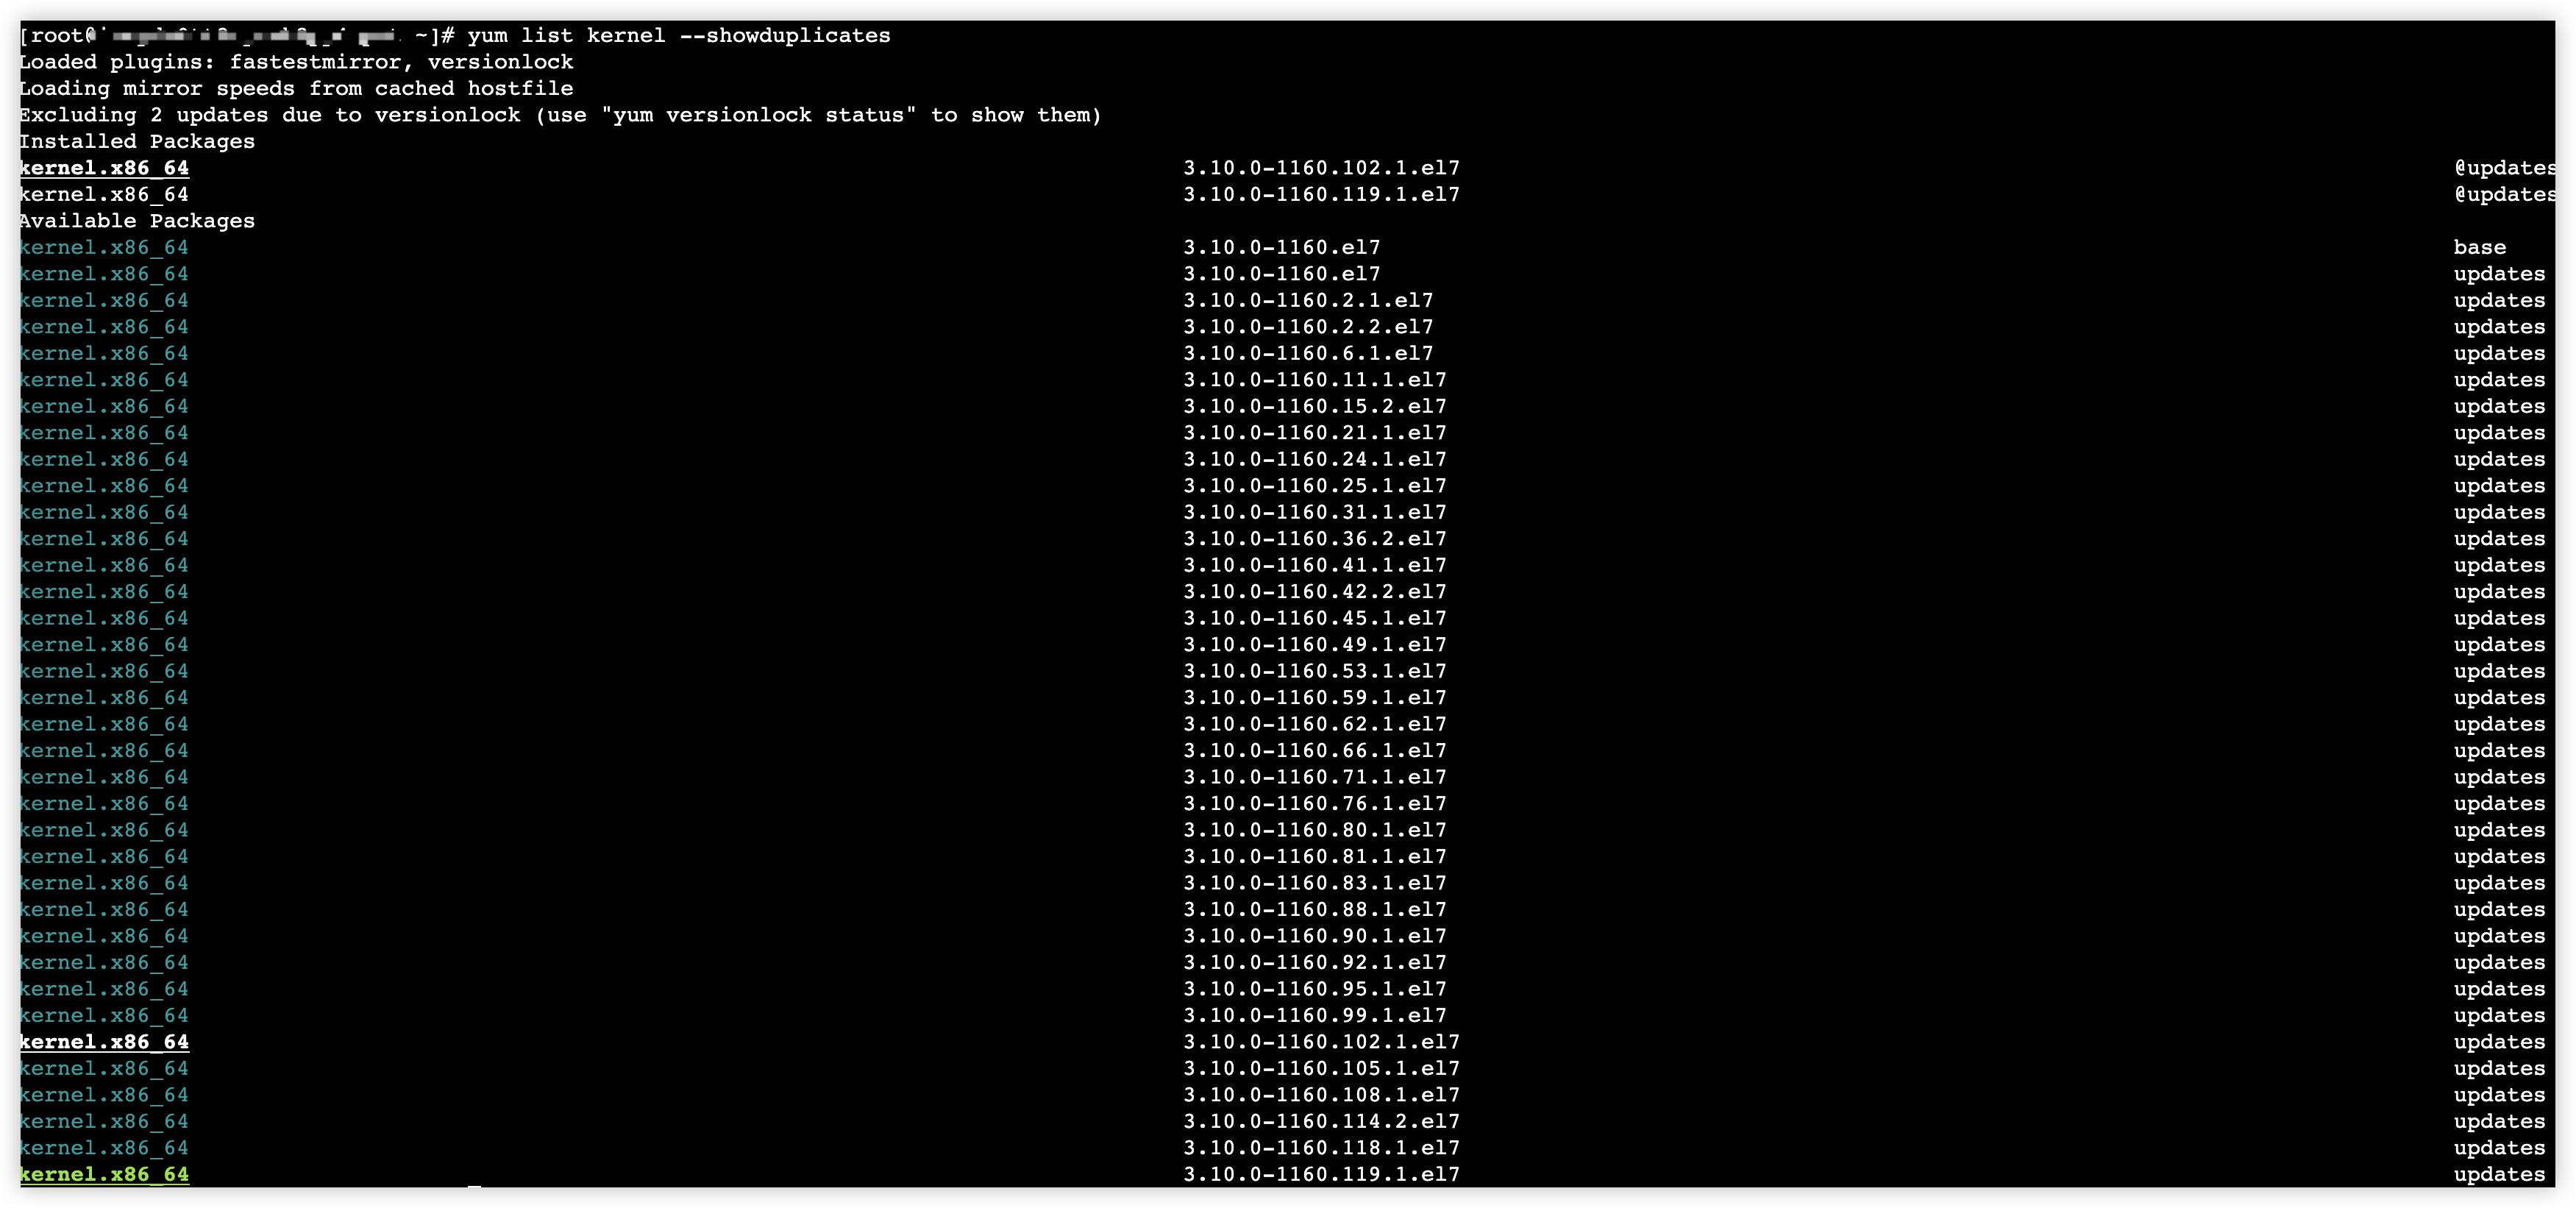
- Execute the following command to install the specified version of the kernel.
-
tip
Replace 3.10.0-1160.119.1.el7 with the actual kernel version.
- Update boot configuration.
- BIOS boot mode:
-
- UEFI boot mode:
-
- Execute the following command to view the installed kernels.
- BIOS boot mode:
-
- UEFI boot mode:
-
- Sample output:
-

- Execute the following command to specify the default kernel.
-
tip
Replace 0 with the serial number of the installed kernel that you obtained in Step 7.

- Execute the following command to restart the instance.
-
- Execute the following command to view the current kernel version and check whether the kernel is upgraded.
-
- Sample output:
-

- Execute the following command to install the kernel software packages related to the new kernel.
-
- Sample output:
-

warning
If the required version of kernel-headers, kernel-devel, etc., is not available in the Yum repository. You can download and install them yourself:
- Download the target software packages. One option is to download them from the Tsinghua University Mirror Site.
- Upload the software packages to the target instance. Learn more.
- Execute the rpm -ivh <RPM package to be installed> command to install the target software package.
If you need to upgrade the major version of the kernel, you can use the ELRepo repository or compile the kernel yourself.
tip
In the example provided in this section, the CentOS 8.3 kernel version is upgraded from 4.18.0-348.7.1 to 6.10.11.
Step 1: Install the ELRepo repository
- Execute the following command to view the current kernel version.
-
- Sample output:
-

- Execute the following command to update the software packages.
-
- Execute the following command to import the ELRepo public key.
-
- Execute the following command to install the ELRepo repository.
-
- Execute the following command to replace the ELRepo repository address with the Tsinghua University open-source software mirror site, and comment out mirrorlist.
-
tip
In the example provided in this topic, the address of the Tsinghua University open-source software mirror site https://mirrors.tuna.tsinghua.edu.cn/ is used as address of the repository. You can use other mirror sites based on your needs. Learn more.
- Execute the following command to update the software package cache.
-
Step 2: Install a new kernel
- Execute the following command on the target instance to load data from the ELRepo repository.
-
- Sample output:
-

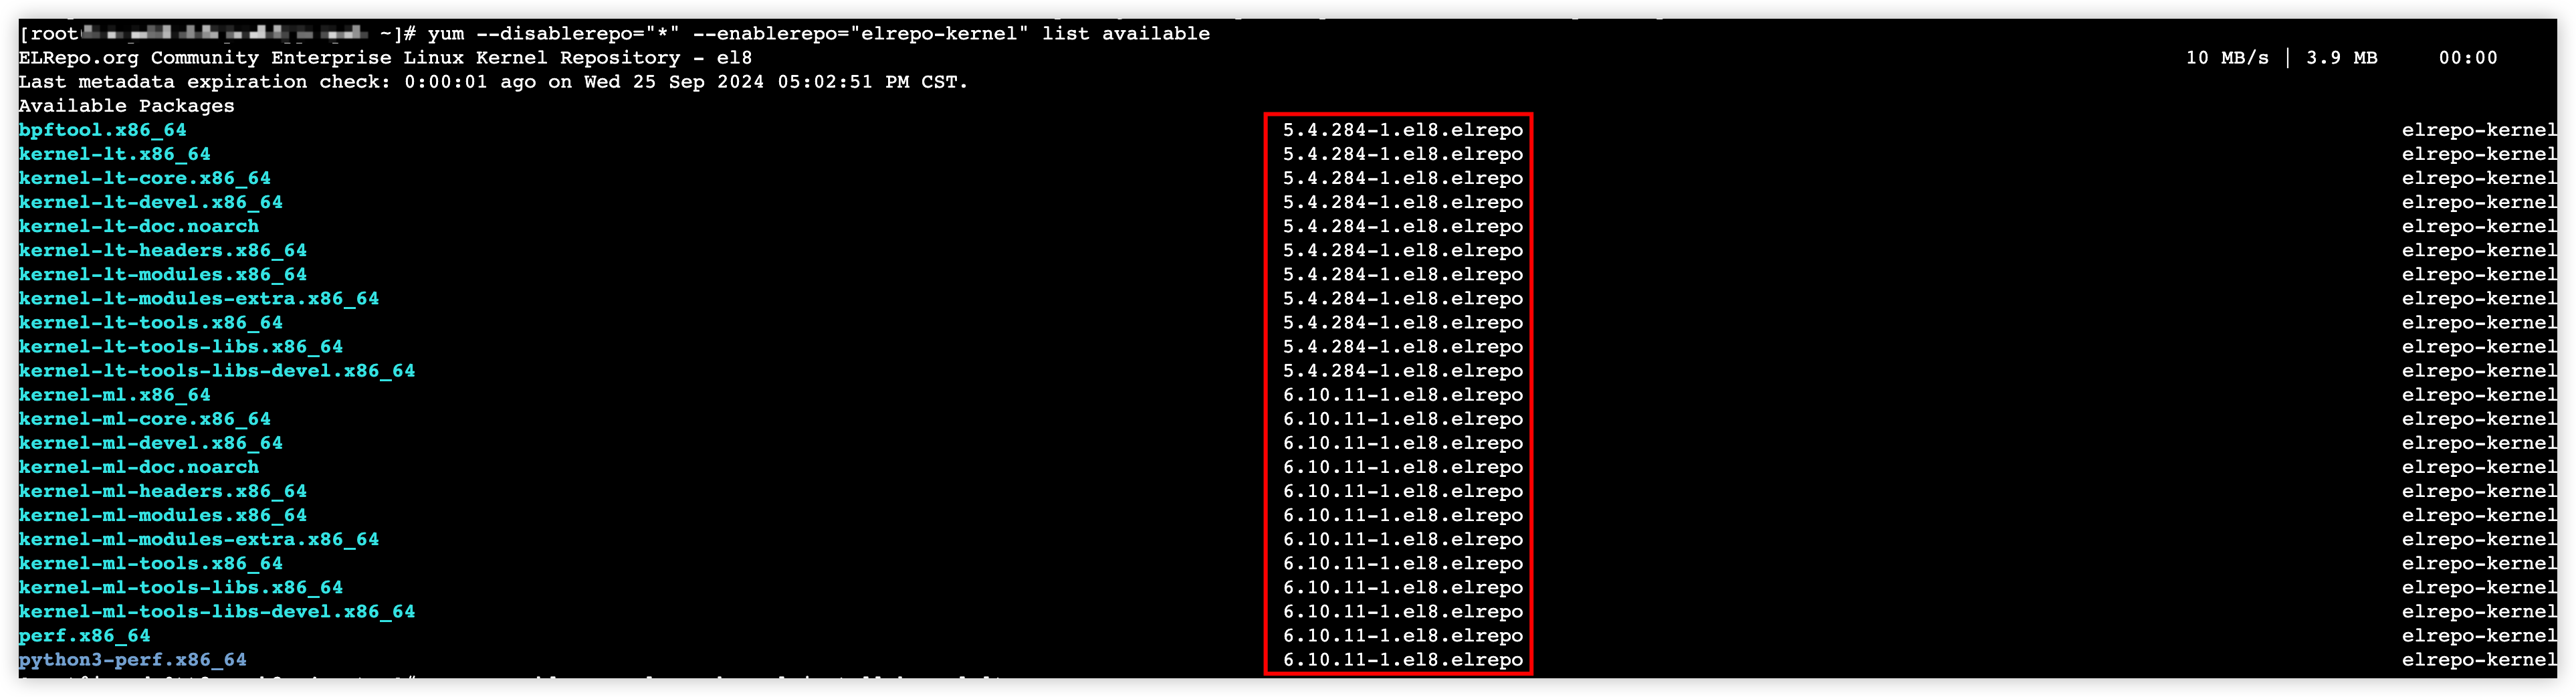
- View the kernel packages in the ELRepo repository that are supported by the current operating system.
-
- Sample output:
-
tip
- kernel-ml: represents the mainline kernel. It includes the latest features, improvements, and experimental functionalities, with frequent updates. You can use this type of kernel if you pursue the latest technologies and features, have a certain tolerance for system instability, and are willing to handle potential issues.
- kernel-lt: represents the Long-Term Support (LTS) kernel. It focuses on stability and compatibility. These kernel versions undergo extensive testing and receive support for an extended period. You can use this type of kernel if you need a stable operating environment, do not want to update the kernel frequently, or have no high demand for new features.
- Execute the following command to install the latest mainline kernel.
-
- If you want to install the specified kernel, you can execute the following command. Replace kernel-ml-6.10.11-1.el8.elrepo with the target kernel version obtained from the previous step.
-
Step 3: Modify Grub configuration
- Execute the following command to view information about installed kernels.
-
- Sample output:
-
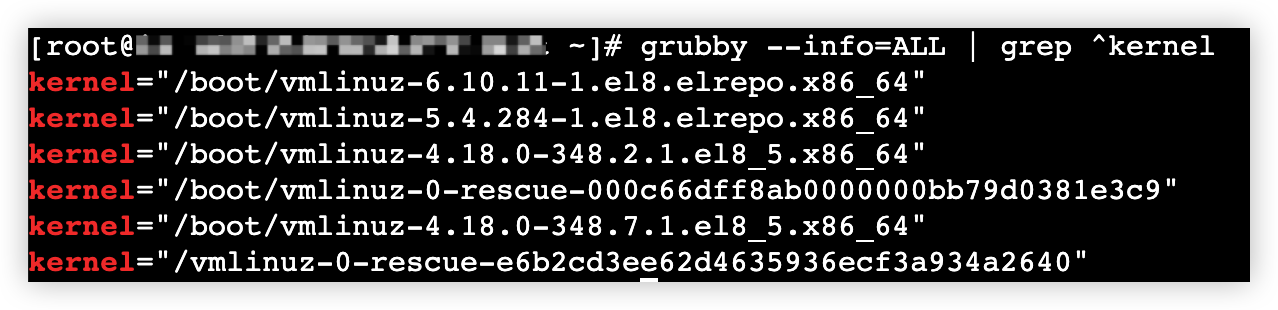
- Execute the following command to specify the default kernel used when the instance starts.
-
- Sample output:
-

tip
In the example provided in this topic, the installed 6.10.11-1.el8.elrepo.x86_64 kernel is used. Replace /boot/vmlinuz-6.10.11-1.el8.elrepo.x86_64 with the actual target kernel information obtained from the previous step.
- Execute the following command to restart the instance.
-
- Execute the following command to check whether the instance kernel is updated.
-
- Sample output:
-

- Install software packages related to the new kernel.
- Execute the following command to view the installed kernel software packages.
-
- Sample output:
-
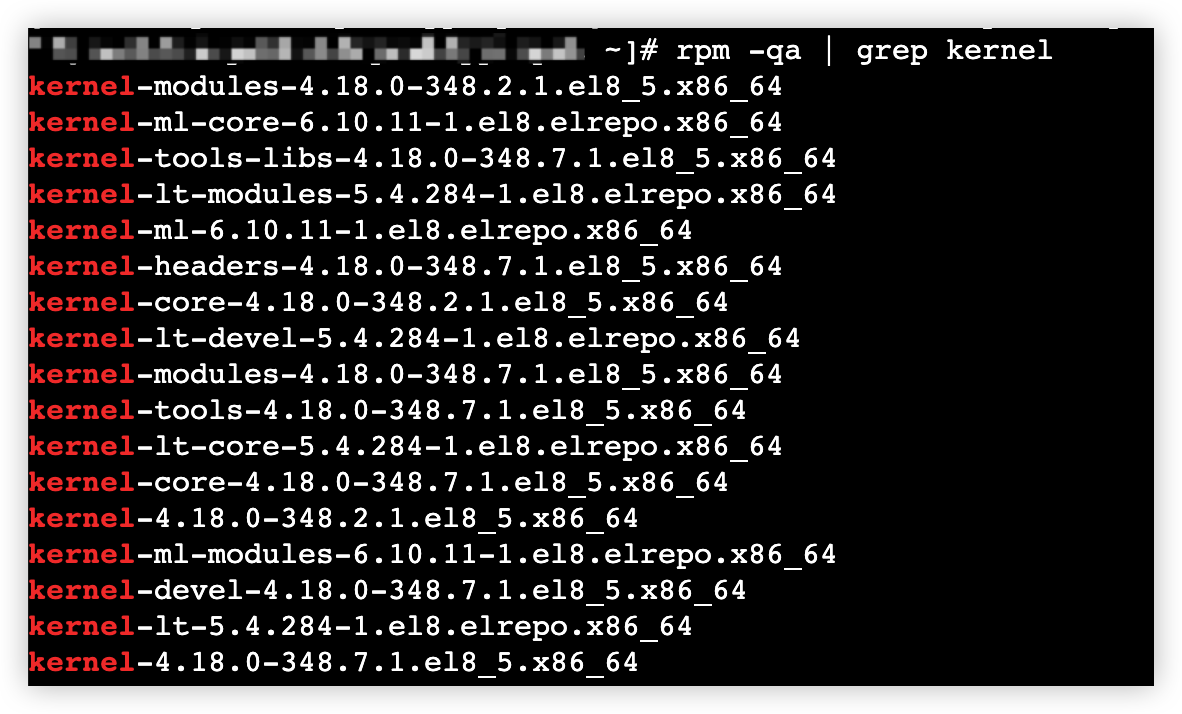
- Execute the following command to delete old kernel software packages.
-
tip
In the example provided in this topic, software packages related to v4.18.0 kernel are deleted. Replace the software packages with the actual ones to delete them.
- Execute the following command to install the software packages related to the new kernel currently in use.
-
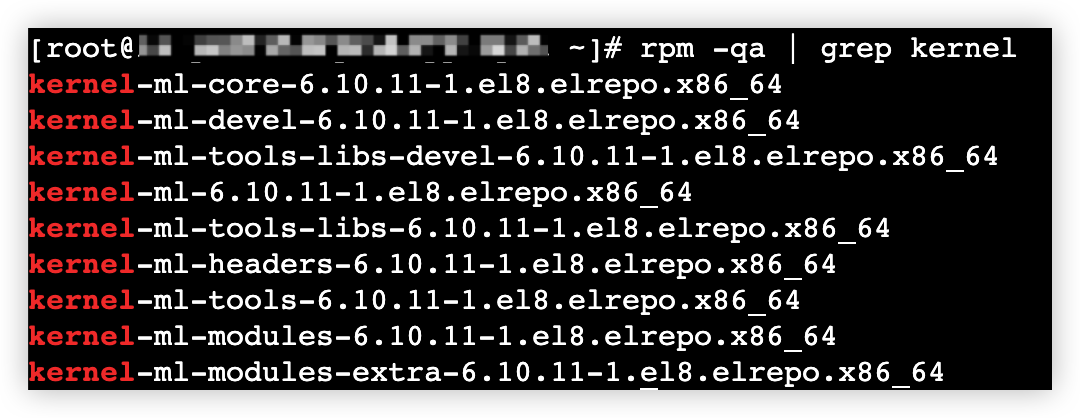
- Execute the following command to check whether the required new kernel and its kernel software packages are installed.
-
- Sample output:
-
tip
In the example provided in this section, the CentOS 7.9 kernel version is upgraded from 3.10.0-1160.102.1.el7 to 5.4.278.
Step 1: Download the kernel source code
- Go to the official kernel site and go to the directory for the kernel version you want to download.
-
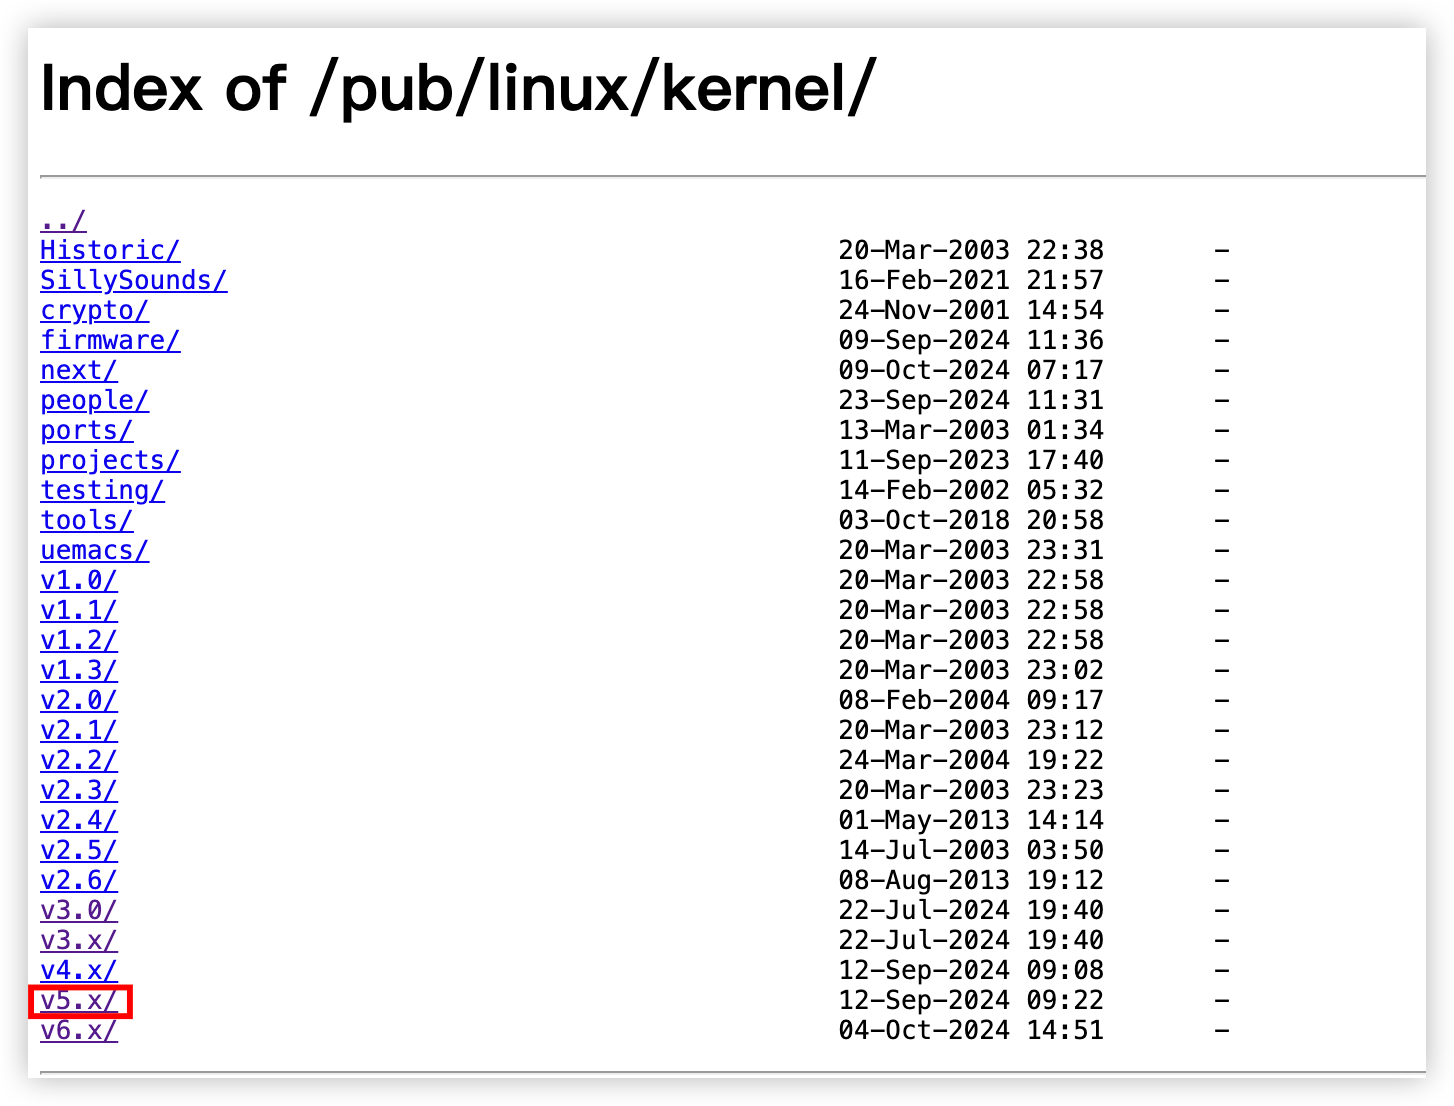
tip
In the example provided in this topic, the v5.x kernel source package is downloaded.
- Obtain the download link for the kernel source package of the target version.
-

tip
In the example provided in this topic, the 5.4.278 kernel is installed. After you go to the v5.x directory, obtain the download link for linux-5.4.278.tar.gz, which is https://mirrors.edge.kernel.org/pub/linux/kernel/v5.x/linux-5.4.278.tar.gz.
- In the instance for which you want to replace the kernel, execute the following command to download the kernel source package.
-
- Execute the following command to download the software packages related to system installation.
-
- Execute the following command to view the GCC version.
-
- If the version is not lower than 7, proceed to the next step.
-

- If the version is lower than 7, execute the following command to upgrade GCC.
- Execute the following command to install the default SCL repository.
-
- Execute the following command to replace the software repository address with a mirror site address in the Chinese mainland.
tip
In the example provided in this topic, the software repository address is replaced by the Volcano Engine mirror site address https://mirrors.volces.com/. You can use another mirror site address based on your needs.
-
- Execute the following command to refresh the yum cache.
-
- Execute the following command to install a later version of GCC.
-
tip
In the example provided in this topic, GCC v10 is installed. Install the GCC version based on your needs.
- Execute the following command to make the new GCC version to take effect.
- Temporarily valid (becomes invalid after instance restart or bash exit)
-
- Permanently valid
-
- Execute the following command to check whether the newly installed GCC takes effect.
-
- Sample output:
-

Step 2: Compile the kernel
- In the directory where the downloaded kernel source package is located, execute the following command to decompress it.
-
tip
Replace linux-5.4.278.tar.gz with the actual source package.
- Execute the following command to enter the source code directory obtained after decompression.
-
tip
Replace linux-5.4.278 with the actual source code package.
- Execute the following command to copy the configuration file currently used by the kernel.
-
- Execute the following command to modify the configuration file of the new kernel.
-
tip
Replace /root/linux-5.4.278/.config with the path where the configuration file you copied in Step 8 is located.
- Modify kernel parameters.
- Execute the following command to enter the text interface.
-
-
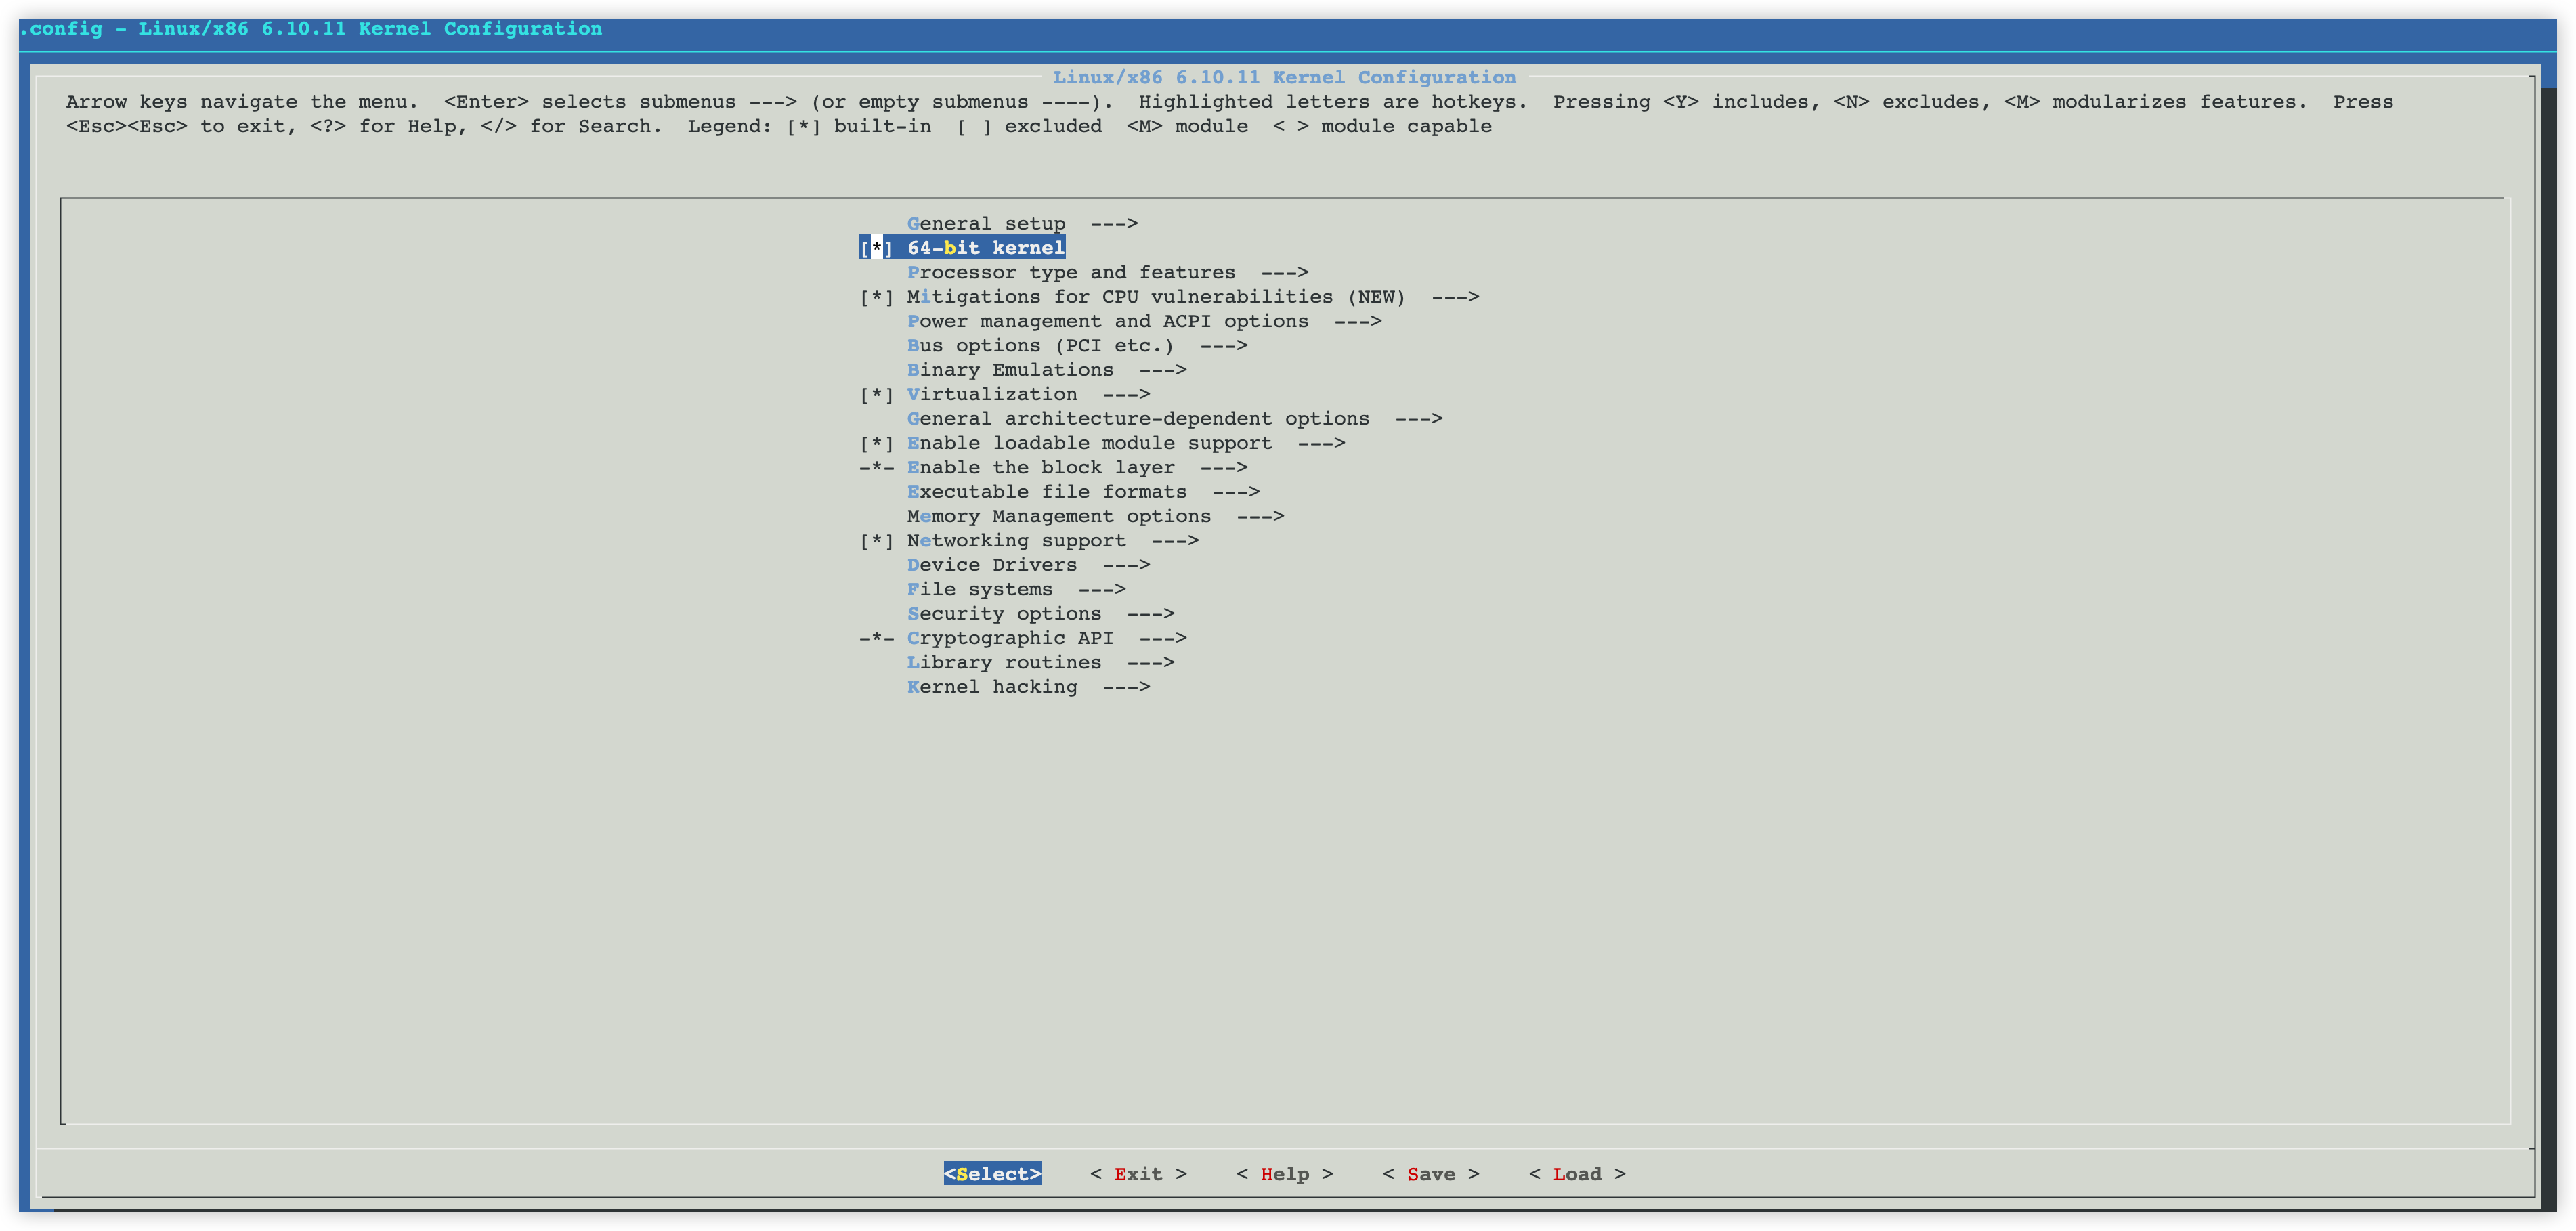
- Modify the kernel parameter configuration based on your needs. In the example provided in this topic, only the kernel name is modified.
- Use the arrow keys to select General setup, and then press Enter to go to the general settings page.
-
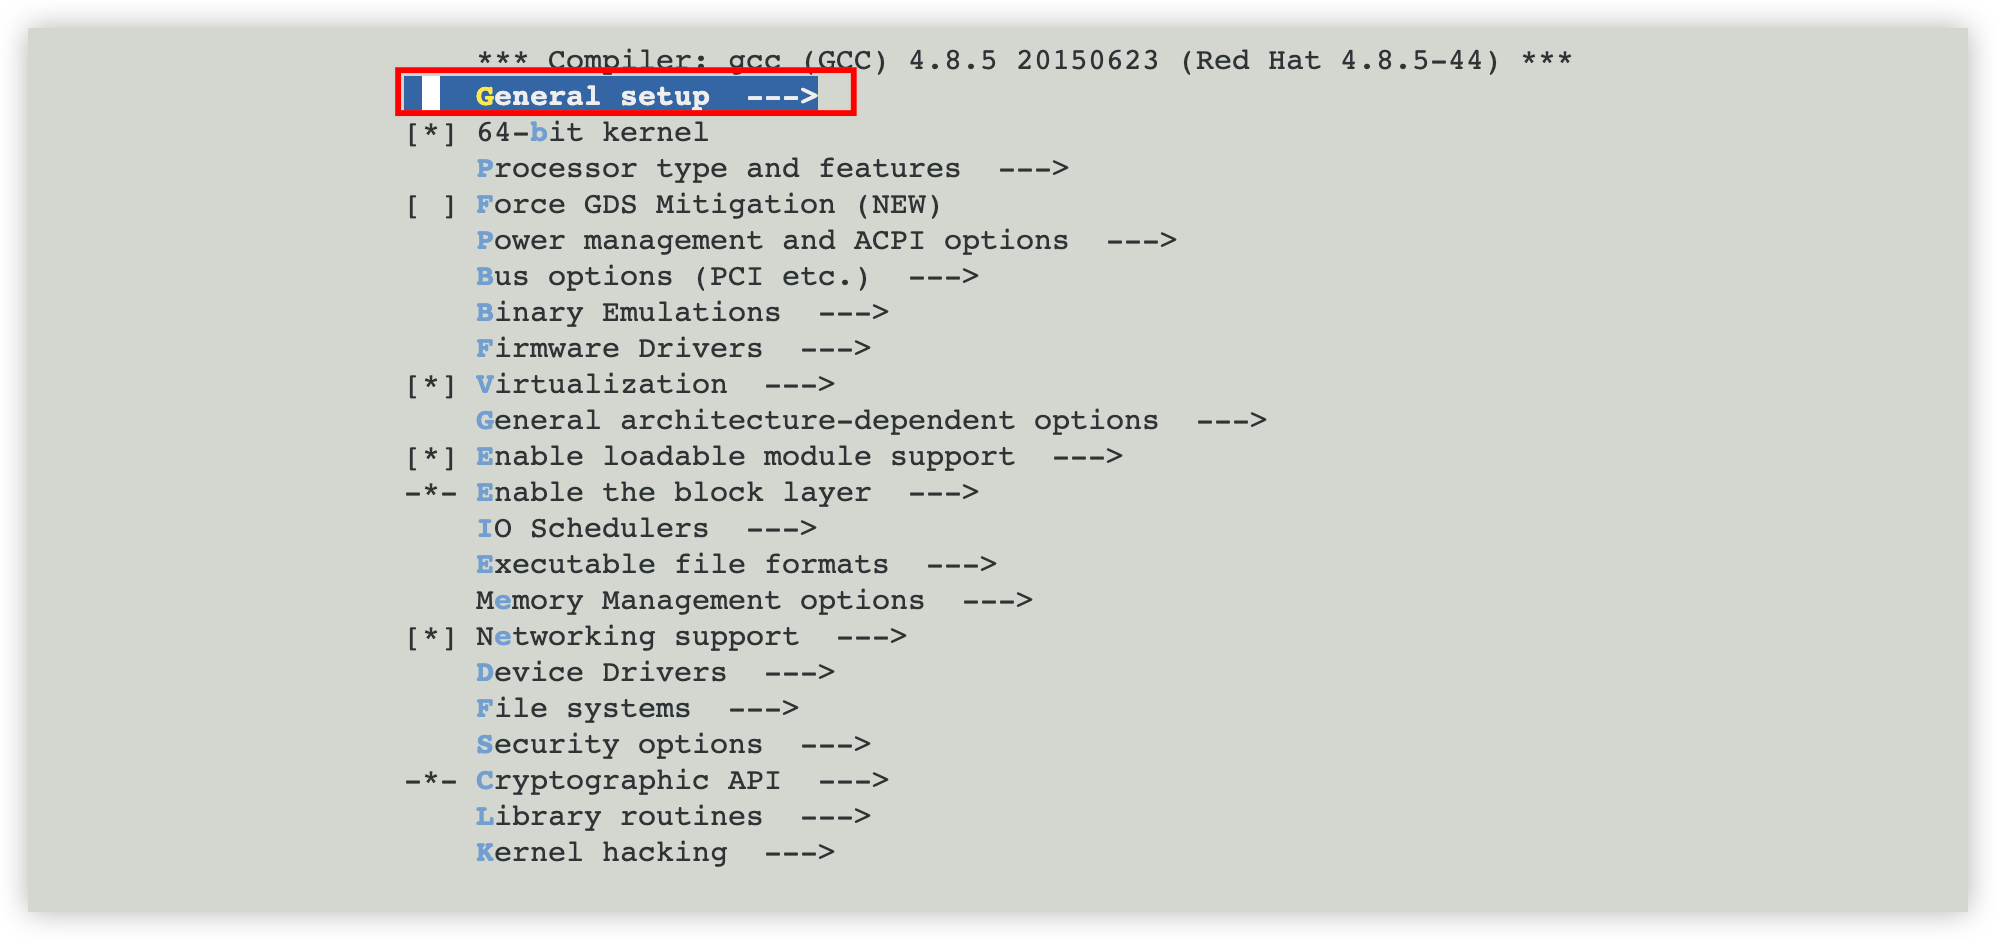
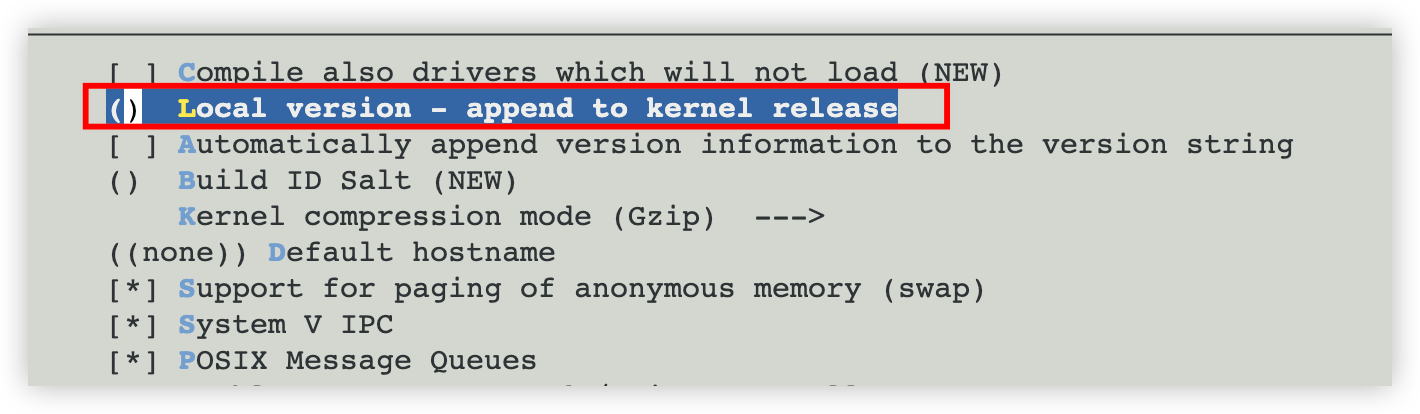
- Use the arrow keys to select Local version - append to kernel release, and then press Enter to go to the page for specifying the kernel version.
-
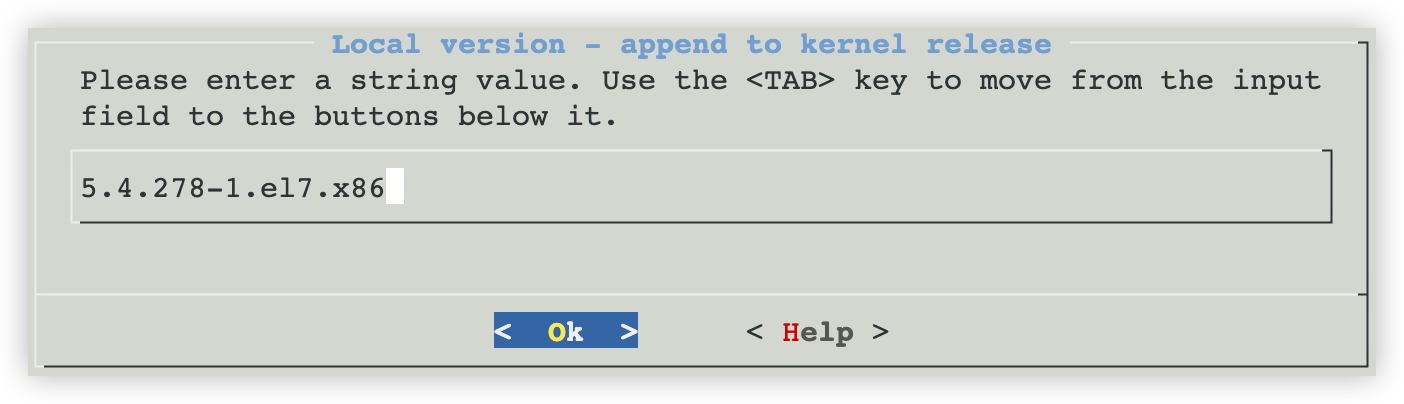
- Enter the local information that follows the kernel version. Taking -1.el7.x86 as an example in this topic, the final kernel information will be displayed as 5.4.278-1.el7.x86.
-
- Press the Tab key to select < Ok >, and then press Enter to save the changes.
- Press the Tab key to select < Exit >, and then press the Enter key to return to the homepage.
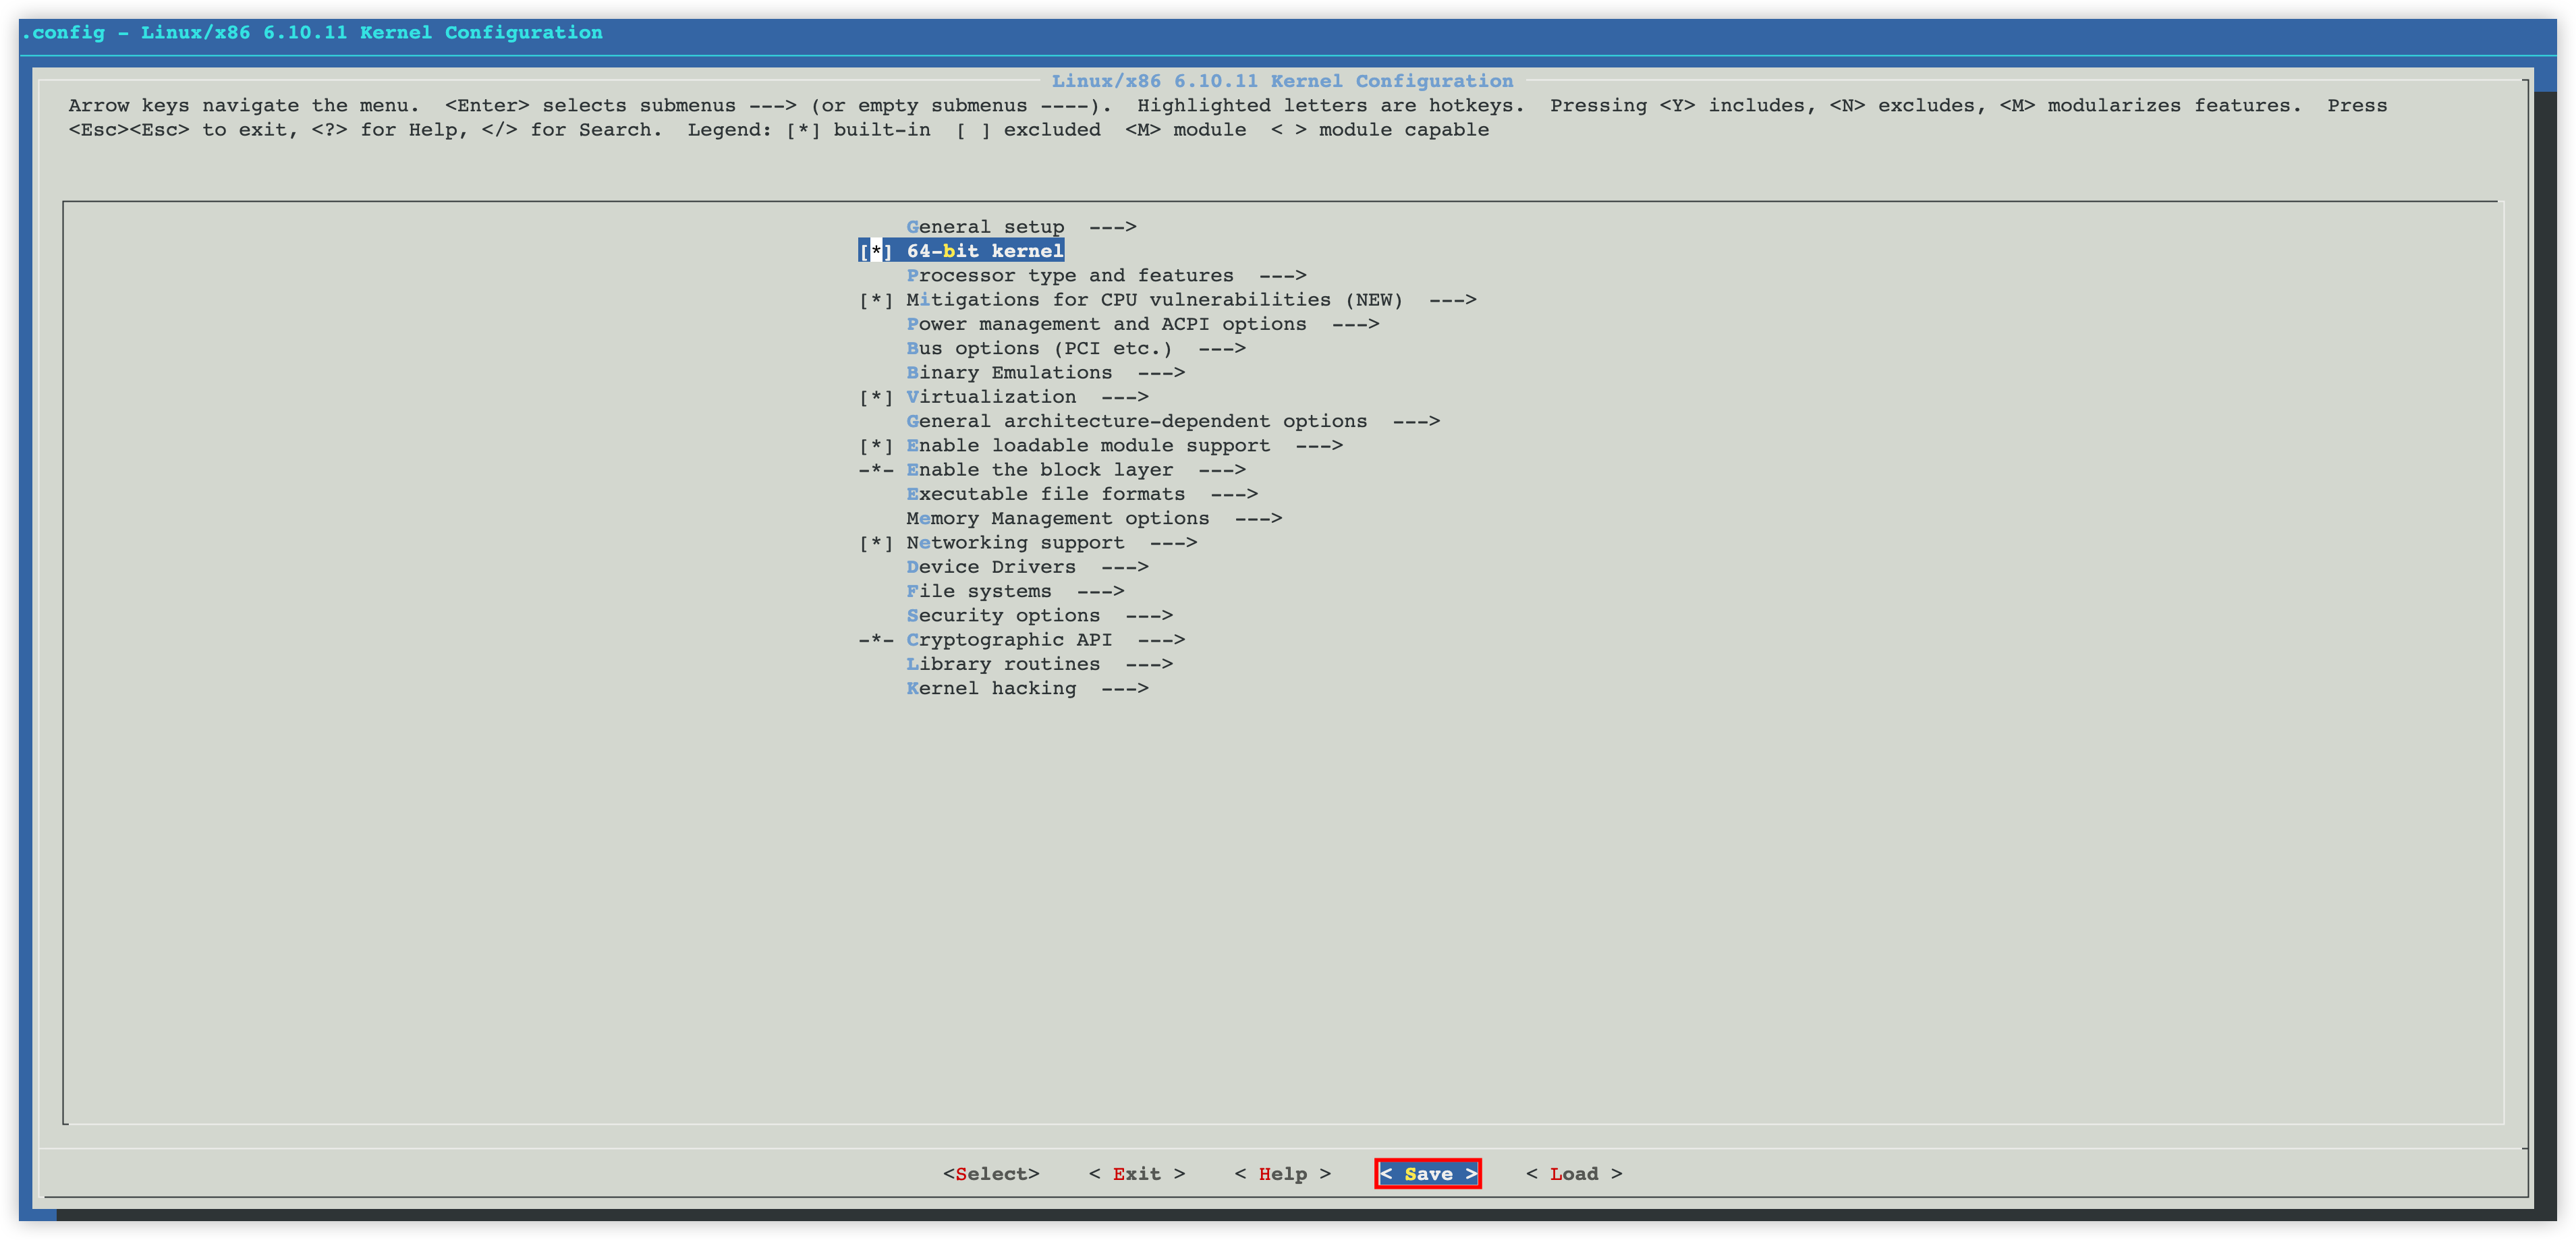
- Press the Tab key to select < Save >, and then press the Enter key to save the changes.
tip
In the example provided in this topic, the default settings are used. Modify the settings based on your needs.
-
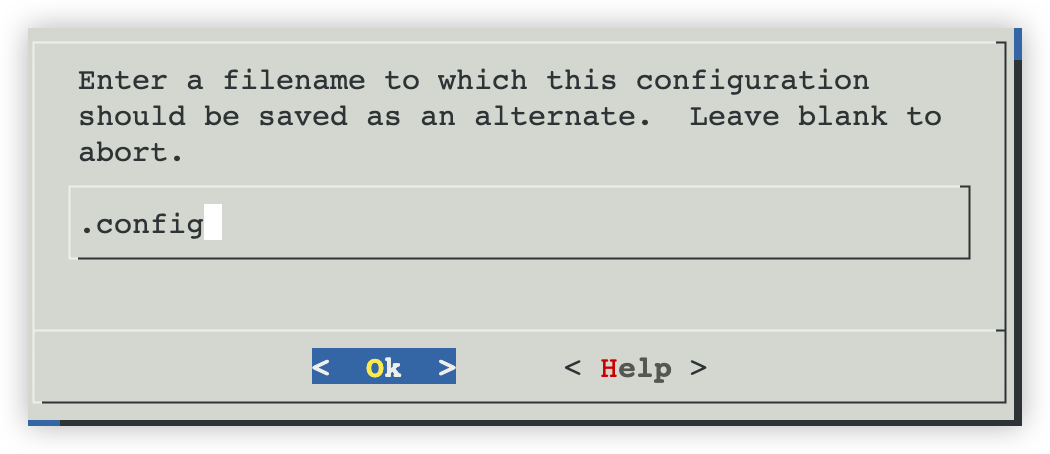
- Modify the name of the kernel configuration file based on your needs, press the Tab key to select < Ok >, and then press the Enter key to save the changes.
tip
In the example provided in this topic, the default settings are used. Modify the settings based on your needs.
-
- Press the Enter key to exit edit mode.
-
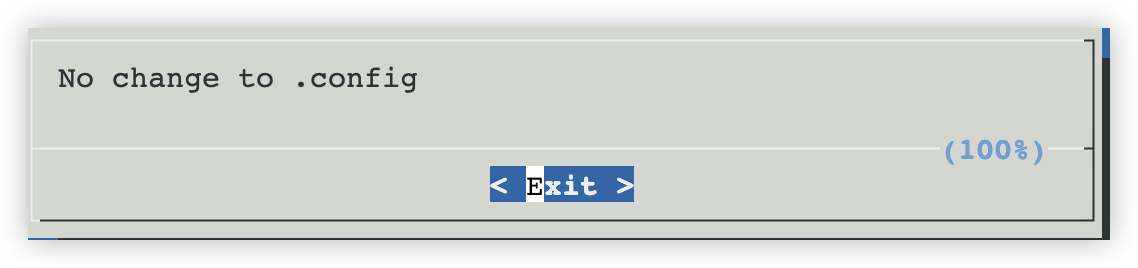
- Press the Tab key to select < Exit >, and then press the Enter key to exit edit mode.
-
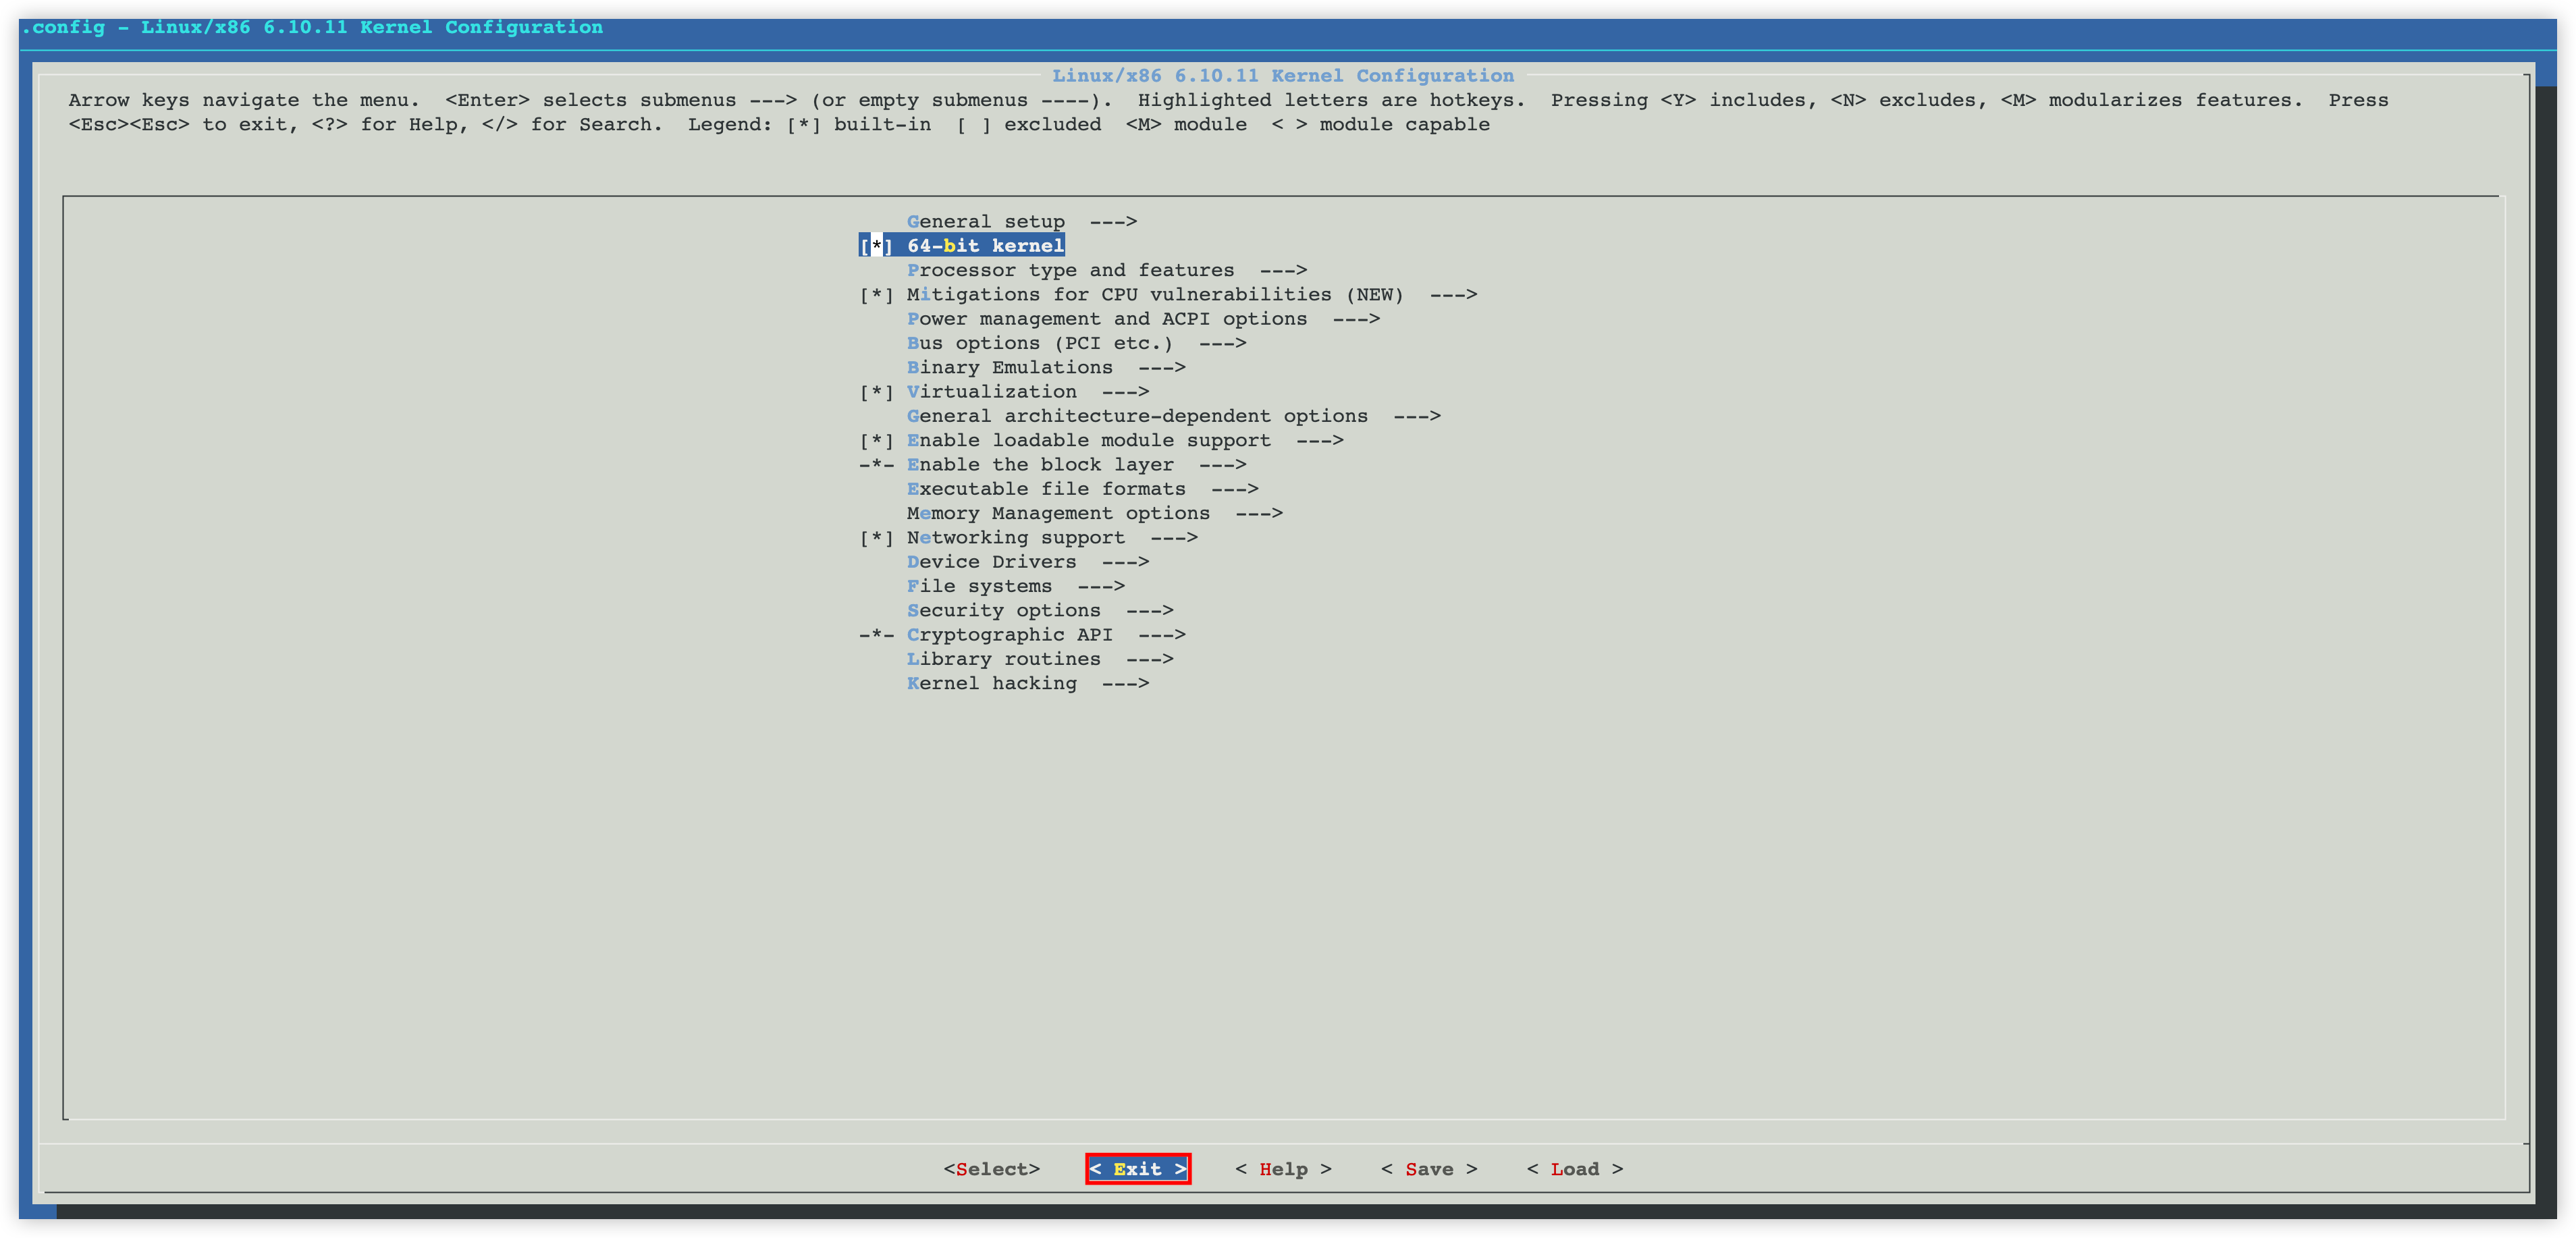
- Execute the following command to compile the kernel.
-
- Sample output of a compilation success:
-
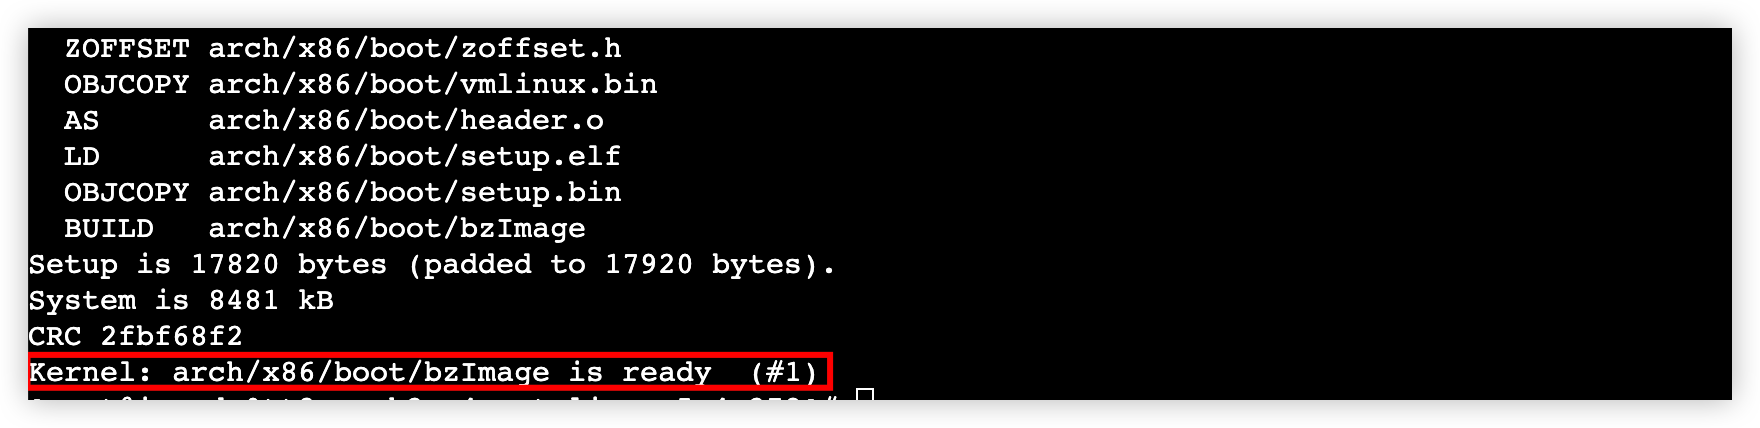
- Execute the following command to copy the compiled kernel module to the system directory.
-
- Execute the following command to install the kernel image and the image of the boot initialization file system.
-
Step 3: Modify Grub configuration
- Update boot configuration.
- BIOS boot mode:
-
- UEFI boot mode:
-
- Execute the following command to view the installed kernels.
- BIOS boot mode:
-
- UEFI boot mode:
-
- Sample output:
-

- Execute the following command to specify the default kernel.
-
- Replace 0 with the serial number of the installed kernel that you obtained in Step 2.
-

- Execute the following command to restart the instance.
-
- Execute the following command to view the current kernel version and check whether the kernel is upgraded.
-
- Sample output:
-

- Install software packages related to the new kernel.
- Execute the following command to view the installed kernel software packages.
-
- Sample output:
-
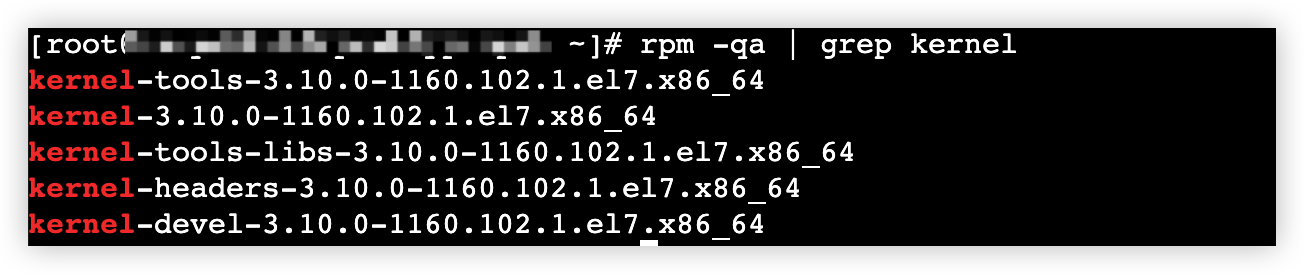
- Execute the following command to delete old kernel software packages.
-
tip
In the example provided in this topic, v3.10.0 kernel and software packages related to it are deleted. Replace the kernel version and software packages with the actual ones to delete them.
- Execute the following command to install the kernel software packages related to the new kernel.
-
warning
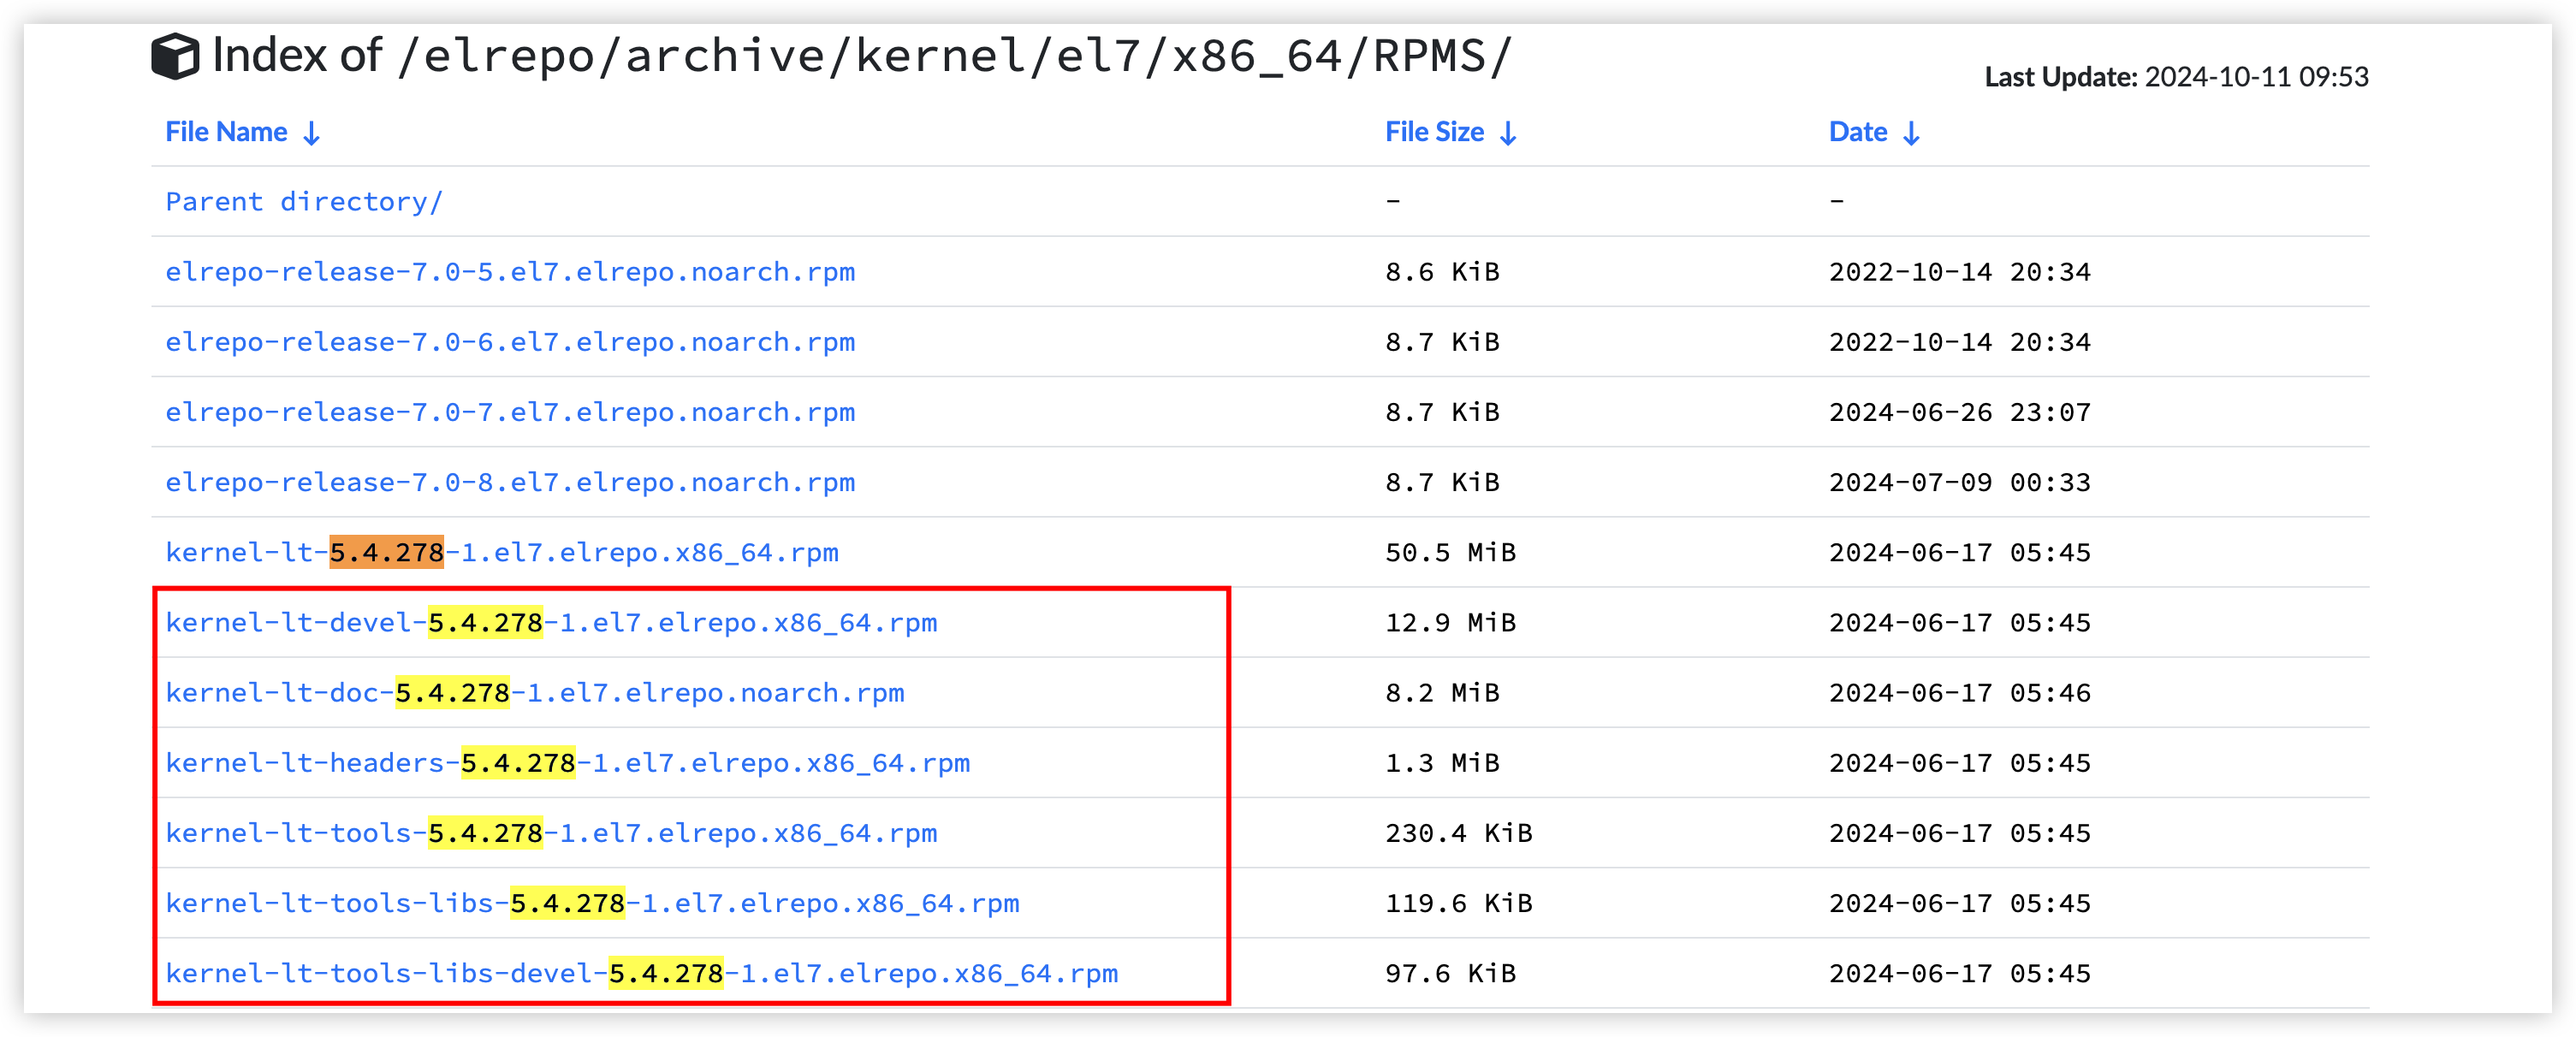
If the Yum repository does not contain the required versions of kernel-headers, kernel-devel, and other packages, you can download and install them yourself:
- Download the target software packages. One option is to download them from the Tsinghua University Mirror Site.
-
- Upload the software packages to the target instance. Learn more.
- Execute rpm -ivh <RPM package to be installed> command to install the target package
-

- Execute the following command to check whether the required new kernel and its kernel software packages are installed.
-
Ubuntu OS
In this section, the operation of upgrading the Ubuntu 22.04 kernel version from 5.15.0-91-generic to 6.8.0-56-generic is used as an example.
- Execute the following command to view the current kernel version.
-
- Sample output:
-

- Execute the following command to update the system software package list.
-
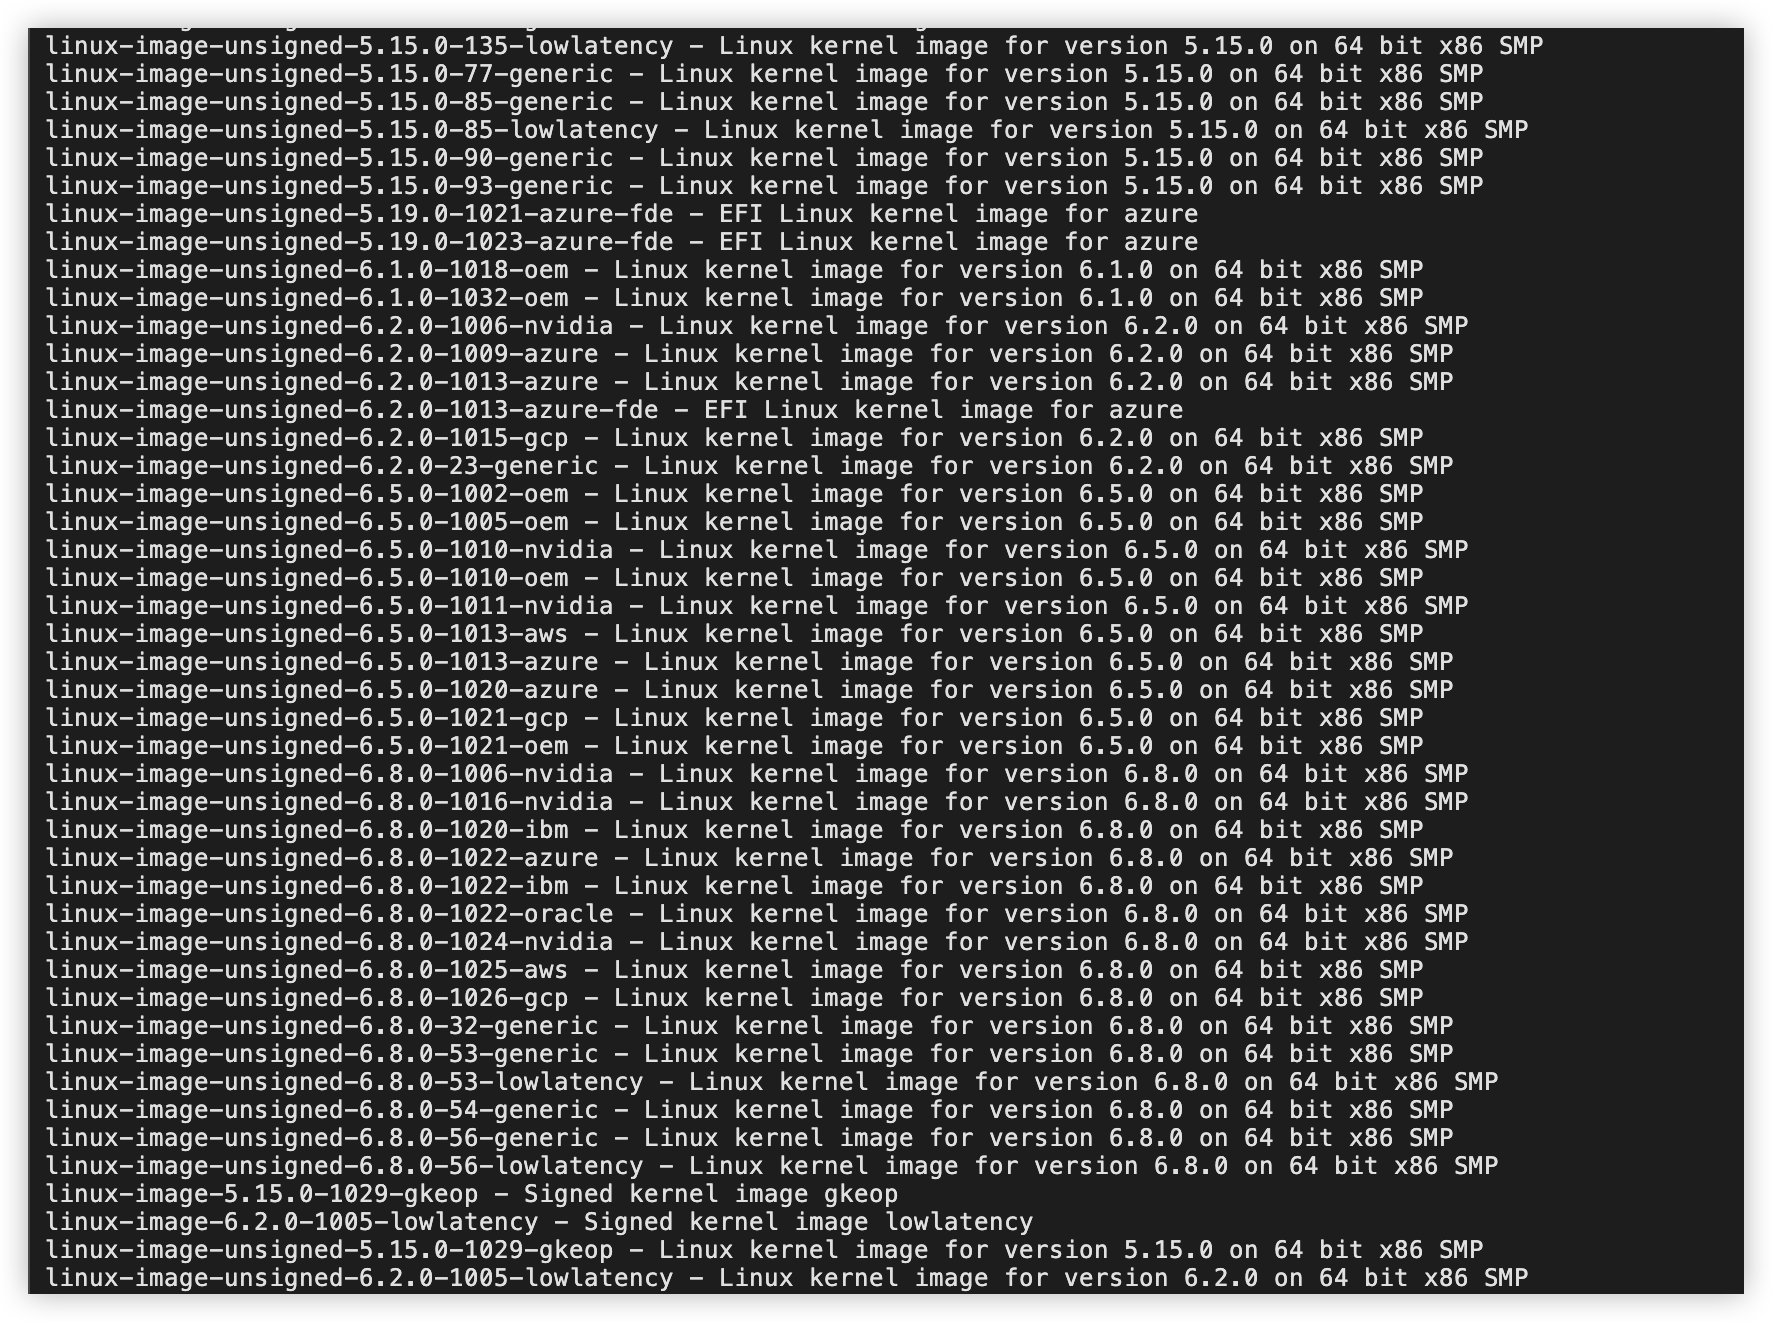
- Execute the following command to view the installable kernel versions.
-
- Sample output:
-
- Install the specified kernel version.
- Execute the following command to install the specified version of the kernel.
-
tip
Please replace 6.8.0-56-generic with the actual kernel version.
- Press Enter to confirm new kernel information.
-

- Install kernel packages required by the new kernel.
- Execute the following command to install kernel packages required by the new kernel.
-
tip
Please replace 6.8.0-56-generic with the actual kernel version.
- Press the Enter key to confirm the new kernel information.
-
- Execute the following command to forcibly update Initramfs.
-
tip
Please replace 6.8.0-56-generic with the actual kernel version.
- Execute the following command to update the GRUB configuration file.
- BIOS boot mode:
-
- UEFI boot mode
-
- Edit the default kernel.
- Execute the following command to view the serial numbers of installed kernels.
-
- When the following appears, it means that 6.8.0-56-generic, 5.15.0-135-generic, and 5.15.0-91-generic kernels have been installed. Their order is arranged from top to bottom, with the serial numbers starting from0, i.e., 6.8.0-56-generic serial number is 0, 5.15.0-135-generic serial number is 1, and 5.15.0-91-generic serial number is 2.
-

- Execute the following command to open the GRUB file.
-
- Please replace the GRUB_DEFAULT argument value with the target kernel number.
-

- Press the Esc key to exit edit mode, enter :wq, and then press Enter to save the changes and exit the file.
- Execute the following command to update the GRUB configuration file.
-
- Execute the following command to restart the instance.
-
- Execute the following command to check whether the kernel is upgraded.
-
- The callback shown below indicates that the kernel version has been successfully upgraded to 6.8.0-56-generic.
-

Debian OS
This section uses the example of upgrading the kernel version of Debian 12 from 6.1.0-18-amd64 to 6.1.0-31-amd64.
- Execute the following command to view the current kernel version.
-
- Sample output:
-

- Execute the following command to update the system software package list.
-
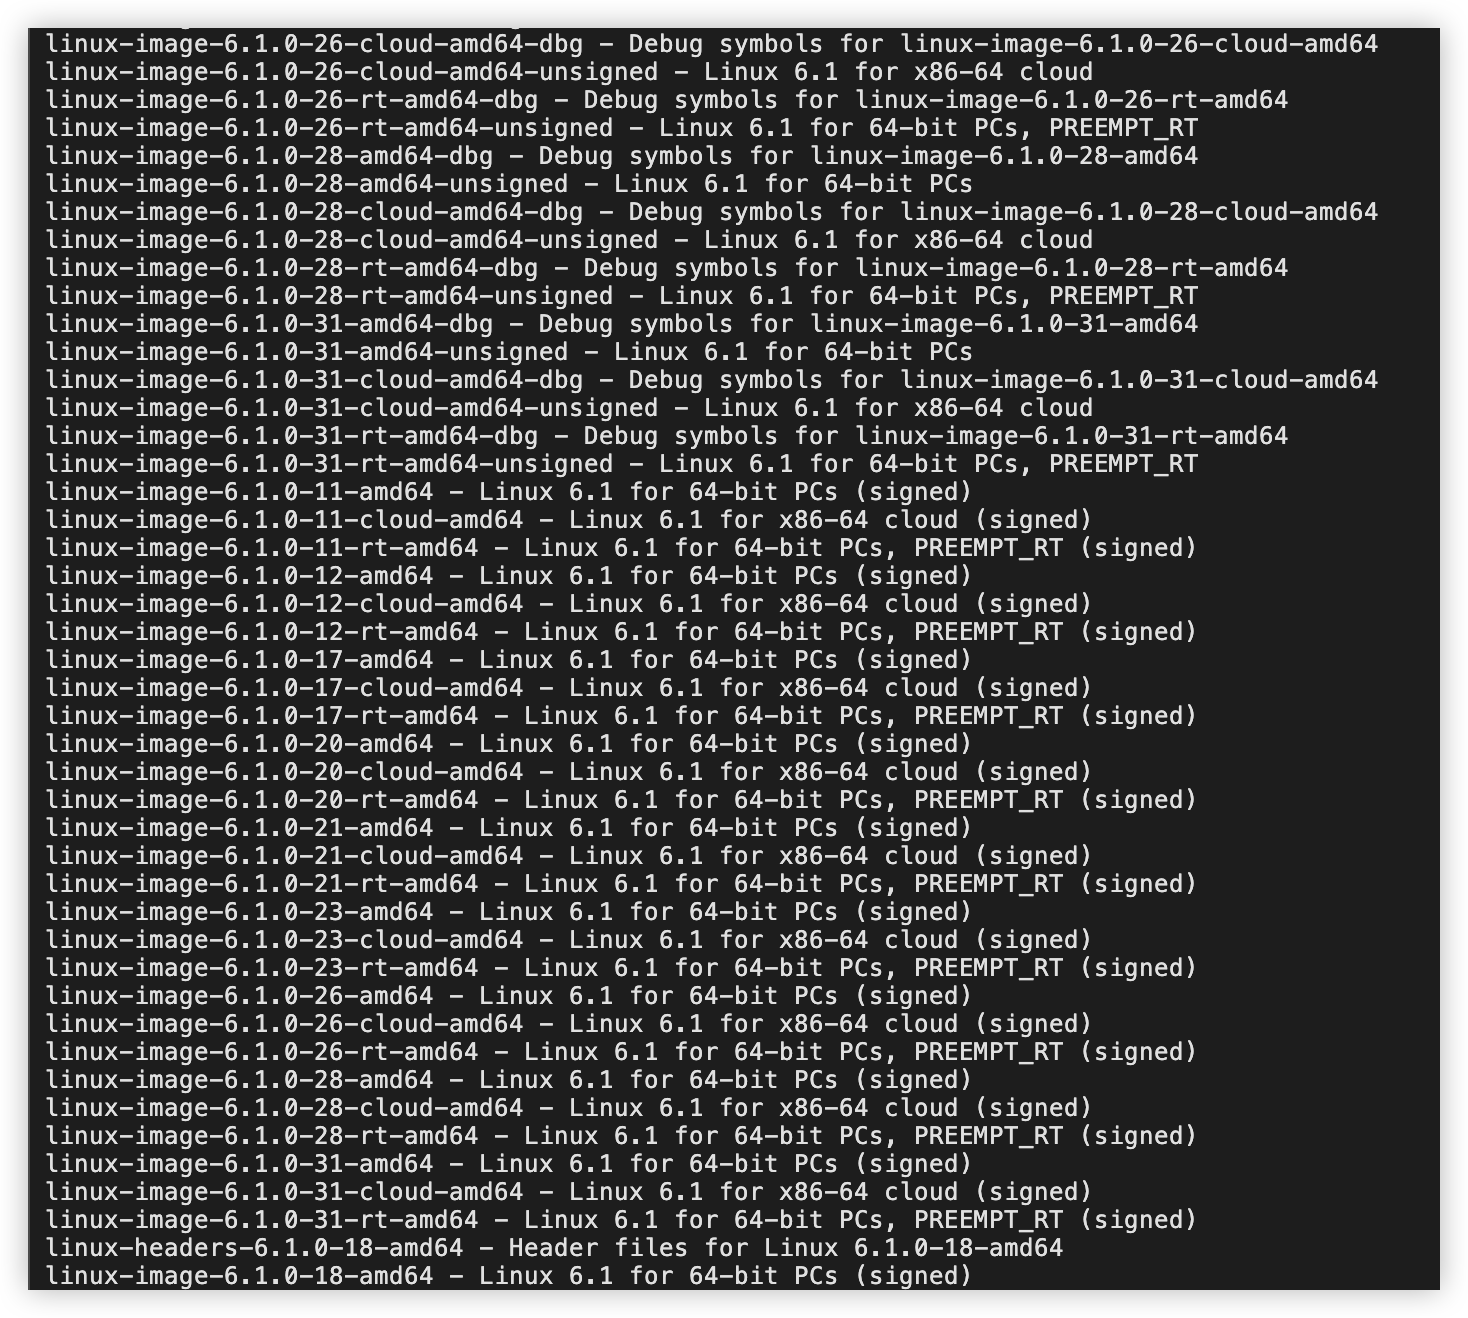
- Execute the following command to view the installable kernel versions.
-
- Sample output:
-
- Execute the following command to install the specified version of the kernel.
-
tip
Please replace 6.1.0-31-amd64 with the actual kernel version.
- Execute the following command to force update initramfs.
-
tip
Please replace 6.1.0-31-amd64 with the actual kernel version.
- Execute the following command to update the GRUB configuration file.
- BIOS boot mode:
-
- UEFI boot mode:
-
- Edit the default kernel.
- Execute the following command to view the serial numbers of installed kernels.
-
- When the following is echoed, it indicates two installed kernels: Kernel version: 6.1.0-31-amd64 and 6.1.0-18-amd64. Their order is arranged from top to bottom, with the serial numbers starting from 0, i.e., 6.1.0-31-amd64 number is 0, and 6.1.0-18-amd64 number is 1.
-

- Execute the following command to open the GRUB file.
-
- Please replace the GRUB_DEFAULT argument value with the target kernel number.
-

- Press the Esc key to exit edit mode, enter :wq, and then press Enter to save the changes and exit the file.
- Execute the following command to update the GRUB configuration file.
-
- Execute the following command to restart the instance.
-
- Execute the following command to check whether the kernel is upgraded.
-
- When the echo is as follows, it indicates that the kernel version has been successfully upgraded to 6.1.0-31-amd64.
-

Last updated: 2026.06.18 17:49:52
All rights reserved © Beijing Volcano Engine Technology Co., Ltd2024
