Elastic Compute Service
Elastic Compute Service


Document

- Documentation
 Elastic Compute ServiceElastic Compute ServiceUser GuideInstancesSelect instance billing methodOffsetting ResourcesReserved InstancesModifying RIs
 Copy page
 Download PDF
Reserved Instances
Modifying RIs
Copy pageDownload PDFModifying RIs
Applicable scenarios
After you purchase an RI, if your business needs change, you can adjust the RI through the RI modification function. This feature allows you change the name, availability zone, instance type and number, associated project and tag, and auto-renewal function of RI. The specific scenarios are as follows:
tip
For ease of description, the RI to be changed is called the original RI, and the one obtained after change is the target RI.
Scenarios | Description |
Change RI attribute | Such as change of the name, instance type, instance number. |
| You can change the availability zone of RI on the following occasions:
tip Accounts that have not enabled regional RIs can not change the availability zone attribute. Regional RI is currently in Beta. If you need a trial, contact your account manager to apply. |
Split RI | You can split one or more RIs into multiple RIs with less computing power. This allows you match them with pay-as-you-go instances of the corresponding types and handle traffic distribution of your business. |
Merge RI | If your business demand is concentrated, you can merge multiple RIs into one or more RIs with greater computing power. Therefore, you can match RIs with pay-as-you-go instances of corresponding type. |
Prerequisites
- The original RI must be In effect.
- Instances of original RI and the target RI must belong to the same instance family. And the original RI and the target RI must have the same expiration time.
- When you modify RI, the total computing power of the original RI and target RI must be the same. For information related to the normalization factor, refer to Viewing normalization factor.
- You can modify a maximum of 10 original RIs one time. The number of target RIs generated from the change must not exceed 50.
Usage notes
Some RIs do not support changing the instance type.
For RIs of certain instance families/types, you can not change their instance type. However, you can still change the number of instances and RIs. Those instance families/types are listed below:
tip
- For HPC-optimized RIs, in addition to the number of both instances and RIs, you can also change the HPC Cluster that instances belong to.
- RIs that do not support instance type change and those that do, can not be converted between each other.
Instance type family | Instance type that does not support specification change |
General-purpose g1ie | ecs.g1ie.14xlarge |
General-purpose g2i | ecs.g2i.14xlarge |
Local SSD i2g | ecs.i2g.xlarge ecs.i2g.14xlarge ecs.i2g.28xlarge |
Local SSD i2 | All |
Shared | ecs.s2-c1m2.2xlarge |
EBM | All |
GPU Accelerated g1ve | ecs.g1ve.21xlarge |
GPU Accelerated g1te | ecs.g1te.xlarge ecs.g1te.21xlarge |
GPU Accelerated gni2 | ecs.gni2.3xlarge ecs.gni2.10xlarge |
GPU Rendering | All |
HPC-optimized | All |
Procedure
- Log in to the Offsetting resources console.
- In the top menu bar, select the region and project of your business.
- On the RI list page under the "Reserved instances" tab, click the "··· > Modify Reserved Instances" button in the "Actions" column of the selected RI.
- On the "Modify Reserved Instances" page, configure the target RI name, availability zone, instance type and number.
- You can click the "Add RI" button. You can add up to 10 original RIs one time. The RI to be added must match the selected RI in terms of region, instance type family, support for instance type modification, expiration time, and project.
- Complete other configurations.
- Tag/Project: The newly generated target RI is not associated with the same tag/project as the original RI. You can add a new tag/project to it. Once added, all target RIs generated this time are associated with the same tag/project.
- Auto-renewal: After you enable auto-renewal function, the platform automatically deducts the renewal expenses before the expiration of all the target RIs generated this time. You don't need to manually renew them.
- Click Confirm to complete the operation.
- Log in to the Offsetting resources console.
- In the top menu bar, select the region and project of your business.
- On the RI list page under the "Reserved instances" tab, click the "··· > Modify Reserved Instances" button in the "Actions" column of the selected RI.
- On the "Modify Reserved Instances" page, confirm the information of the selected original RI.
- If you need to add multiple original RIs, you can click the "Add RI" button. You can add up to 10 original RIs one time.
- Once you confirm all details, you can click the "Add Target RI" button, add them one by one and configure each accordingly. You can add up to 50 target RIs one time.
tip
To split RI, the total computing power of the original RI and target RI must be the same.
- Complete other configurations.
- Tag/Project: The newly generated target RI is not associated with the same tag/project as the original RI. You can add a new tag/project to it. Once added, all target RIs generated this time are associated with the same tag/project.
- Auto-renewal: After you enable auto-renewal function, the platform automatically deducts the renewal expenses before the expiration of all the target RIs generated this time. You don't need to manually renew them.
- Click Confirm to complete the operation.
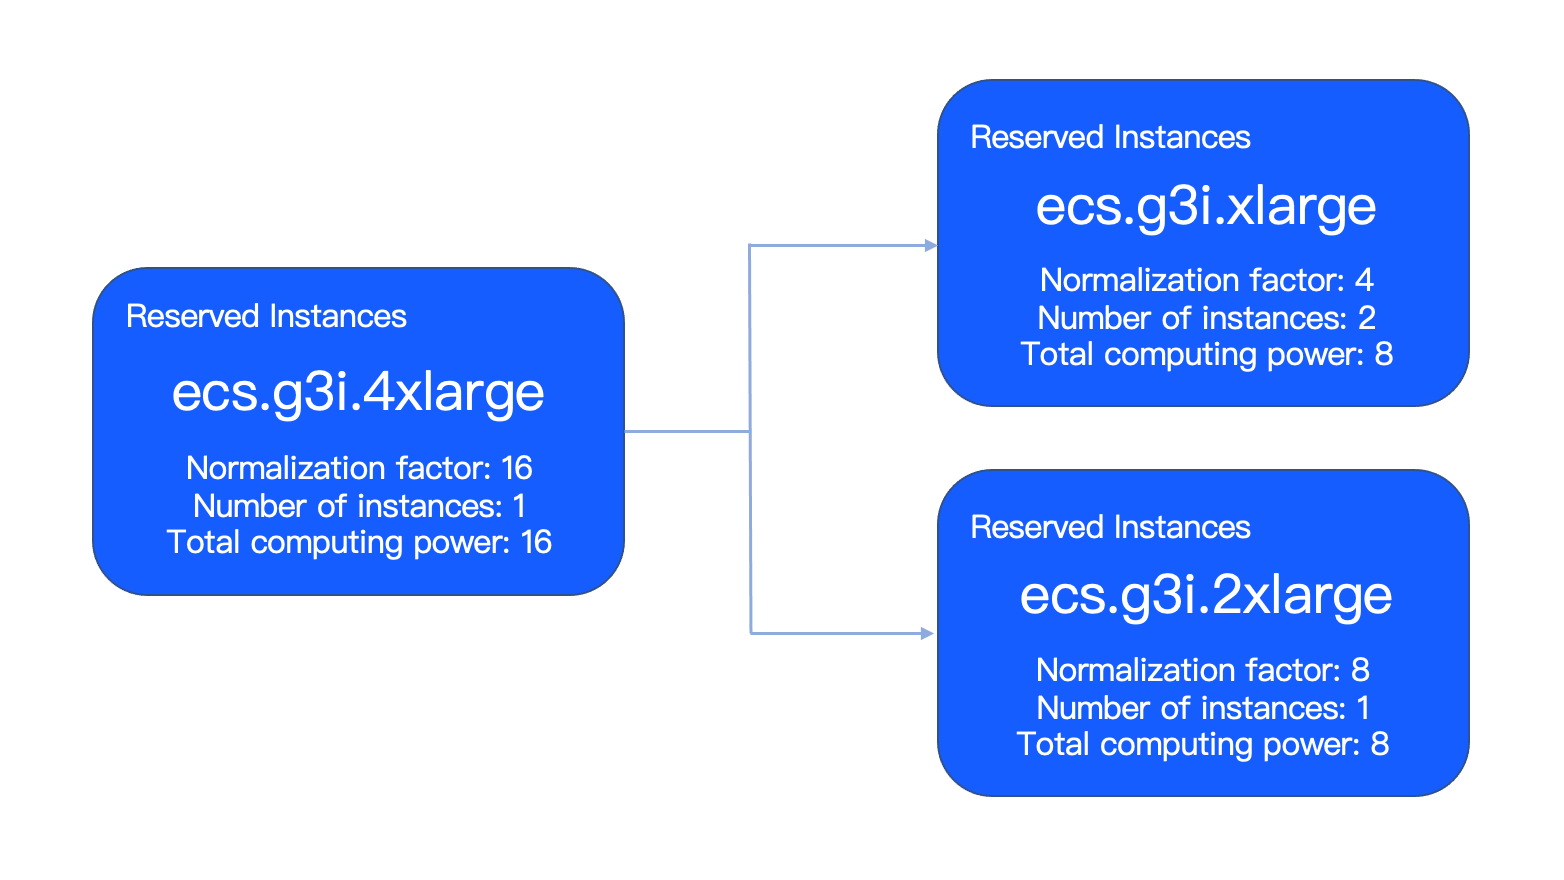
A sample of splitting RI is shown in the figure below.
- Log in to the Offsetting resources console.
- In the top menu bar, select the region and project of your business.
- On the RI list page under the "Reserved instances" tab, click the "··· > Modify Reserved Instances" button in the "Actions" column of the selected RI.
- On the "Modify Reserved Instances" page, confirm the information of the selected original RI.
- If you need to add multiple original coupons, you can click the "Add RI" button. You can add up to 10 original coupons in one operation.
- Once you confirm all details, configure the name, instance type, and instance count of target RI.
- If you need to generate multiple target RIs, you can click the "Add Target RI" button, add them one by one and configure each accordingly.
tip
The total computing power of the original RI and target RI must be the same for successful change.
- Complete other configurations.
- Tag/Project: The newly generated target RI is not associated with the same tag/project as the original RI. You can add a new tag/project to it. Once added, all target RIs generated this time are associated with the same tag/project.
- Auto-renewal: After you enable auto-renewal function, the platform automatically deducts the renewal expenses before the expiration of all the target RIs generated this time. You don't need to manually renew them.
- Click Confirm to complete the operation.
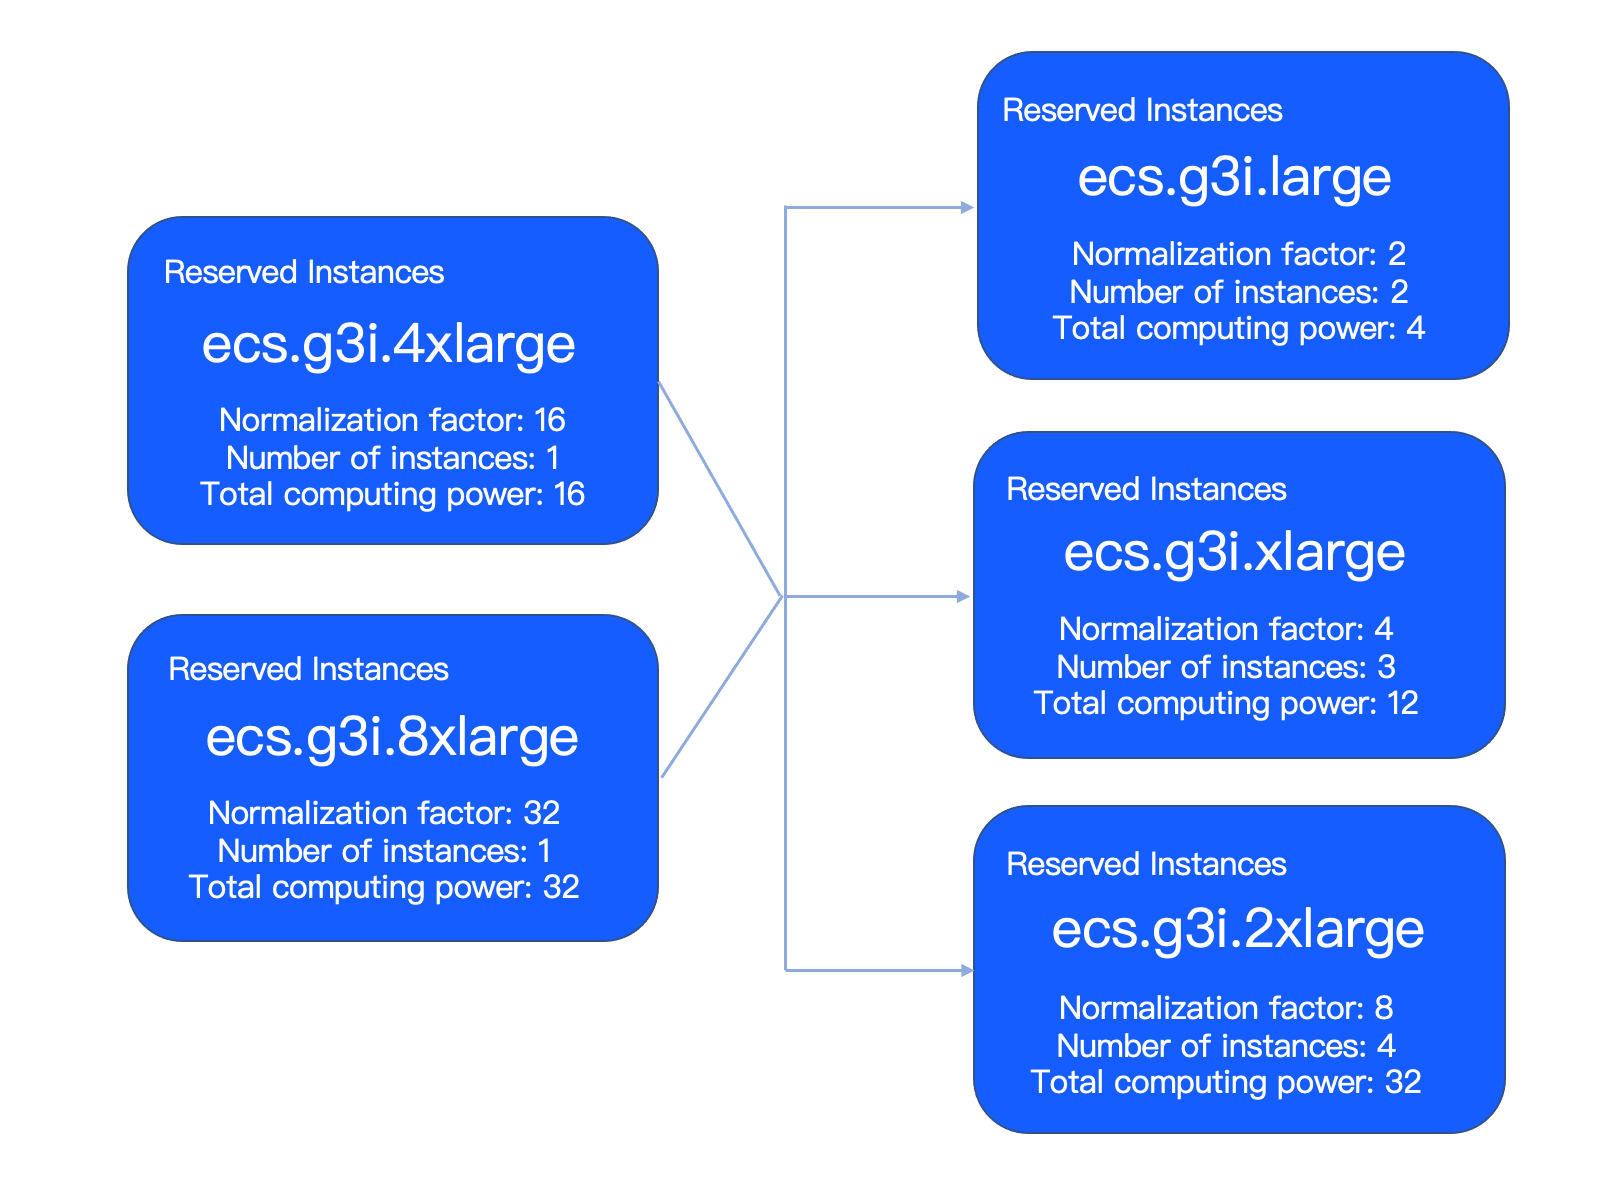
A sample of merging RIs is shown in the figure below.
Operation results
After you split or merge RIs, the original RI enters the Changing status. The target RI appears with the status of Creating.
- Original RI: It expires, and its expiration time is the same as the modification time. The remaining value on the original RI is allocated to the newly generated target RI. For details on value allocation, refer to Order management.
- Target RI: It becomes In effect. Its creation time is the same as the modification time. The time it starts working and can be used for deductions is calculated on the hour. It expires at the same time as the original RI, and the type of reserved resources updates automatically. If the target RI matches the pay-as-you-go instance, it begins to deduct the pay-as-you-go bill at the same time.
- Success example
- Suppose at 13:35:00 on December 20, 2022, you successfully changed a zonal RI with the specification ecs.g2i.2xlarge (RI1) into two zonal RIs with the specification ecs.g2i.xlarge (RI2 and RI3),
- Then:
- RI1 would expire at 13:35:00 on December 20, 2022. It could only be used to offset hourly bills for ecs.g2i.2xlarge instances generated before 13:00:00 on December 20, 2022.
- RI2 and RI3 were also created at 13:35:00 on December 20, 2022. They could be used to offset hourly bills for ecs.g2i.xlarge instances from 13:00:00 on December 20, 2022 until they expired. Additionally, the resources they could offset and reserve would change from ecs.g2i.2xlarge to ecs.g2i.xlarge. If RI2 and RI3 successfully matched with an instance immediately after they took effect, they would start to deduct the hourly bill of the ecs.g2i.xlarge instance from December 20, 2022 13:00:00.
The original RI remains available, and the tag/project associated with it remains unchanged.
Related documents
Last updated: 2026.06.24 17:17:27
All rights reserved © Beijing Volcano Engine Technology Co., Ltd2024
