Elastic Compute Service
Elastic Compute Service
Elastic Compute Service


Document
Elastic Compute Service
What's New
Announcement
OpenAPI related
Pricing and quotas are related
About products and plugins
Feature discontinuation
Overview
Billing
Billable items
Billing methods
Billing methods change
Getting Started
User Guide
Instances
Instance types
X86 Computing
Elastic Bare Metal Server
Heterogeneous Computing
Select instance billing method
Spot instance
Elastic Scheduled Instance
Offsetting Resources
Reserved Instances
Buying ECS instances
Logging in to an instance
Logging in to a Linux instance
Managing instance status
Modifying instance types
Using instance user data and metadata
Instance metadata
Images
Public images
veLinux images
Custom images
Importing custom images
Creating custom images
Image detection
End of life (EOL) of image
Elastic Block Storage
Basic volume operations
Partitioning and formatting a volume
Extending a volume
EBS Agent
Snapshots
Basic snapshot operations
Auto snapshot policies
DataInsights
Network
Network interface and IP address
IP Address
IPv4 address
Security group
Security
Passwords and key pairs
Deployment and scaling
Monitoring
Monitoring metrics
Event monitoring
Local volume event O&M
Method 1: Solve the local volume failure by replacing the faulty volume
O&M
Cloud assistant
Managing agents
Process choreography
Common operation and maintenance tasks
Batch operations on instances
Batch operations on EBS Volumes
Batch operations on images
Temporary upgrade of bandwidth
Managing application updates
orchestration plan
Patch management
Managing patch plans
Managing patch baselines
IAM
Tags and projects
Best Practices
AI applications
OpenClaw (formerly Moltbot)
Quickly deploying OpenClaw via application templates
Quickly deploying OpenClaw via marketplace images
Manually deploying OpenClaw
Self-service website creation
Building environments
Building a Web environment (Windows)
Building applications
Building FTP site
Deploying databases
Building game servers
Building websites
Building a WordPress blog
Building multiple websites
Manage software sources for Linux instances
AIGC practices
Performance test
Network performance test
Instance configuration
Setting up AD Domain Services on Windows OS
Windows Multi - User Login
Changing screen resolution
Instance data
Uploading or downloading files
Data restoration
ECS instance local time synchronization
Volume
Monitoring
Security
Images
Kernel fine-tuning
O&M
Troubleshooting
Remote log in issue
Linux operating system issue
Windows operating system issue
SSH log in issue
Operating system issue
veLinux operating system issue
Linux operating system issue
Windows operating system issue
Instance status issue
Instance unable to start issue
High instance load issue
GPU instances issue
Network connection issue
Network configuration issue
Storage classes issue
EBS Volume issue
Local Disk issue
Logs and monitoring issue
Third - party software issue
API Reference
Regions and availability zones
Instances
Images
HPC clusters
Key pairs
Tags
Volumes
Reserved storage capacity
Snapshot
Auto snapshot policy
Monitoring
Deployment sets
Launch templates
Cloud assistant
Patch management
SDK reference
CLI Reference
FAQ
Dedicated Host DDH
What's New
Billing
User Guide
Manage Dedicated Host
Manage Dedicated Host Cluster
Manage ECS instances
Monitoring and O&M
API reference
proprietary host
- Documentation
 Elastic Compute ServiceElastic Compute ServiceUser GuideImagesChanging operating systems
 Copy page
 Download PDF
Images
Changing operating systems
Copy pageDownload PDFChanging operating systems
Scenarios
Changing the operating system is an important means to reset the system volume and recover instances from system failures.
- When an existing instance encounters a system failure, you can change the operating system (that is, reset the system volume) to restore the instance to its initial status at startup.
- When the current operating system of an existing instance does not meet your business requirements, you can also change the operating system to meet business requirements.
You can change the operating system regardless of whether you change the operating system type. For example, you can change a Windows operating system to another Windows operating system. You can also change a Linux operating system to a Windows operating system.
tip
You can also use the operating system migration feature of the SMC to change the CentOS operating system of an instance to the CentOS-compatible veLinux operating system without downtime. Learn more.
Considerations
Changing the operating system is a high-risk operation that may cause prolonged business interruptions. Read the following precautions before you proceed.
Preparations | |
Instance stopped |
|
Considerations | |
Image selection |
tip
|
Host name | After the Linux operating system is changed to a Windows operating system, the first 15 characters of the hostname are retained by default. |
Network | The EIP address of the instance will not change after the operating system is changed. |
Volume |
|
Local volume | After the operating system is changed, the data in the local volume (such as local NVMe SSD and SATA HDD) mounted on the instance is retained. |
Security protection | After the operating system is changed as follows, HIDS is disabled in the ECS console by default. To enable HIDS, go to the Security Center console. Learn more.
|
Metadata access method | After you change the operating system, the instance metadata access method remains unchanged. tip After the operating system is changed, you can call the ModifyInstanceMetadataOptions operation to adjust the instance metadata access method. For example, when the instance cannot start as expected because Security Hardening Mode is not supported by the image, you need to call the operation to change the instance metadata access method to Normal Mode. |
Procedure
You can change the operating system of one or multiple existing instances at the same time to restore the system volume to the initial status.
tip
When you change the operating system of multiple existing instances at the same time, take note of the following items:
- The instances for which you want to change the operating system must remain in Stopped state, and their associated availability zones, images, and billing methods must be identical.
- You can change the operating system for up to 20 instances at the same time.
- You can log in to the instances for which you have changed the operating system at the same time by using the newly configured credentials.
- Log in to the instance console.
- In the top menu bar, select the region and project where the target instance resides.
- On the Instances page, click "Stop" in the "Actions" column of the target instance to stop the instance.
- After the instance is stopped, click "... > Volumes & Image > Replace operating system" in the "Actions" column of the instance. Configure the parameters described in the following table.
- ParameterDescriptionImagePublic Image, Custom Image, Shared Images, and Marketplace Image are supported. The current image type is selected by default. You can select the type of image that you want to use to change the operating system.warning
- If the custom image you select has any items that are strongly recommended to be fixed, click the "View details" button and follow the guidance to complete the fixes before you use the custom image. This helps prevent instance malfunctions caused by image issues. Learn more
- If you use a custom image belonging to a project to change the operating system, your account must have permissions to perform operations on the project. Otherwise, you cannot use the custom image. For more information about how to authorize an account to operate a project, see Managing access to projects.
Login credentials"Password", "Key pair", and "Keep Image settings" are supported. We recommend that you select "Key pair" for higher security.- Password: If you select "Password", specify a complex password to enhance security.
- Key pair (recommended): A key pair consists of a public key and a private key. If you already have a key pair, select the name of the key pair to associate it. After association, you can log in to Linux instances with the private key. If you do not have a key pair, click the "Create key pair" button to go to the key pair page and create one.
- Keep Image settings: When you use a custom image or shared image, you can log in to the instance by using the preset credentials (password/key pair) in the image.
warning- You cannot select "Key pair" for a Windows image.
- When you select "Keep image settings" for a Windows image, take note of the following items. Otherwise, you cannot log in to the instance by using the preset password of the image.
- Before November 10, 2022, instances created by using Windows public images provided by the platform need to have their operating system or the Cloudbase-init configuration files changed. The Cloudbase-init configuration files of custom images or shared images generated by using the instances also need to be changed. For more information, refer to Installing Cloudbase-init on virtual machine.
- Read the precautions for replacing the system volume and click the "Confirm the order" button to submit the request.
tip
If the target instance is running a Linux operating system and the billing method is subscription, when you change the Linux operating system to a Windows operating system, you will be redirected to the order information confirmation page. On the order information confirmation page, you can confirm the new configuration information and choose whether to use a coupon to offset fees.
Operation results
- Successful: After you submit the request for changing the operating system, the instance changes to the Rebuilding status. Approximately 10 minutes later, the operating system is changed, the instance automatically starts, and the status changes to Running. Billing is resumed for instances in economical mode. Click the instance name to go to the instance details page, on which the new image is displayed.
- Failed: The status changes from Rebuilding to Stopped. The instance will roll back to the pre-failure status and remain in the shutdown status. Please retry or contact customer service for assistance.
What to do next
After you change the operating system, you must perform the following operations before the data disk can be used as expected.
Switch between Linux operating systems
Switch between Windows and Linux operating systems
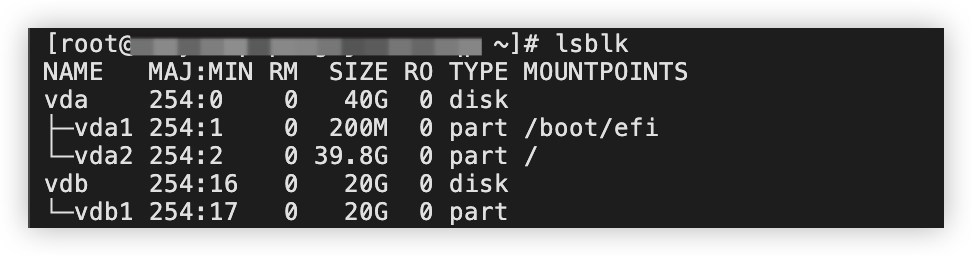
- Execute the following command to view information about unmounted data volumes.
- lsblk
- If the following result is displayed, the original data volume vdb (this volume contains one partition vdb1) is not mounted.
-
- Execute the following command to create a mount point.
- sudo mkdir /data
tip
Replace /data with the name of the target mount point.
- Execute the following command to mount the data volume to the target mount point.
- sudo mount /dev/vdb1 /data/
tip
Replace /dev/vdb1 with the name of the target data volume partition.
Replace /data/ with the name of the target mount point.
- Configure automatic mounting.
- Execute the following command to query the UUID of the partition.
- sudo blkid /dev/vdb1
tip
Please replace /dev/vdb1 with the target data disk partition name.
- Sample output:
-

- Run the following command to open the /etc/fstab file.
- vim /etc/fstab
- Press the i key to enter edit mode, and add the following content at the end of the file.
- UUID=9439749e-8d07-4ce2-9591-xxxxxbc9 /data ext4 defaults 0 0
tip
Replace 9439749e-8d07-4ce2-9591-xxxxxbc9 with the actual UUID of the target volume partition.
Replace /data with the actual mount point name for the target volume partition.
Replace ext4 with the actual file system format of the target volume partition.
- Press the esc key to exit editing, enter :wq, and press Enter to save and exit the file.
- After the Linux operating system is changed to a Windows operating system, the Windows operating system cannot recognize file system formats such as ext3, ext4, and XFS by default.
- If your data volume contains important data, you can install software (such as Ext2Read or Ext2Fsd) to recognize the data volume and obtain the data.
- If your data volume does not contain important data, we recommend that you re-initialize the data volume and then partition and format the volume (Windows) so that the data volume can be used as expected.
- After the Windows operating system is changed to a Linux operating system, the Linux operating system cannot recognize the NTFS file system format by default.
- If your data volume contains important data, you can install software (such as ntfsprogs) to recognize the data volume and retrieve the data.
- If your data volume does not contain important data, we recommend that you re-initialize the data volume and then partition and format the volume (Linux) so that the data volume can be used as expected.
Related documents
Last updated: 2026.08.04 11:11:47
All rights reserved © Beijing Volcano Engine Technology Co., Ltd2024
