实时音视频
实时音视频


文档指南

请输入


- 文档首页
 实时音视频互动白板构建白板应用iOS
 复制全文
复制全文 下载 pdf
iOS
 文档反馈
文档反馈 问问助手
问问助手前提条件
- 获取 AppID,参考 开通服务。
- 获取 Token,参考 密钥说明。
- Xcode 12.5 或以上版本。
本文操作步骤和示例图以 Xcode 13.1 为例。
- iOS 9.0 或以上版本的设备。
- 使用 Objective-C 作为开发语言。
- 请确保您的项目已设置有效的开发者签名。
- 已获取 Whiteboard SDK。
步骤 1: 创建项目
- 打开 Xcode, 点击 File > New > Project。
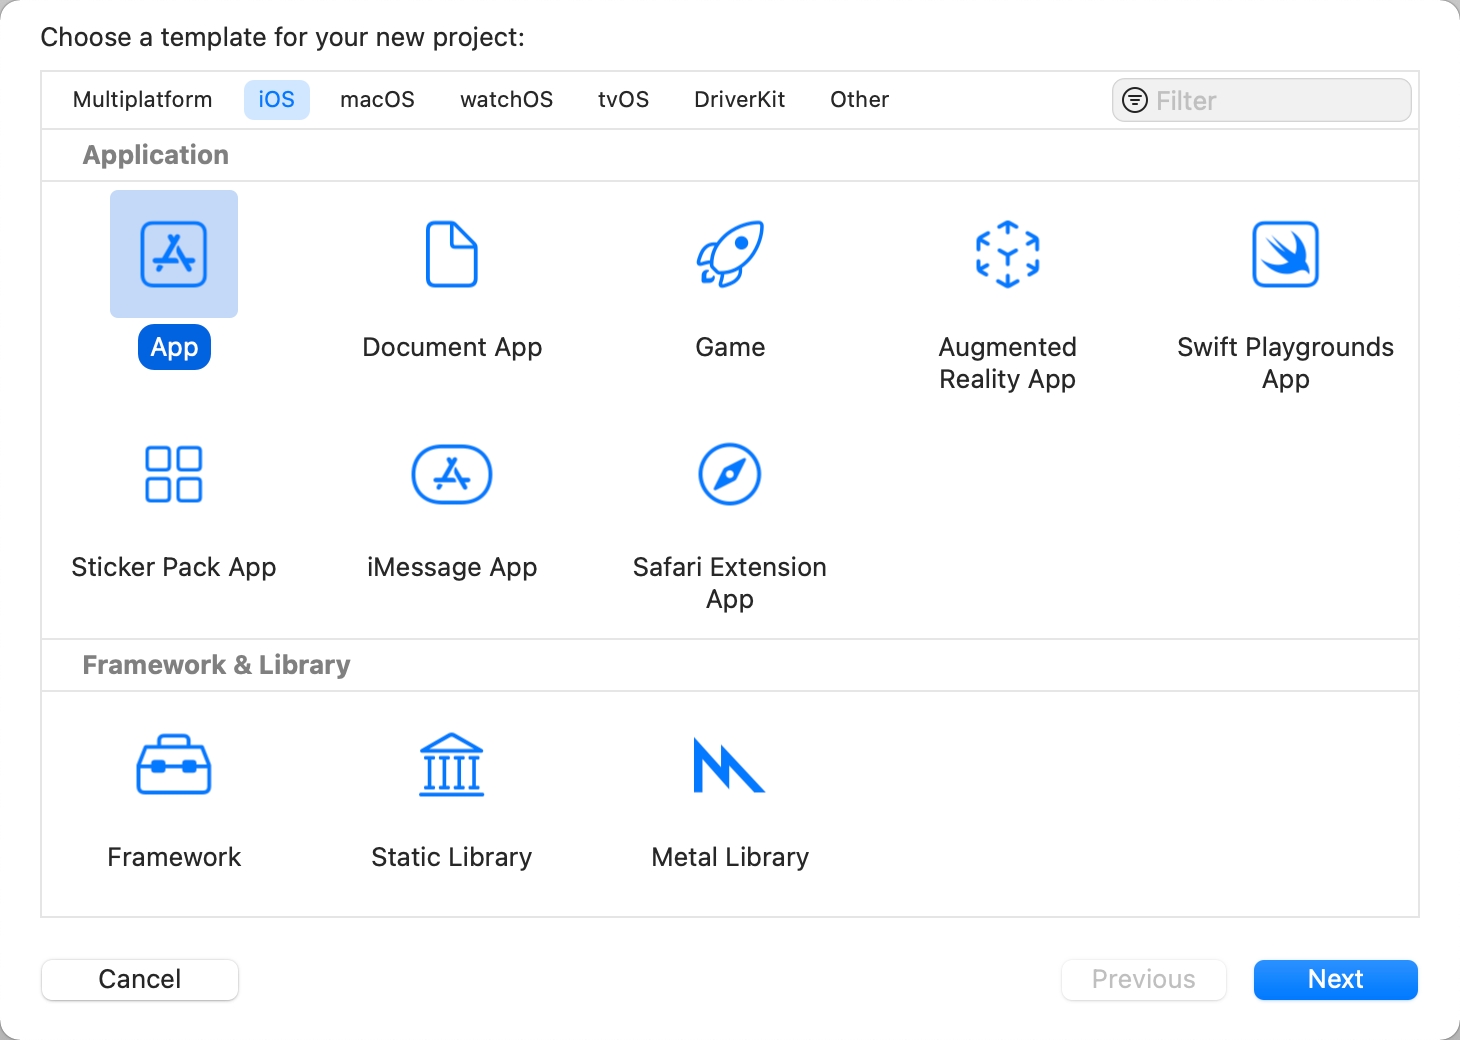
- 选择 iOS > App , 点击 Next。
-
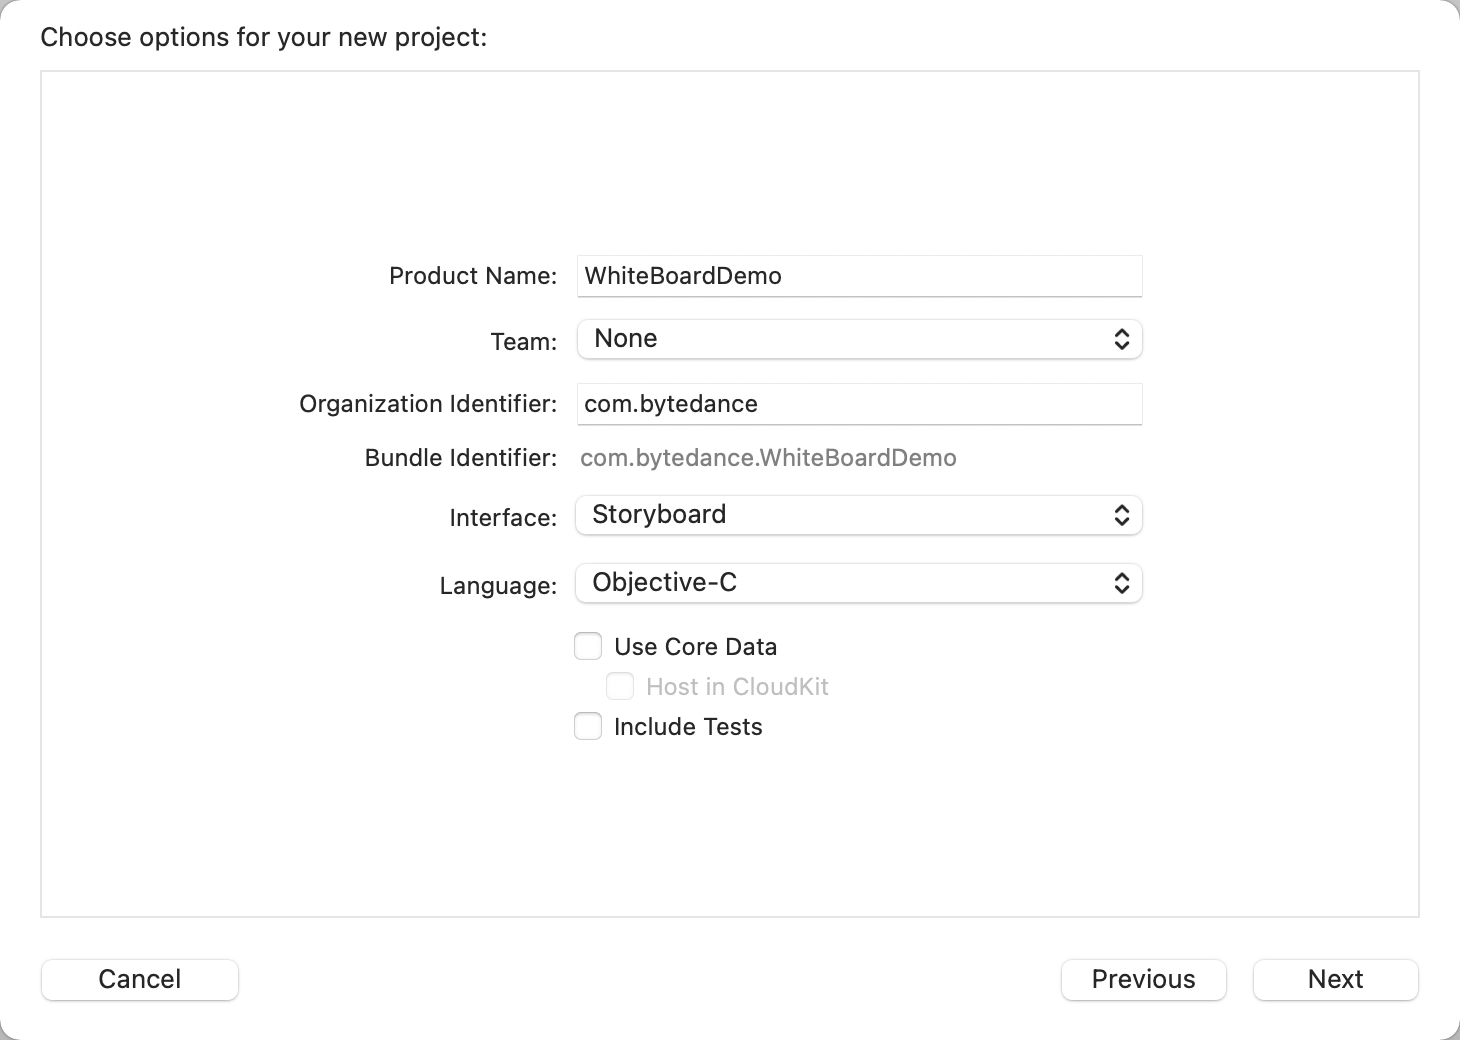
- 输入项目名称、团队名称、选择开发语言,点击 Next。
- 选择项目存储位置,点击 Create。
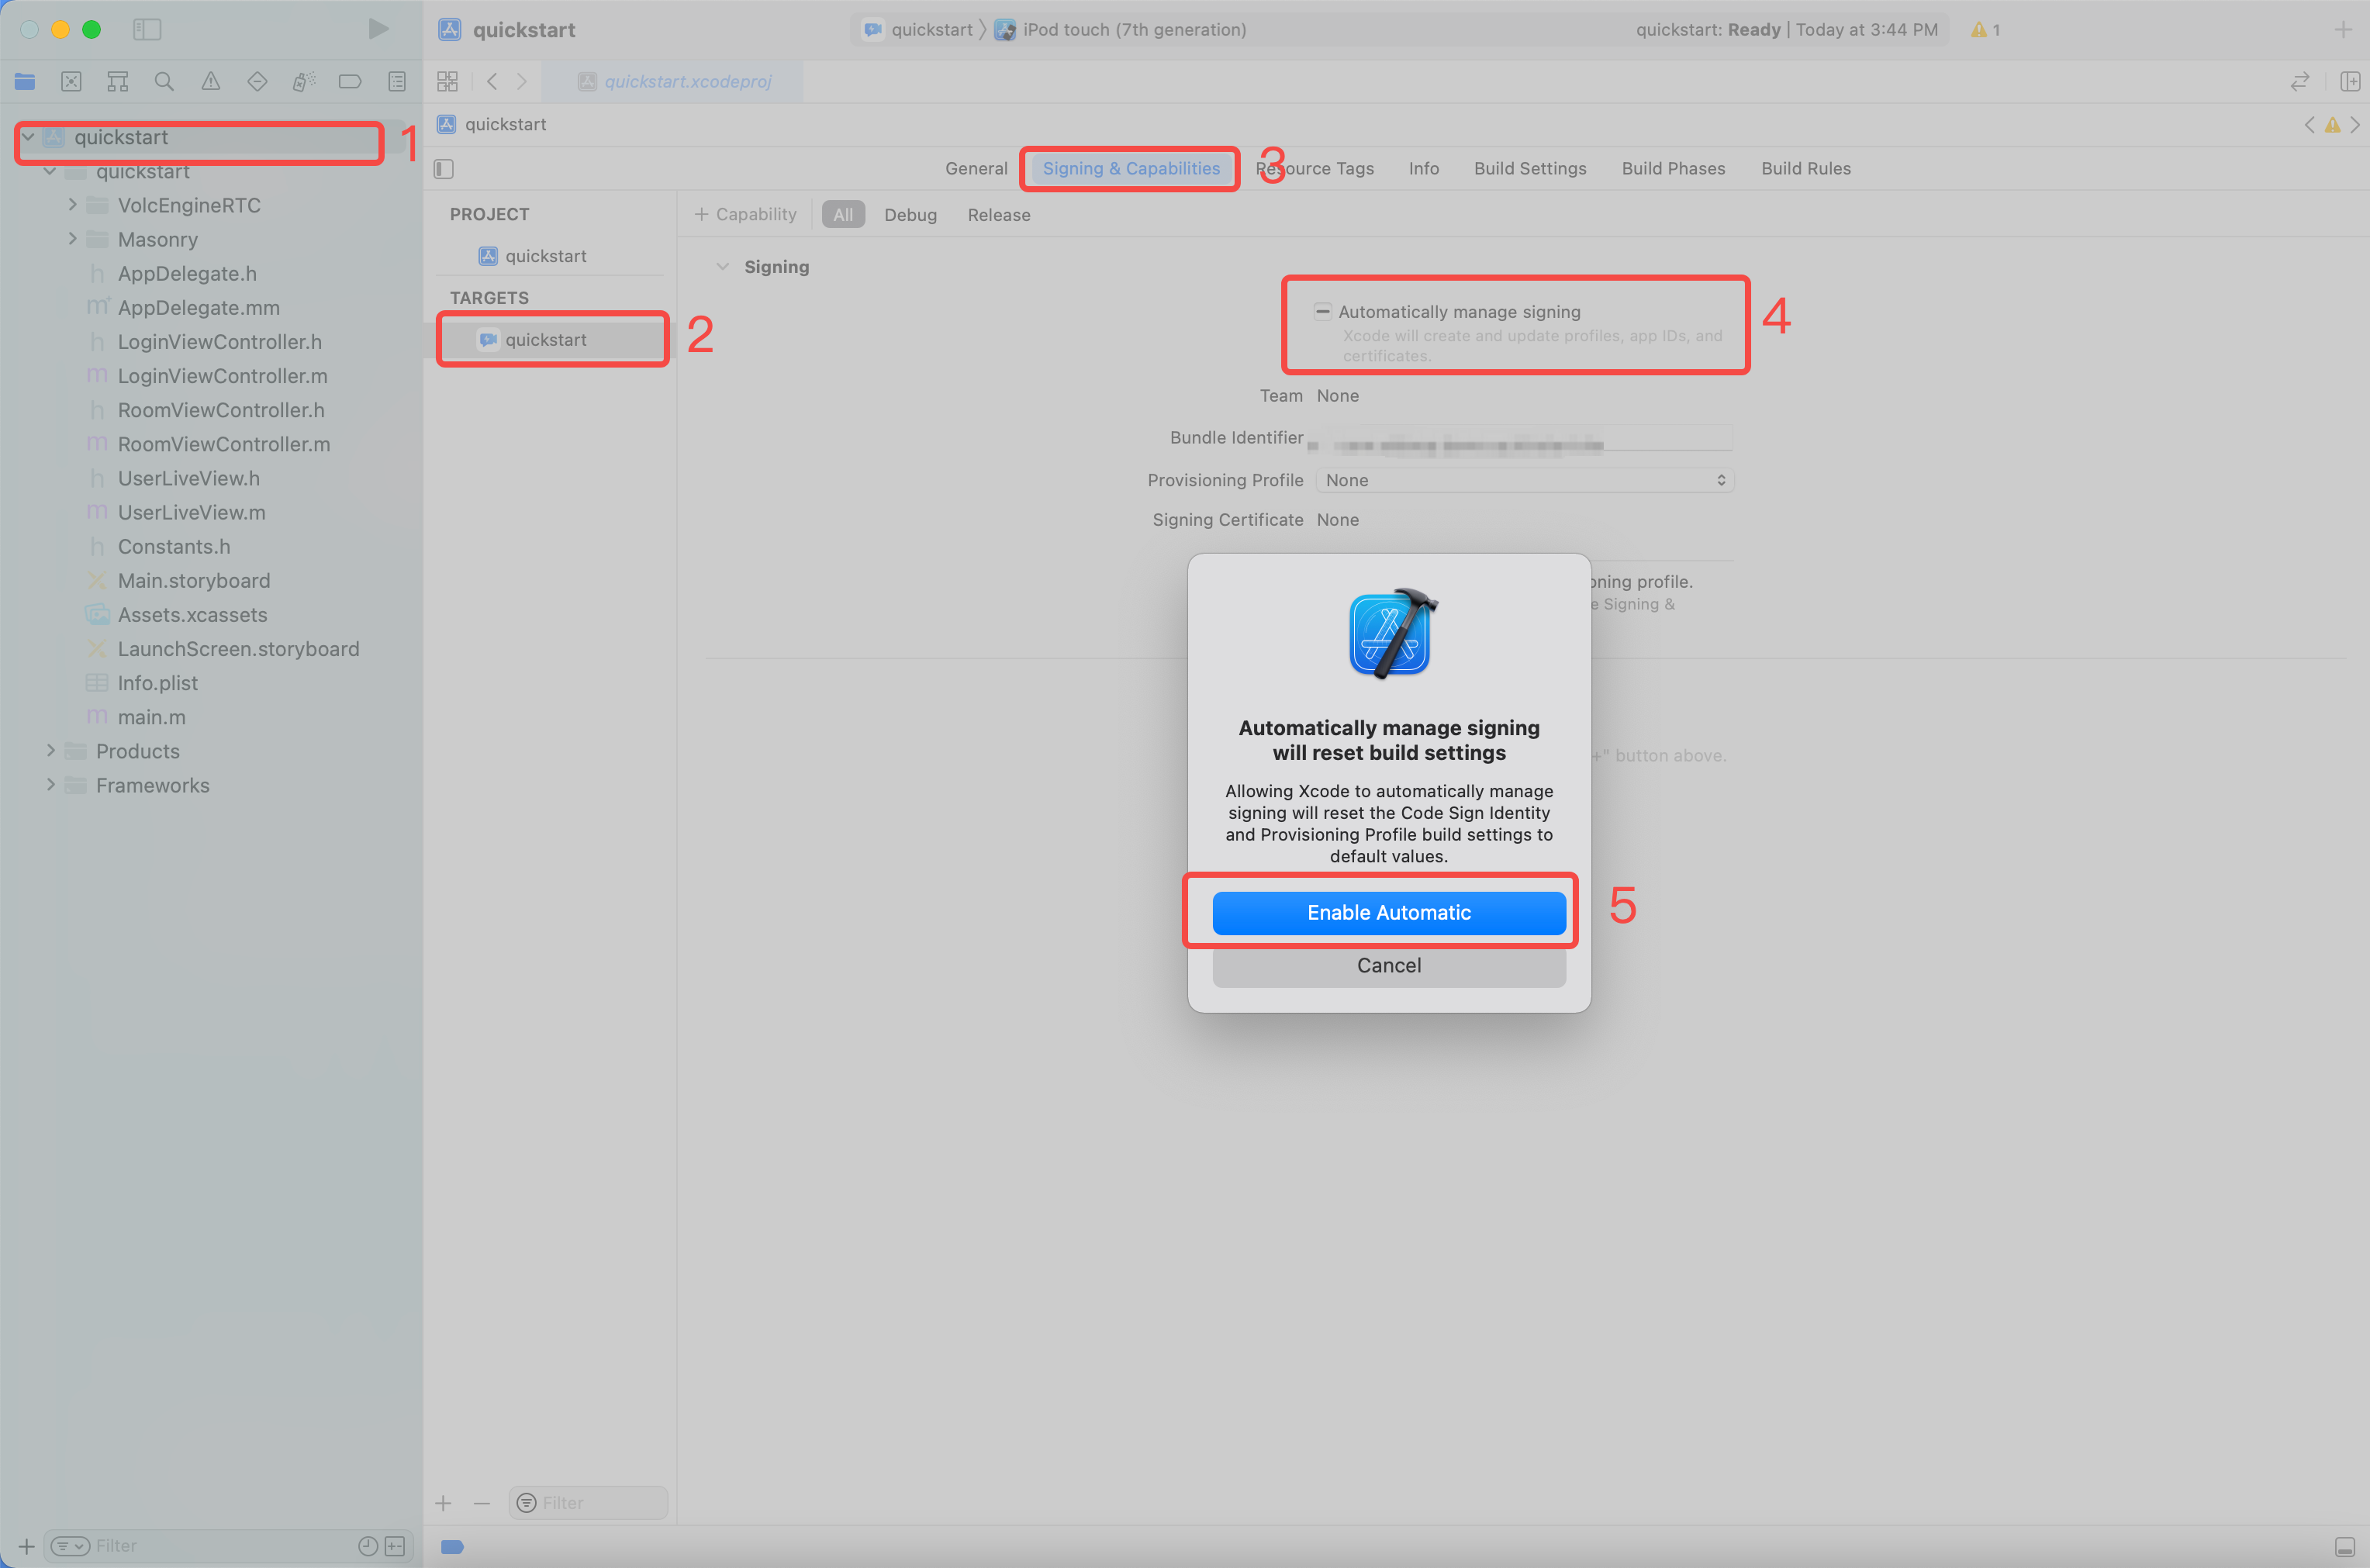
- 签名设置:进入 TARGETS > Project Name > Signing & Capabilities。勾选 Automatically manage signing, 并在弹出菜单中选择 Enable Automatic。
-
步骤 2: 创建用户界面
根据场景需要,为你的项目创建互动白板的用户界面。
为实现基本的白板功能,我们建议在项目中添加如下视图或元素:
- 选择模式按钮
- 调节图形(直线、圆、矩形、箭头)格式的面板按钮
- 橡皮擦按钮
- 清空白板按钮
- 下课按钮
- 退出房间按钮
步骤 3: 集成 SDK
- 为 podfile 文件的 target 工程添加依赖项,例如:
platform :ios, '9.0'
source 'https://github.com/volcengine/volcengine-specs.git'
target '你的项目名字' do
pod 'VolcEngineWhiteboard', '1.6.0'// 将版本号替换为最新或你需要的版本号。
end
- 在项目的配置文件里加入 SDK 依赖。可以根据实际需要指定 SDK 的版本。
spec.dependency 'VolcEngineWhiteboard', '1.6.0'// 版本号和 podfile 中的依赖项保持一致。
- 引入头文件
在调用了白板 SDK API 的文件中引入头文件。
//引入 头文件
#import "WhiteBoard/ByteWhiteBoardRoomManager.h"
#import "WhiteBoard/ByteWhiteBoardRoom.h"
#import "WhiteBoard/ByteWhiteBoard.h"
步骤 4: 实现功能
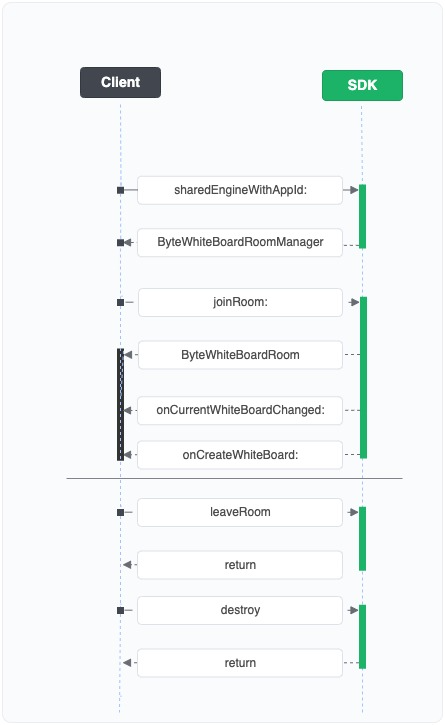
基础互动白板 API 时序图
1. 创建和初始化白板房间
- 为白板创建以下 3 个属性。
@property (nonatomic, strong) ByteWhiteBoardRoomManager * boardRoomManager;
@property (nonatomic, strong) ByteWhiteBoardRoom * boardRoom;
@property (nonatomic, strong) ByteWhiteBoard * board;
- 调用类 ByteWhiteBoardRoomManager 中的方法绑定设备信息和环境。
+ (void)setDeviceID:(NSString *)deviceID; // 设备id用于方便追踪排查问题
+ (void)setAid:(NSString*)aid; //火山内部客户使用,用于标识APP
+ (void)setLogLocation:(NSString*)path;//设置日志的位置,不设置则SDK自动选择
+ (instancetype)sharedEngineWithAppId:(NSString *)appId setEnv:(ByteWhiteBoardEnv)env bindToWindow:(UIView *)view completionHandler:(void (^)(void))block;
2. 加入白板房间
加入白板房间。如果当前房间没有白板,SDK 将自动创建白板。
- (void)joinRoom:(NSString *)roomID userID:(NSString *)userID token:(NSString*)token defalutBoard:(ByteWhiteBoardInfo *)boardInfo completionHandler:(void (^)(ByteWhiteBoardRoom *))block delegate:(id)delegate;
//回调触发后我们可以通过getRoomStatus得知当前房间是否上课。
- 白板房间 roomID 不能与 RTC 房间 roomID 相同。以免影响白板房间和 RTC 房间内回调提醒相互影响。建议为白板房间名加上 whiteboard_ 前缀。
- 白板用户 userID 不能与 RTC userID 相同。
- id<ByteWhiteBoardRoomDelegate>)delegate 为白板 ViewController,继承了 ByteWhiteBoardRoomDelegate 协议。
- 参考 使用 Token 完成鉴权 获取 Token。Token 有效时长应大于单次白板互动时长。例如, 24 小时。
3. 获取房间内所有白板信息
加入房间后,如果房间内白板数量为 0,将自动创建白板并触发 byteWhiteBoardRoom:onCreateWhiteBoard:boardId:whiteboard:。你可以通过本回调获取到白板对象。
此外,SDK 将通过 ByteWhiteBoardRoomDelegate 的 byteWhiteBoardRoom:onCurrentWhiteBoardChanged:activeBoard:whiteboard: 回调当前活跃的白板信息。
4 使用白板
使用不同的画笔对白板进行编辑。
[self.board setEditType:ByteWhiteBoardShapeTypePen];//设置成画笔模式或者其他
[self.board setWritable:YES];//设置当前白板是否可写
5. 结束使用白板
在结束白板使用时,释放资源的步骤如下。
- 调用 ByteWhiteBoardRoom 的 leaveRoom 离开房间,结束通话过程,释放所有通话相关的资源。
- (void)leaveRoom;
除了用户主动结束使用之外,在监听到以下错误时,你也需要调用上述接口,执行离房操作。
- (void)byteWhiteBoard:(ByteWhiteBoard *)board onError:(ByteWhiteBoardErrorCode)code message:(NSString *)message{
if (code == DUPLICATE_LOGIN || code == KICKED_OUT || code == INVALID_TOKEN) {
//离开房间的代码
[self.boardRoom leaveRoom];
[ByteWhiteBoardRoomManager destroy];
}
}
- (void)byteWhiteBoardRoom:(ByteWhiteBoardRoom *)boardRoom onError:(ByteWhiteBoardErrorCode)code message:(NSString *)message {
[self.class showToast:[NSString stringWithFormat:@"room error %ld",(long)code]];
if (code == DUPLICATE_LOGIN || code == KICKED_OUT || code == INVALID_TOKEN) {
//离开房间的代码
[self.boardRoom leaveRoom];
[ByteWhiteBoardRoomManager destroy];
}
}
- 调用 ByteWhiteBoardRoomManager 的 destroy 释放资源。
[ByteWhiteBoardRoomManager destroy];
常见问题
1. 日志和缓存文件的路径在哪里?
- 日志默认路径:AppData/Library/Caches/Logs。你可以调用 setLogLocation: 自定义日志路径。
- 回放文件默认路径:AppData/Library/Caches
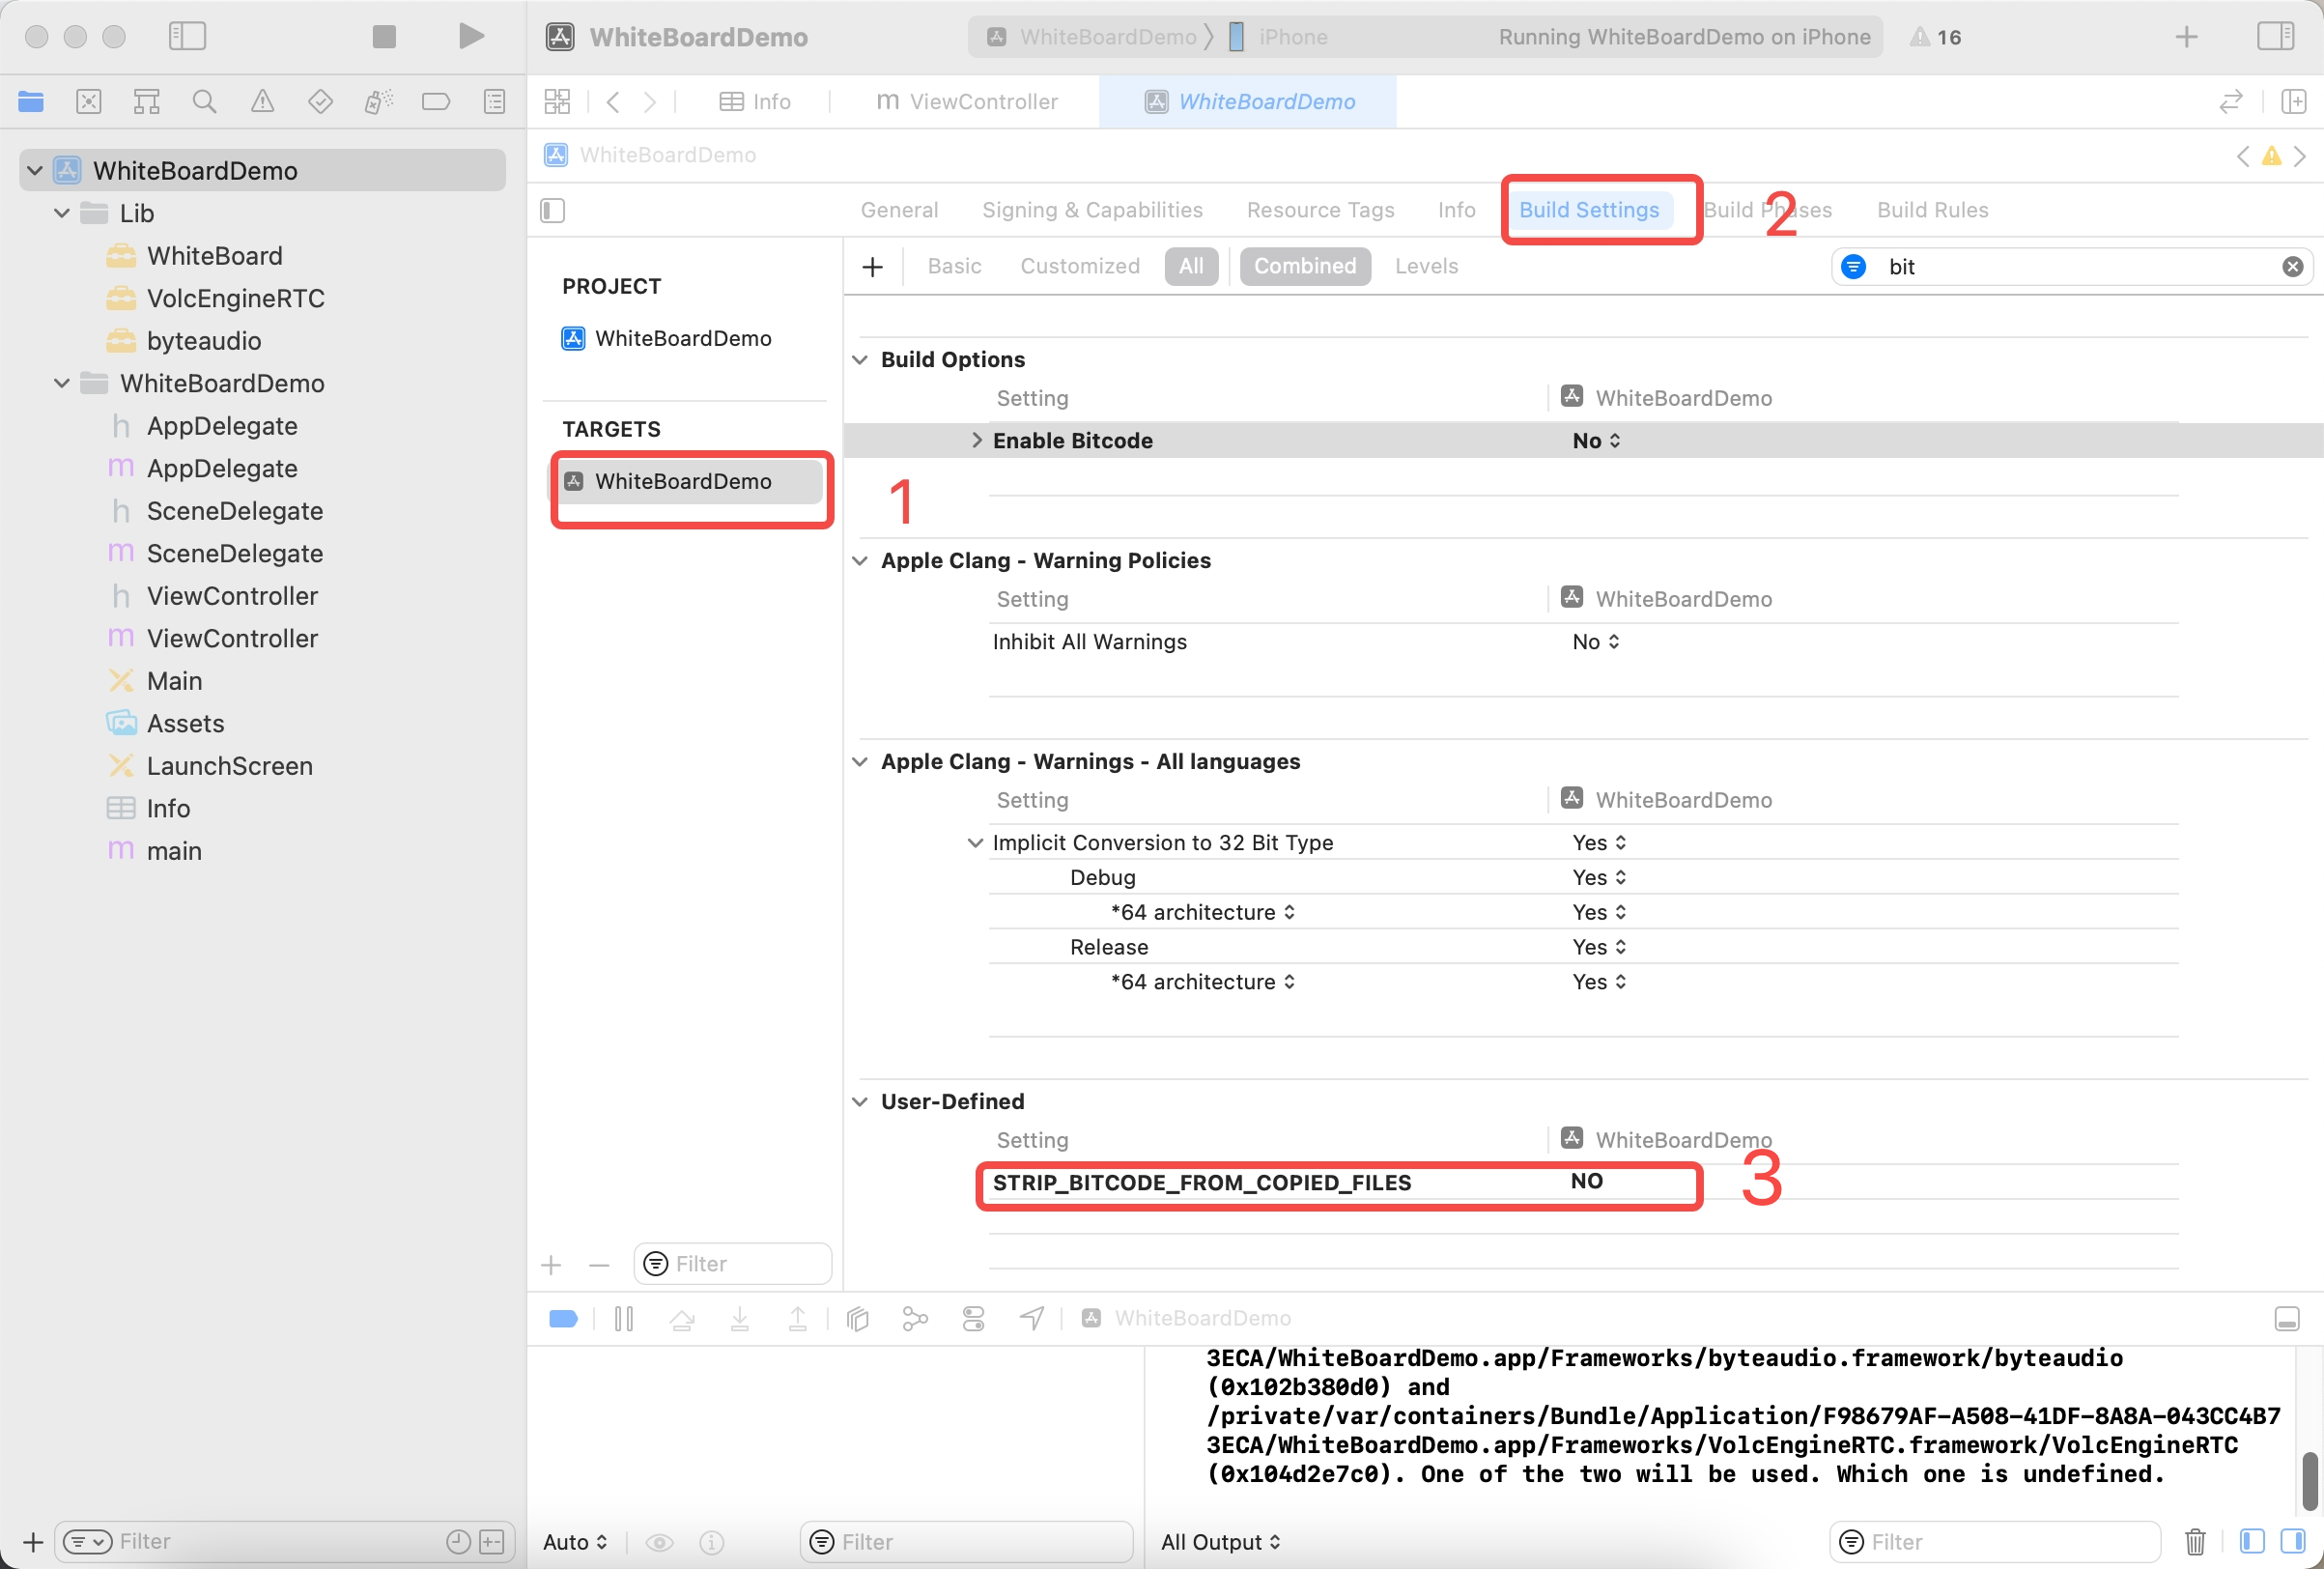
2. bitcode_strip 报错
bitcode_strip ****/byteaudio.framework/byteaudio: /Applications/Xcode.app/Contents/Developer/Toolchains/XcodeDefault.xctoolchain/usr/bin/bitcode_strip exited with 1
解决方法:
关闭 bitcode:自定义环境设置 STRIP_BITCODE_FROM_COPIED_FILES = NO
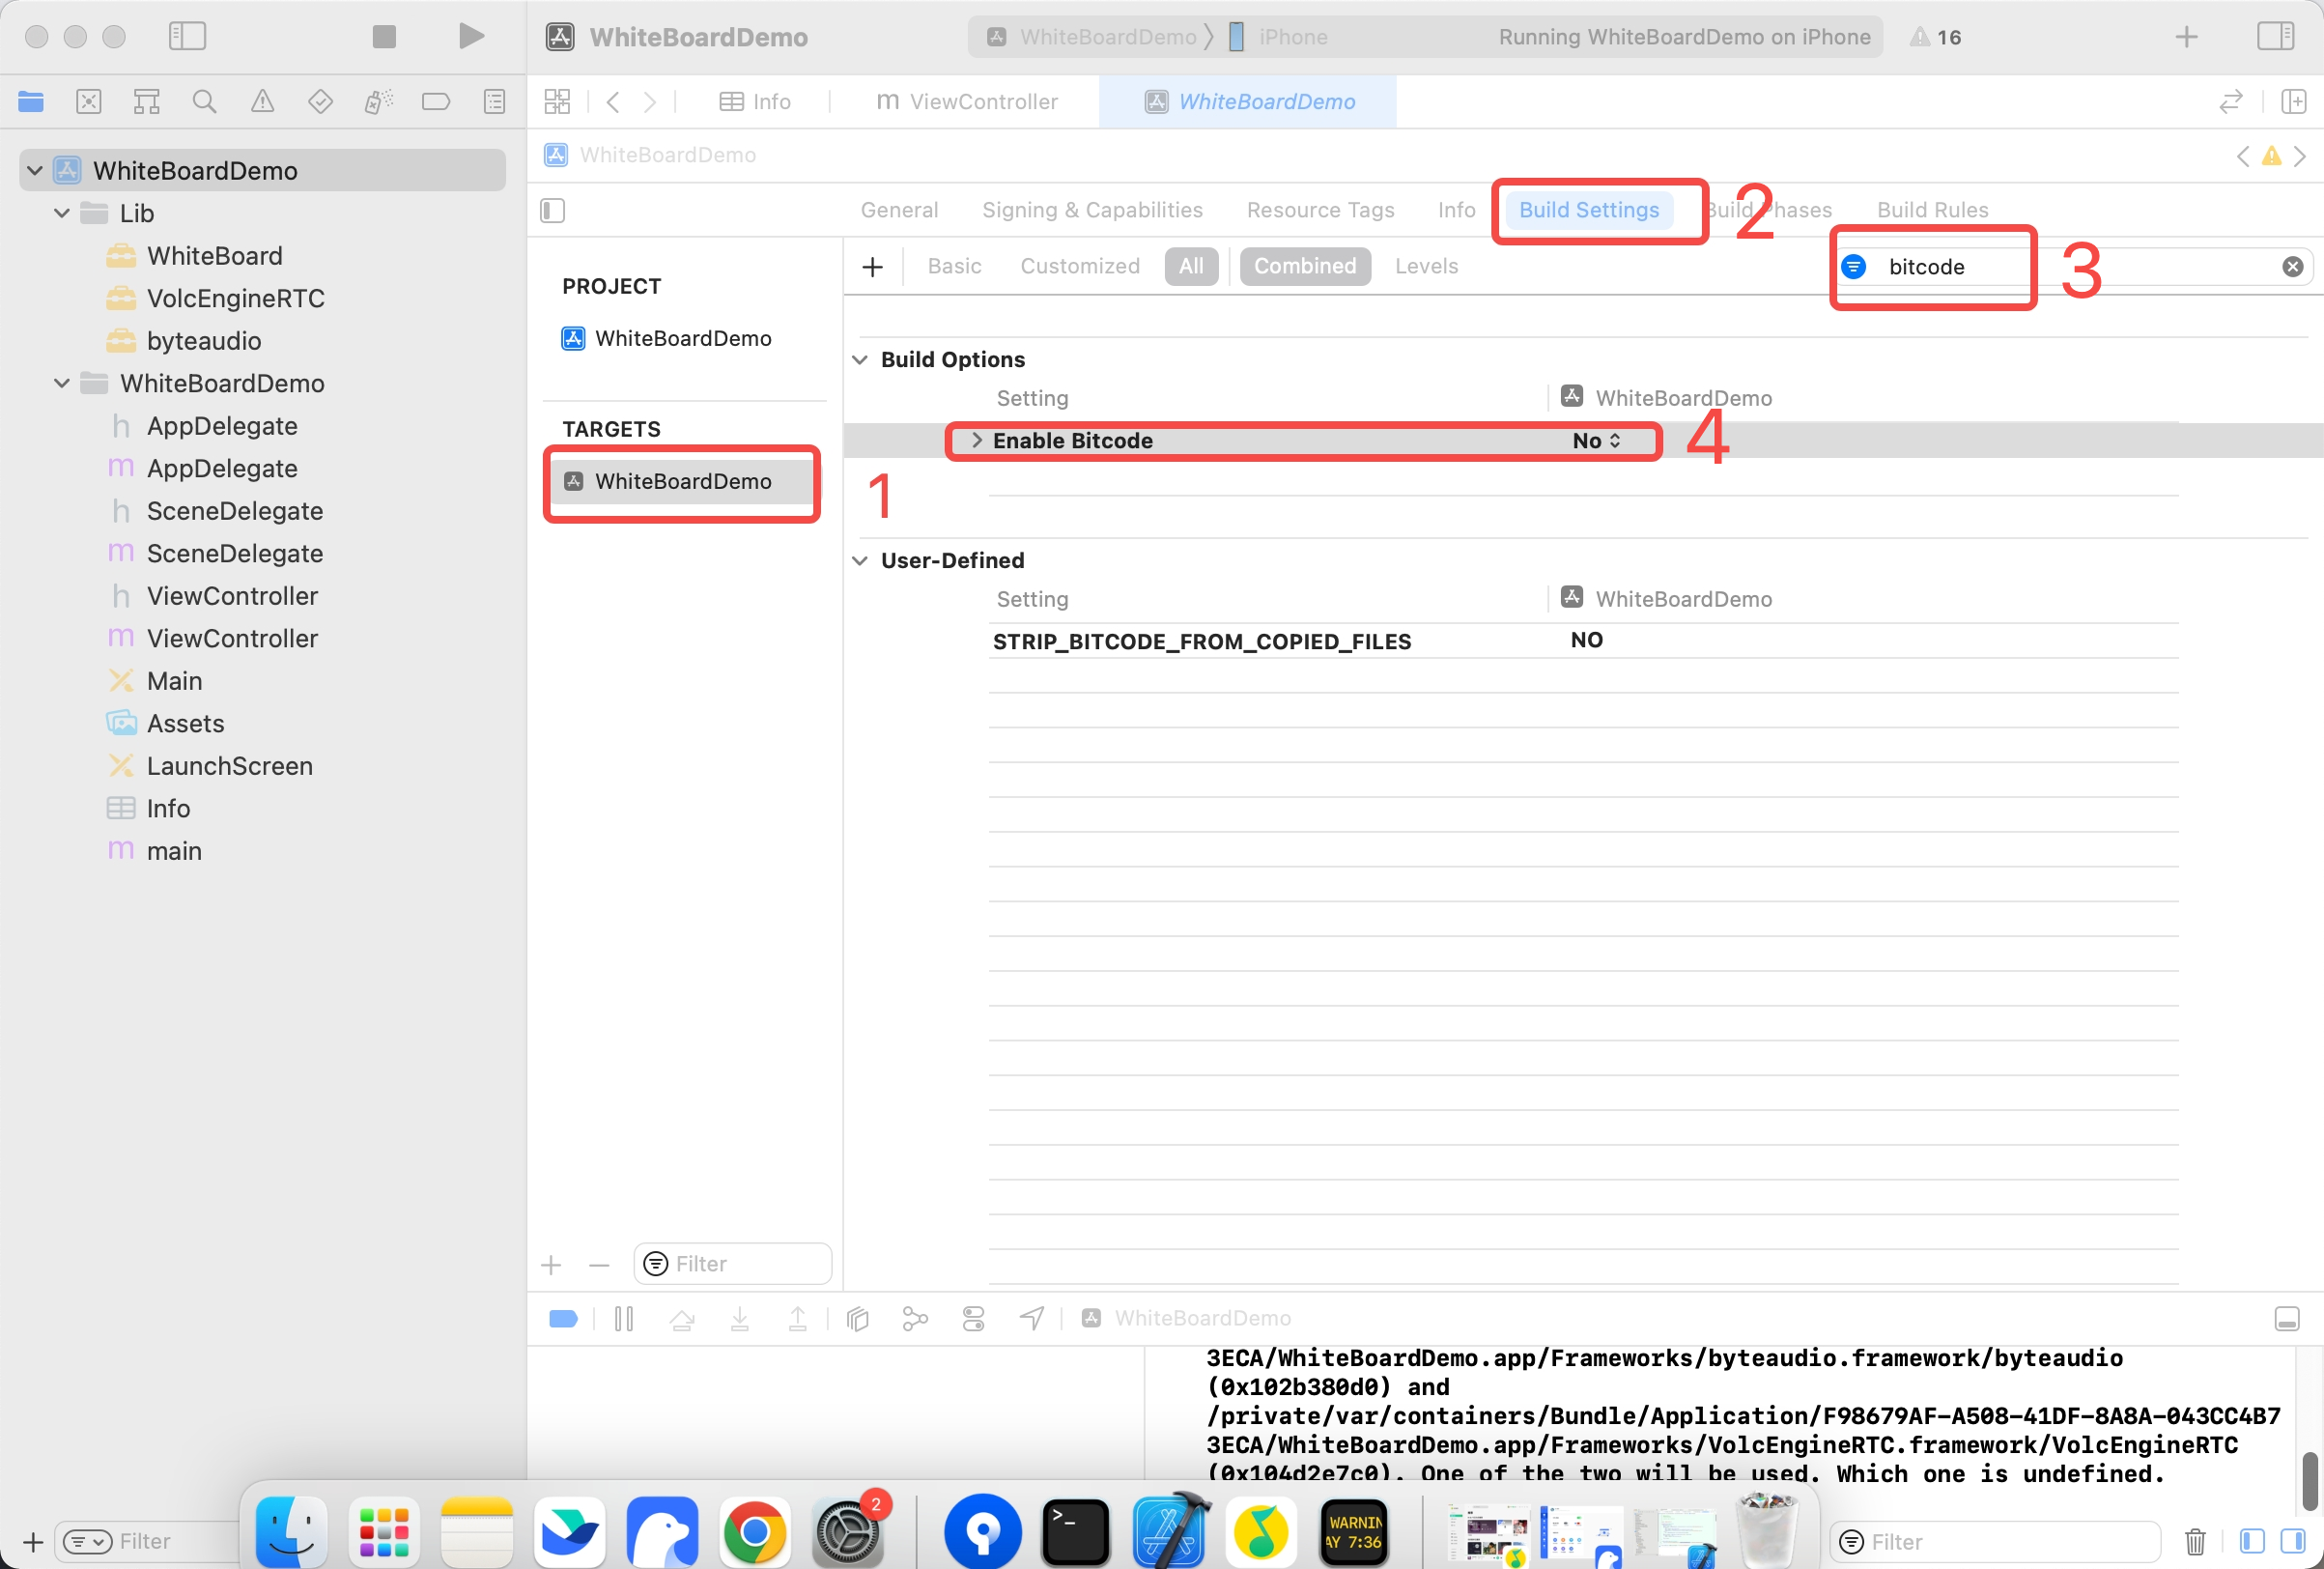
3. ENABLE_BITCODE 报错
'***/WhiteBoardDemo/Lib/WhiteBoard.framework/WhiteBoard' does not contain bitcode. You must rebuild it with bitcode enabled (Xcode setting ENABLE_BITCODE), obtain an updated library from the vendor, or disable bitcode for this target. file '***/WhiteBoardDemo/Lib/WhiteBoard.framework/WhiteBoard' for architecture arm64
解决方法:
设置 target 的 Enable BitCode 字段为 NO。
最近更新时间:2026.09.28 09:46:49
这个页面对您有帮助吗?
有用
有用
无用
无用