实时音视频
实时音视频


- 文档首页
 实时音视频实时音视频开发指南视频管理美颜智能美化特效(付费版)
 复制全文
复制全文 下载 pdf
 文档反馈
文档反馈 问问助手
问问助手RTC SDK 提供与智能美化特效 SDK 联合方案,你可以通过调用 RTC SDK 提供的美颜处理接口,快速接入,对本地采集的视频添加美颜、滤镜、贴纸等特效。相较于通过 RTC 自定义视频前处理功能接入第三方美颜,集成更快捷、使用更方便、效果更佳。
本文介绍如何在 RTC 应用中接入火山引擎智能美化产品,实现美颜功能。
前提条件
- 已在项目中集成 3.50 及以上版本的 RTC SDK 并实现 RTC 视频通话功能。为保证你可以体验所有新增特性,推荐使用 最新版本 RTC SDK。支持本功能的 SDK 详见API 参考。
- 通过解压 RTC SDK 压缩包获取对应平台的火山引擎智能美化 SDK。
- 已购买火山引擎智能美化特效产品,并获取到符合业务功能需求的产品 License 和素材资源包。
注意:
- 请确保获取的 License 和特效素材资源与接入的火山引擎智能美化 SDK 版本完全一致,以保证相关功能的正常使用。
- 完整的授权信息参考智能特效在线授权说明。
- 操作系统需满足以下要求:
- Android 5.0+
- iOS 11+(不支持模拟器)
- macOS 10.11+
- Windows 7+
Android 端功能实现
智能美化特效库及相关资源集成
- 下载并解压 Android 端 RTC SDK,获取智能美化特效库 effectAAR-release_V4.x.xLite.aar 文件。
- 将特效库文件添加至 Android 项目中的 app/libs 文件夹中。注意,若对特效库文件进行重命名,则需确保特效库名在 Android 工程中一致。此处以重命名为 ByteEffect.aar 为例。
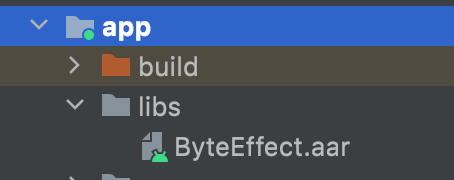
- 在项目根目录下
<yourprojectname>/app/build.gradle文件的 dependencies 中使用implementation字段添加智能美化特效库,并点击 Sync 按钮同步。
dependencies {
    //...
    implementation(name: 'ByteEffect', ext: 'aar')
    implementation 'com.volcengine:VolcEngineRTC:3.xx.xxx'
}
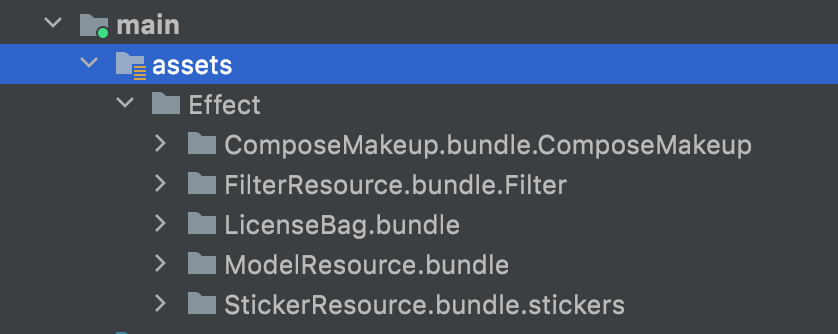
- 新建 assets 文件夹,并在该文件夹下添加自定义美颜文件夹(此处以 Effect 为例),将获取到的特效素材资源文件拷贝至 Effect 文件夹中。
注意:
- LicenseBag.bundle 中存放特效证书,其他 bundle 中存放各类型的素材资源文件。
- 特效证书的包名需与项目的包名保持一致,否则证书无法生效。
API 调用时序图
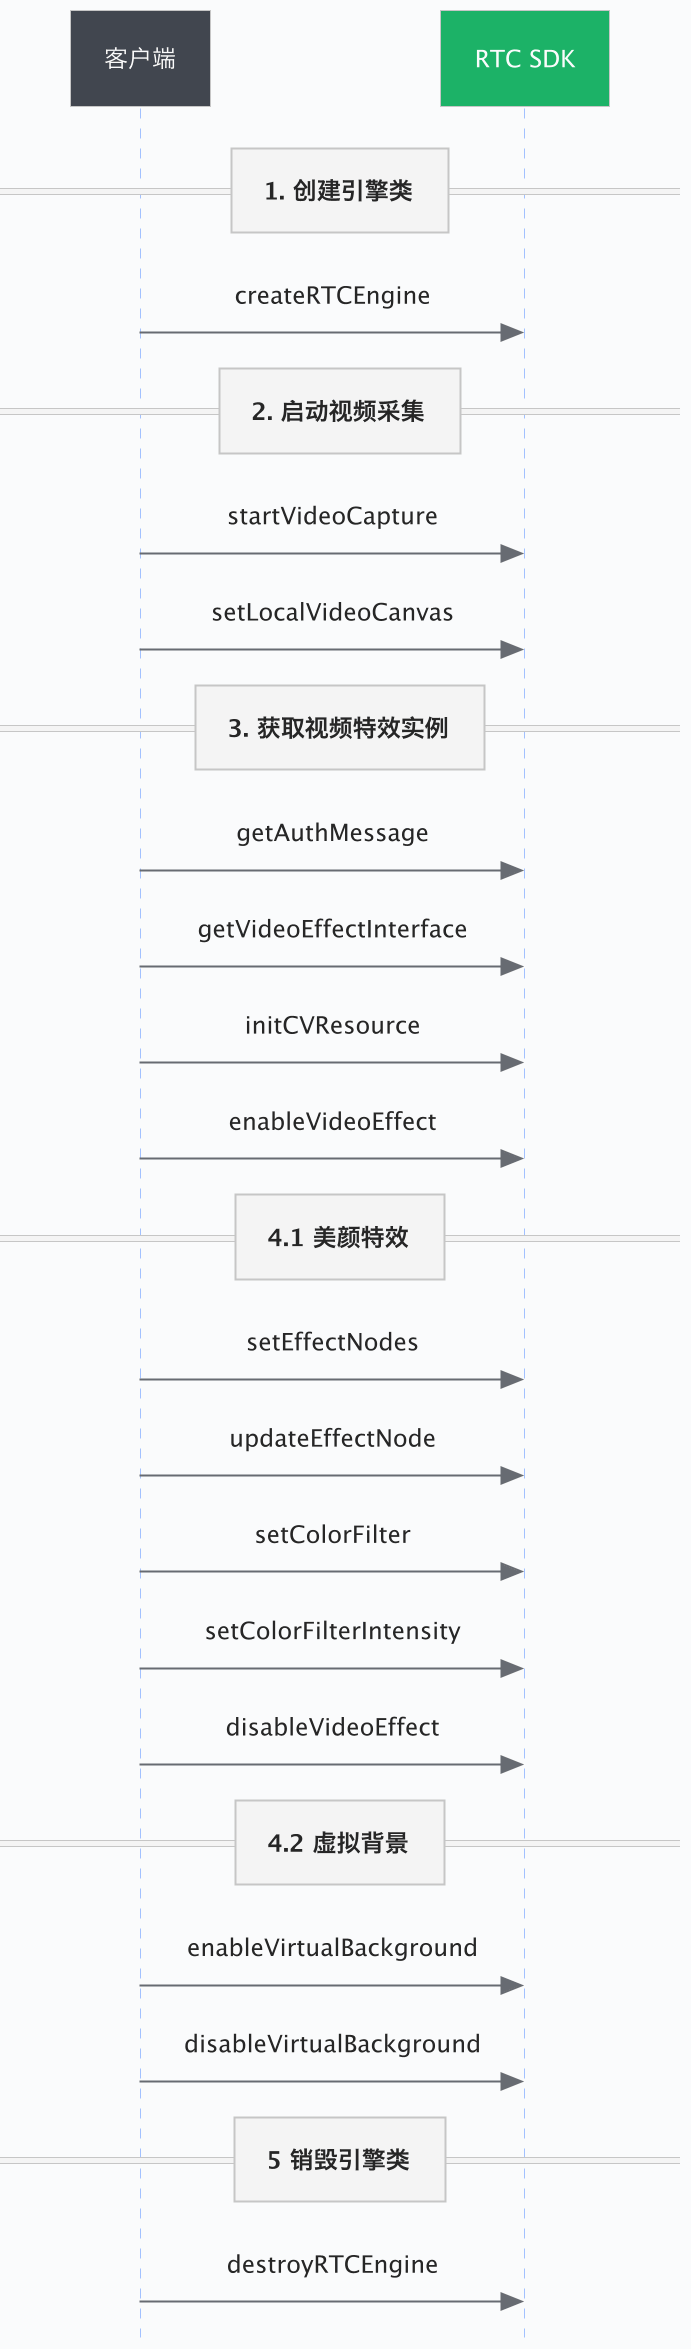
初始化
- Android 中内置素材时是把素材放到 assets 中,其中的文件内容无法通过路径获取,所以需要初次启动 app 时将其拷贝到应用私有目录中使用。相关代码在API Example 中可以获取,你也可以自行编写复制资源的代码。
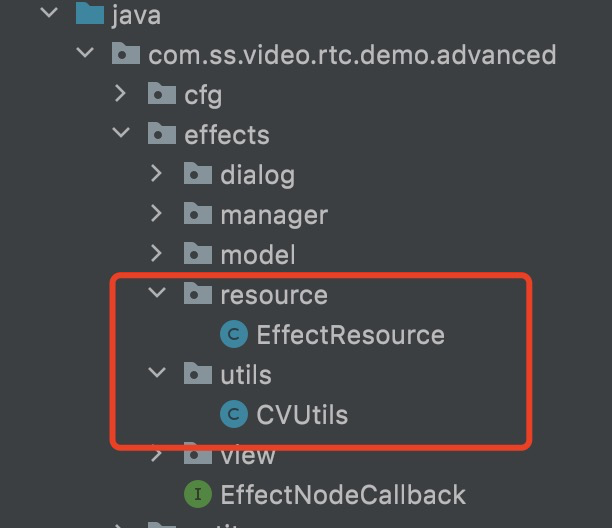
通过下方示例中 getExternalResourcePath() 函数可以获取指定的资源拷贝路径,指定的路径可以自定义。copyAssetFolder() 会将 assets 路径下的资源拷贝到指定的资源路径下,这里需要保证资源路径和拷贝路径都正确。
// 初始化美颜资源文件
// 将安装包内的资源文件拷贝到外部存储上
public static void initVideoEffectResource() {
    Context context = mAppCxt;
    File licensePath = new File(getExternalResourcePath(), "LicenseBag.bundle");
    licensePath.deleteOnExit();
    copyAssetFolder(context, "Effect/LicenseBag.bundle", licensePath.getAbsolutePath());

    File modelPath = new File(getExternalResourcePath(), "ModelResource.bundle");
    if (!modelPath.exists()) {
        copyAssetFolder(context, "Effect/ModelResource.bundle", modelPath.getAbsolutePath());
    }
    File stickerPath = new File(getExternalResourcePath(), "StickerResource.bundle");
    if (!stickerPath.exists()) {
        copyAssetFolder(context, "Effect/StickerResource.bundle", stickerPath.getAbsolutePath());
    }
    File filterPath = new File(getExternalResourcePath(), "FilterResource.bundle");
    if (!filterPath.exists()) {
        copyAssetFolder(context, "Effect/FilterResource.bundle", filterPath.getAbsolutePath());
    }
    File composerPath = new File(getExternalResourcePath(), "ComposeMakeup.bundle");
    if (!composerPath.exists()) {
        copyAssetFolder(context, "Effect/ComposeMakeup.bundle", composerPath.getAbsolutePath());
    }
    File virtualPicturePath = new File(getExternalResourcePath(), "virtual_background.png");
    if (!virtualPicturePath.exists()) {
        copyAssetFile(context, "virtual_background.png", virtualPicturePath.getAbsolutePath());
    }
}

public static String getExternalResourcePath() {
    return mAppCxt.getExternalFilesDir("assets").getAbsolutePath() + "/Effect/";
}

public static String getEffectPortraitPath() {
    return getStickerPathByName("matting_bg");
}

public static String getStickerPathByName(String name) {
    return mAppCxt.getExternalFilesDir("assets").getAbsolutePath() + "/Effect/StickerResource.bundle/stickers/" + name;
}

public static String getFilterPathByName(String name) {
    return mAppCxt.getExternalFilesDir("assets").getAbsolutePath() + "/Effect/FilterResource.bundle/Filter/" + name;
}

public static String getBeautyPath() {
    return mAppCxt.getExternalFilesDir("assets").getAbsolutePath() + "/Effect/ComposeMakeup.bundle/ComposeMakeup/beauty_Android_lite";
}

public static String getStylePathByName(String name) {
    return mAppCxt.getExternalFilesDir("assets").getAbsolutePath() + "/Effect/ComposeMakeup.bundle/ComposeMakeup/style_makeup/" + name;
}
- 调用 createRTCEngine 创建引擎并开启视频采集后,你需先初始化美颜资源,并设置美颜资源和证书路径,方可开启美颜,在本地预览画面中看到美颜效果。注意,你需设置完整的证书文件路径,即指定到具体的证书文件;模型文件路径指定到 ModelResource.bundle 这层即可。
集成完成后,可通过调用 initCVResource(),查看返回值,判断是否集成成功。
private void configEffect() {
    //EffectManager 为自定义封装的美颜工具类
    EffectManager.initVideoEffectResource();
    String licPath = EffectManager.getLicensePath();
    String modelPath = EffectManager.getModelPath();
    IVideoEffect effect = mRTCEngine.getVideoEffectInterface();
    int result = effect.initCVResource(licPath, modelPath);
    result = effect.enableVideoEffect();
}
关闭所有美颜特效。
effect.disableVideoEffect();
美颜
美颜特效素材存放在 ComposeMakeup.bundle 文件中,使用 setEffectNodes 设置素材路径并使用 updateEffectNode 更新特效强度才可显示美颜效果。updateEffectNode 可以设置的素材 key 可以参考素材key对应说明。
注意:资源路径需要指定到 ../ComposeMakeup.bundle/ComposeMakeup/beauty_Android_lite 这层。
private void configEffect(){
    //...省略美颜资源初始化和美颜配置代码
    //美颜设置
    String composePath = EffectManager.getBeautyPath();
    List<String> nodes = Arrays.asList(composePath);
    result = effect.setEffectNodes(nodes);
    result = effect.updateEffectNode(composePath,"smooth",0.8f);
 }
贴纸
贴纸特效素材存放在 StickerResource.bundle 文件中,需使用的接口为 setEffectNodes 设置素材路径后方可显示贴纸效果。
注意:贴纸路径需要指定到特定贴纸名,例如 ../StickerResource.bundle/stickers/stickers_zhaocaimao
private void configEffect(){
    //...省略美颜资源初始化和美颜配置代码
    //贴纸
    String stickerPath = EffectManager.getStickerPathByName("stickers_zhaocaimao");
    List<String> nodes = Arrays.asList(stickerPath);
    result = effect.setEffectNodes(nodes);
}
风格妆
风格妆特效素材存放在 ComposeMakeup.bundle 文件中,需使用 setEffectNodes 设置素材路径并使用 updateEffectNode 更新特效强度方可显示风格妆效果。updateEffectNode 可以设置的素材 key 可以参考素材key对应说明。
注意:风格妆路径需要指定到特定风格妆名,例如 ../ComposeMakeup.bundle/ComposeMakeup/style_makeup/aidou
private void configEffect(){
    //...省略美颜资源初始化和美颜配置代码
    //风格妆
    String stylePath = EffectManager.getStylePathByName("nuannan");
    List<String> nodes = Arrays.asList(stylePath);
    result = effect.setEffectNodes(nodes);
    result = effect.updateEffectNode(composePath,"Filter_ALL",0.8f);
    result = effect.updateEffectNode(stylePath,"Makeup_ALL",0.8f);
}
滤镜
滤镜特效素材存放在 FilterResource.bundle 文件中,使用 setColorFilter 设置素材路径后,可使用 setColorFilterIntensity 调整滤镜强度。默认强度为 1.0,取值范围 [0, 1],超出范围时设置无效。
注意:滤镜路径需要指定到特定滤镜名,例如 ../FilterResource.bundle/Filter/Filter_01_38
private void configEffect(){
    //...省略美颜资源初始化和美颜配置代码
    effect.setColorFilter(filterPath);
    effect.setColorFilterIntensity(0.8f);
}
虚拟背景
使用 enableVirtualBackground(backgroundStickerRes, source) 开启虚拟背景特效,参数 bg_sticker_res 为背景贴纸素材的绝对路径,参数 source 为期望设置的背景,当你期望设置一张自定义图片作为背景时,需将 sourceType 指定为 SourceTypeImage,并通过 sourcePath 设置自定义背景图片的绝对路径。
注意:虚拟背景的贴纸特效素材类型必须选择为 “matting_bg”。
private void configEffect(){
    //...省略美颜资源初始化和美颜配置代码
    //开启虚拟背景
    VirtualBackgroundSource backgroundSource = new VirtualBackgroundSource();
    backgroundSource.sourceType = VirtualBackgroundSourceType.IMAGE;
    backgroundSource.sourcePath = EffectManager.getExternalResourcePath() + File.separator + "virtual_background.png";
    String portraitPath = EffectManager.getEffectPortraitPath();
    effect.enableVirtualBackground(portraitPath,backgroundSource);
    //关闭虚拟背景
    effect.disableVirtualBackground();
}
旧版智能美化特效 API 未更新。
旧版智能美化特效
智能美化特效相关接口自 3.50 版本起由 RTCVideo 类迁移至 IVideoEffect 类。若你使用 3.50 之前版本的 RTC SDK,需通过 RTCVideo 实例调用智能美化特效相关接口。强烈建议你使用最新版 RTC SDK 以体验更加丰富而全面的智能美化特效功能,旧版接口也将在 3.56 版本删除。
API 调用时序图
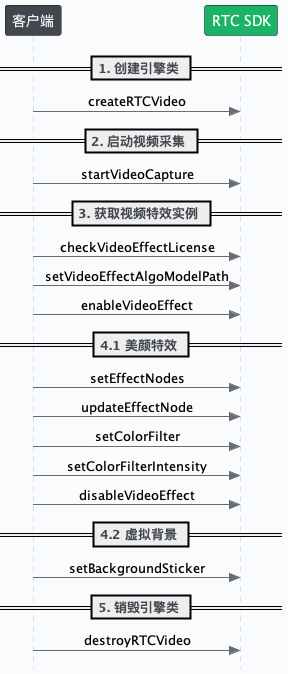
接口使用
private void configEffect(){
    EffectManager.initVideoEffectResource();
    String licPath = EffectManager.getLicensePath();

    String modelPath = EffectManager.getModelPath();
    //美颜
    String composePath = EffectManager.getBeautyPath();
    //滤镜
    String filterPath = EffectManager.getFilterPathByName("Filter_01_38");
    //贴纸
    String stickerPath = EffectManager.getStickerPathByName("stickers_zhaocaimao");
    //妆容
    String stylePath = EffectManager.getStylePathByName("nuannan");
    List<String> nodes = Arrays.asList(composePath,stickerPath);
    int result = mRTCVideo.checkVideoEffectLicense(EffectManager.getApplicationContext(),licPath);
    mRTCVideo.setVideoEffectAlgoModelPath(modelPath);
    result = mRTCVideo.enableVideoEffect(true);
    result = mRTCVideo.setVideoEffectNodes(nodes);
    result = mRTCVideo.updateVideoEffectNode(composePath,"smooth",0.8f);
    mRTCVideo.setVideoEffectColorFilter(filterPath);
    mRTCVideo.setVideoEffectColorFilterIntensity(0.8f);
    mRTCVideo.updateVideoEffectNode(stylePath,"Filter_ALL",0.8f);
    mRTCVideo.updateVideoEffectNode(stylePath,"Makeup_ALL",0.8f);

    //开启虚拟背景
    VirtualBackgroundSource backgroundSource = new VirtualBackgroundSource();
    backgroundSource.sourceType = VirtualBackgroundSourceType.SourceTypeImage;
    backgroundSource.sourcePath = EffectManager.getExternalResourcePath() + File.separator + "virtual_background.png";
    String portraitPath = EffectManager.getEffectPortraitPath();
    mRTCEngine.setBackgroundSticker(portraitPath, backgroundSource);
    //关闭
    mRTCEngine.setBackgroundSticker(null, backgroundSource);
}
iOS 端功能实现
智能美化特效库及相关资源集成
我们提供两种集成方式:直接集成和通过本地 pod 方式集成。你可根据实际需求任选其一。
直接集成
- 下载并解压 iOS 端 RTC SDK,获取智能美化特效库
effect-sdk.framework文件。 - 将 effect-sdk.framework 文件手动拖入项目工程中,并在 General 中将其 embed 属性设置为 Embed & Sign 模式。

- 将获取到的前提条件手动添加至工程中。
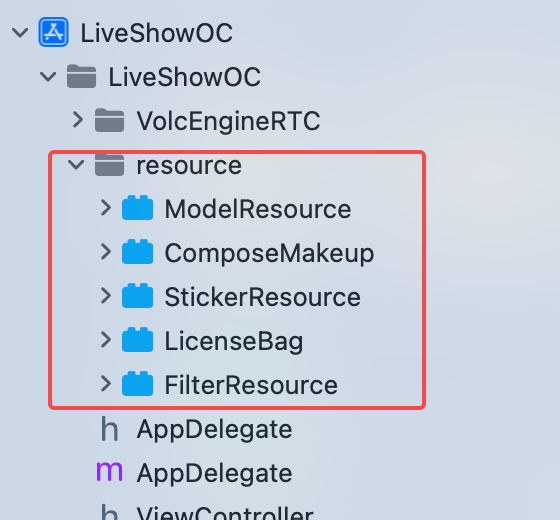
注意:特效证书的包名需与项目的 bundle Identifier 保持一致,否则无法生效。
通过本地 Cocoapods 方式集成
请确保已有 Cocoapods 相关配置。
下载并解压 iOS 端 RTC SDK,获取智能美化特效库
effect-sdk.framework文件。创建智能美化特效 SDK 的配置文件。创建文件
BytedEffectSDK.podspec,内容如下:Pod::Spec.new do |spec| spec.name = 'BytedEffectSDK' spec.version = '4.x.x' # 接入的火山引擎智能美化 SDK 版本 spec.summary = 'Demo for effect-sdk' spec.description = 'Demo for effect-sdk' spec.homepage = 'https://github.com/volcengine' spec.license = { :type => 'Copyright', :text => 'Bytedance copyright' } spec.author = { 'bytertc' => 'bytertc@bytedance.com' } spec.source = { :path => './'} spec.ios.deployment_target = '11.0' spec.vendored_frameworks = 'effect-sdk.framework' spec.requires_arc = true spec.libraries = 'stdc++', 'z' spec.frameworks = 'Accelerate','AssetsLibrary','AVFoundation','CoreGraphics','CoreImage','CoreMedia','CoreVideo','Foundation','QuartzCore','UIKit','CoreMotion' spec.weak_frameworks = 'Metal','MetalPerformanceShaders', 'Photos', 'CoreML' # spec.resources = ['Resource/*.{bundle}'] end将
BytedEffectSDK.podspec、effect-sdk.framework、Resource文件放置在文件的同级目录: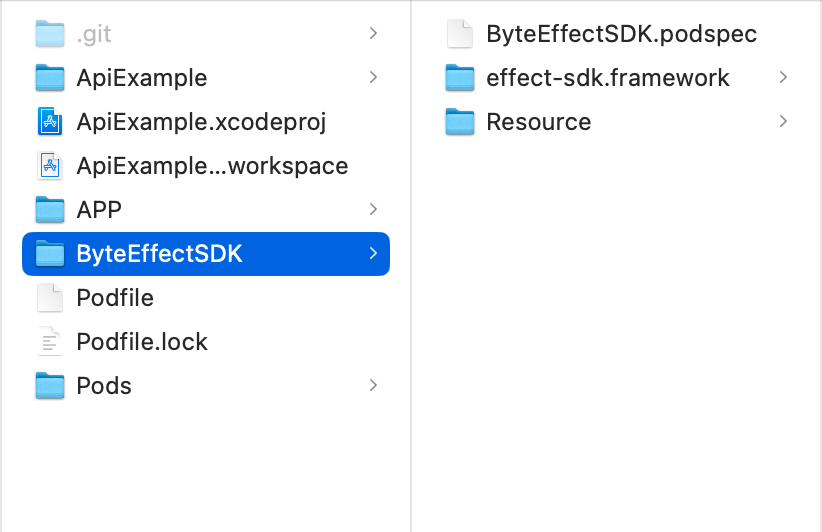
将火山引擎智能美化 SDK 添加到 Cocoapods 项目目录中。在
Podfile文件中追加如下内容:pod 'BytedEffectSDK', :path => './BytedEffectSDK'在
Podfile文件所在目录执行如下命令:pod install
API 调用时序图
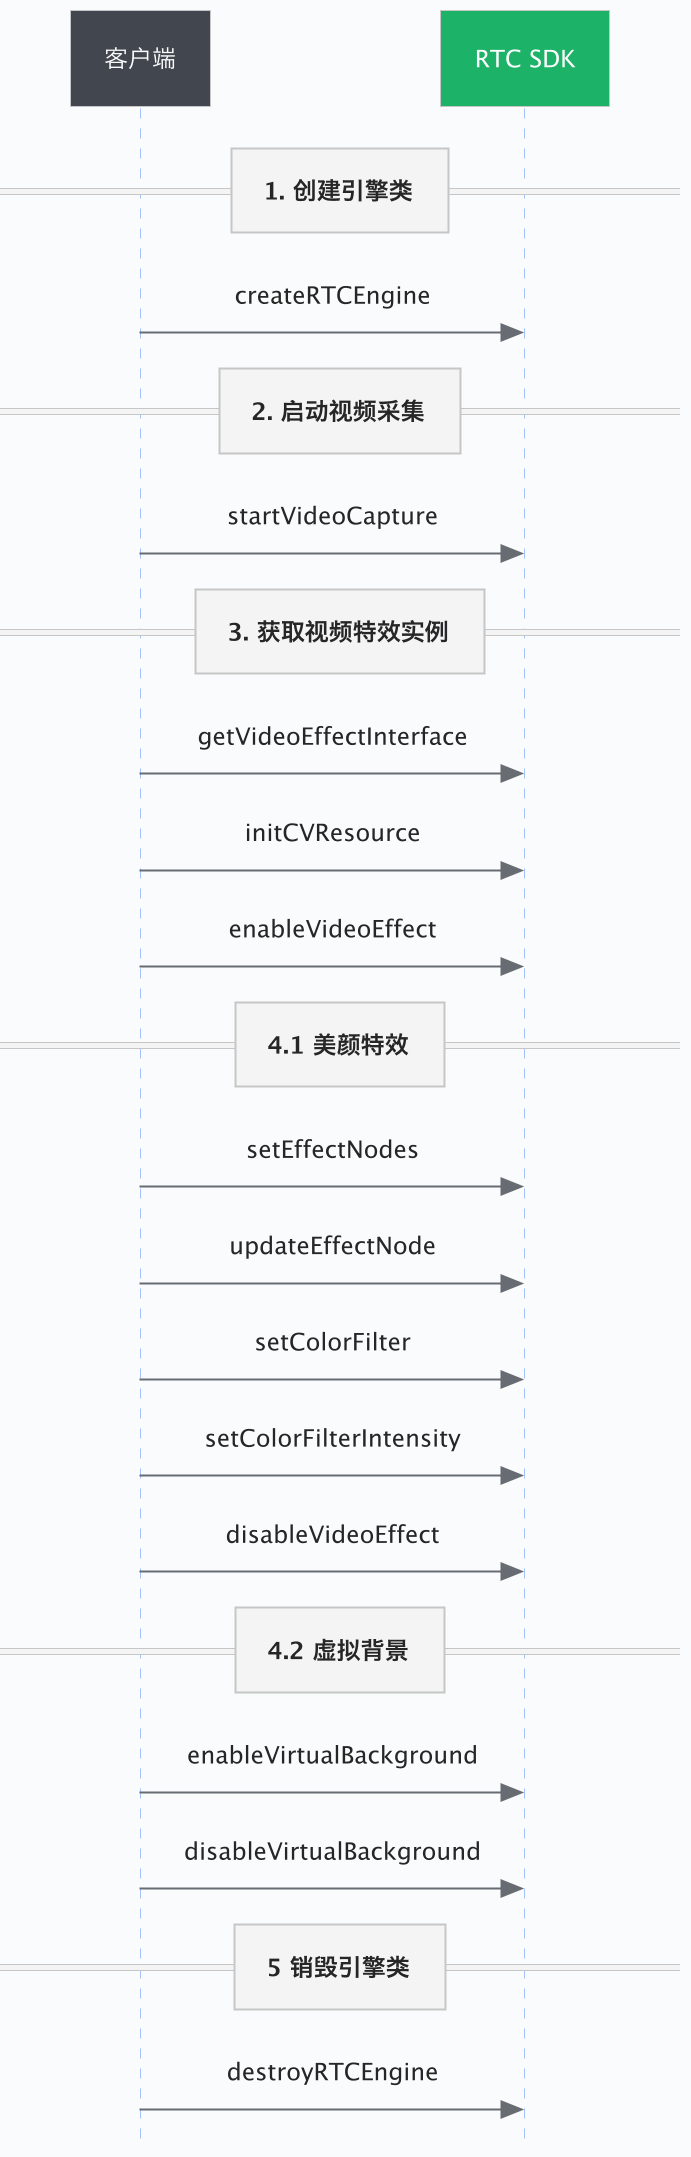
初始化
调用 createRTCEngine 创建引擎并开启视频采集后,你需先初始化美颜资源,并设置美颜资源和证书路径,方可开启美颜,在本地预览画面中看到美颜效果。注意,你需设置完整的证书文件路径,即指定到具体的证书文件;模型文件路径指定到 ModelResource.bundle 这层即可。
集成完成后,可通过调用 initCVResource:withAlgoModelDir:,查看返回值,判断是否集成成功。
func configEffect() {
    let bundlePath = Bundle.main.path(forResource: "LicenseBag", ofType: "bundle")
    let licensePath = bundlePath! + "/<YOUR_LICENSE_NAME>.licbag"
    let modelBundlePath = Bundle.main.path(forResource: "ModelResource", ofType: "bundle")
    guard let effect = self.video.getVideoEffectInterface() else {
       return
    }
    let result = effect.initCVResource(licensePath: licensePath, withAlgoModelDir: modelBundlePath)
    effect.enableVideoEffect()
}
关闭所有美颜特效。
effect.disableVideoEffect()
美颜
美颜特效素材存放在 ComposeMakeup.bundle 文件中,需使用 setEffectNodes 设置素材路径并使用 updateEffectNode 更新特效强度才可显示美颜效果。updateEffectNode 可以设置的素材 key 可以参考素材key对应说明。
注意:资源路径需要指定到 ../ComposeMakeup.bundle/ComposeMakeup/beauty_IOS_lite 这层。
func configEffect() {
    //...省略美颜资源初始化和美颜配置代码
    let beautyPrefix = Bundle.main.path(forResource: "ComposeMakeup", ofType: "bundle")
    let beautyPath = beautyPrefix! + "/ComposeMakeup/beauty_IOS_lite"
    effect.setEffectNodes([beautyStylePath])
    effect.updateEffectNode(node: beautyPath, key: "smooth", value: 0.8)
}
贴纸
贴纸特效素材存放在 StickerResource.bundle 文件中,使用的接口为 setEffectNodes 设置素材路径后方可显示贴纸效果。
注意:贴纸路径需要指定到特定贴纸名,例如 ../StickerResource.bundle/stickers/stickers_zhaocaimao
func configEffect() {
    //...省略美颜资源初始化和美颜配置代码
    let portraitPrefix = Bundle.main.path(forResource: "StickerResource", ofType: "bundle")
    let stickerPath = portraitPrefix! + "/stickers/stickers_zhaocaimao"
    effect.setEffectNodes([stickerPath])
}
风格妆
风格妆特效素材存放在 ComposeMakeup.bundle 文件中,需使用 setEffectNodes 设置素材路径并使用 updateEffectNode 更新特效强度方可显示风格妆效果。updateEffectNode 可以设置的素材 key 可以参考素材key对应说明。
注意:风格妆路径需要指定到特定风格妆名,例如 ../ComposeMakeup.bundle/ComposeMakeup/style_makeup/aidou
func configEffect() {
    //...省略美颜资源初始化和美颜配置代码
    let beautyPrefix = Bundle.main.path(forResource: "ComposeMakeup", ofType: "bundle")
    let beautyStylePath = beautyPrefix! + "/ComposeMakeup/style_makeup/yuanqi"
    effect.setEffectNodes([beautyStylePath])
    effect.updateEffectNode(node: beautyStylePath, key: "Filter_ALL", value: 0.8)
    effect.updateEffectNode(node: beautyStylePath, key: "Makeup_ALL", value: 0.8)
}
滤镜
滤镜特效素材存放在 FilterResource.bundle 文件中,使用 setColorFilter 设置素材路径后,可使用 setColorFilterIntensity 调整滤镜强度。默认强度为 1.0,取值范围 [0, 1],超出范围时设置无效。
注意:滤镜路径需要指定到特定滤镜名,例如 ../FilterResource.bundle/Filter/Filter_01_38
func configEffect() {
    //...省略美颜资源初始化和美颜配置代码
    let filterPrefix = Bundle.main.path(forResource: "FilterResource", ofType: "bundle")!
    let filterPath = filterPrefix + "/Filter/Filter_26_Po4"
    effect.setColorFilter(filter: filterPath)
    effect.setColorFilterIntensity(intensity: 1)
}
虚拟背景
使用 enableVirtualBackground:withSource 开启虚拟背景特效,参数 bg_sticker_path 为背景贴纸素材的绝对路径,参数 source 为期望设置的背景,当你期望设置一张自定义图片作为背景时,需将 sourceType 指定为 ByteRTCVirtualBackgroundSourceTypeImage,并通过 sourcePath 设置自定义背景图片的绝对路径。
注意:虚拟背景的贴纸特效素材类型必须选择为“
matting_bg”。
func configEffect() {
    //...省略美颜资源初始化和美颜配置代码
    //开启虚拟背景
    let source = ByteRTCVirtualBackgroundSource()
    let sourcePath = Bundle.main.path(forResource: "virtual_background", ofType: "png")
    source.sourceType = .image
    source.sourcePath = sourcePath
    let bgPath = portraitPrefix + "/stickers/matting_bg"
    effect.enableVirtualBackground(bgPath, withSource: source)
    //关闭虚拟背景
    effect.disableVirtualBackground()
}
旧版智能美化特效
智能美化特效相关接口自 3.50 版本起由 ByteRTCVideo 类迁移至 ByteRTCVideoEffect 类。若你使用 3.50 之前版本的 RTC SDK,需通过 ByteRTCVideo 实例调用智能美化特效相关接口。强烈建议你使用最新版 RTC SDK 以体验更加丰富而全面的智能美化特效功能,旧版接口也将在 3.56 版本删除。
API 调用时序图
接口使用
func configEffect() {
    let bundlePath = Bundle.main.path(forResource: "LicenseBag", ofType: "bundle")
    let licensePath = bundlePath! + "/xxxxx.licbag"

    let modelBundlePath = Bundle.main.path(forResource: "ModelResource", ofType: "bundle")
    let portraitPrefix = Bundle.main.path(forResource: "StickerResource", ofType: "bundle")
    let beautyPrefix = Bundle.main.path(forResource: "ComposeMakeup", ofType: "bundle")
    let filterPrefix = Bundle.main.path(forResource: "FilterResource", ofType: "bundle")

    let beautyPath = beautyPrefix! + "/ComposeMakeup/beauty_IOS_lite"
    let beautyStylePath = beautyPrefix! + "/ComposeMakeup/style_makeup/yuanqi"
    let stickerPath = portraitPrefix! + "/stickers/stickers_zhaocaimao"
    let filterPath = filterPrefix! + "/Filter/Filter_26_Po4"

    self.video.checkVideoEffectLicense(licensePath: licensePath)
    self.video.setVideoEffectAlgoModelPath(modelBundlePath: modelBundlePath!)
    self.video.enableVideoEffect(enable: true)
    // 贴纸
    self.video.setVideoEffectNodes([beautyStylePath])
    self.video.updateVideoEffectNode(node: beautyStylePath, nodeKey: "Filter_ALL", nodeValue: 0.8)
    self.video.updateVideoEffectNode(node: beautyStylePath, nodeKey: "Makeup_ALL", nodeValue: 0.8)
    // 更新美颜强度,美颜默认强度为0没效果
    self.video.updateVideoEffectNode(node: beautyPath, nodeKey: "smooth", nodeValue: 0.8)
    let result = self.video.setVideoEffectColorFilter(filterPath: filterPath)
    print("-----------------setVideoEffectColorFilter result---------------: \(result)")
    let result2 = self.video.setVideoEffectColorFilterIntensity(intensity: 0.9)
    print("-----------------setVideoEffectColorFilterIntensity result---------------: \(result2)")

    // 开启和配置虚拟背景
    let source = ByteRTCVirtualBackgroundSource()
    let sourcePath = Bundle.main.path(forResource: "virtual_background", ofType: "png")
    source.sourceType = .image
    source.sourcePath = sourcePath
    let bgPath = portraitPrefix! + "/stickers/matting_bg"
    self.video.setBackgroundSticker(sticker: bgPath, source: source)
    // 关闭虚拟背景
    self.video.setBackgroundSticker(sticker: nil, source: source)
}
macOS 和 Windows 端功能实现
智能美化特效库及相关资源集成
- 下载并解压 Windows 端 RTC SDK,获取 effect.dll 文件。文件路径为 VolcEngineRTC/bin/Win32(x64)/effect.dll。
- 如果已经集成 RTC SDK,可以将 effect.dll 文件拷贝到工程目录的 RTC 动态库文件夹中;如果尚未集成 RTC SDK,可以将 VolcEngineRTC 整个目录拷贝至工程目录中。
- 手动添加前提条件到工程中。无路径限制,可置于工程目录下任意位置。
API 调用时序图
初始化
调用 createRTCEngine 创建引擎并开启视频采集后,你需要初始化美颜模块,方可开启美颜,在本地预览画面中看到美颜效果。
- 请求美颜证书。
// 通过 http 请求验证美颜证书
bytertc::IVideoEffect* effectPtr = m_engine->getVideoEffectInterface();
if (effectPtr == nullptr) {
    return;
}
QString key = QString::fromStdString(g_byte_beauty_key); // 美颜 key
QString secret = QString::fromStdString(g_byte_beauty_secret);// 美颜 secret
if (key.isEmpty() || secret.isEmpty()) {
     return;
}

// 构造 http 请求的参数
QJsonObject postDataObj;
// key
postDataObj["key"] = key;
// authMsg
char *pMsg = nullptr;
int len = 0;
effectPtr->getAuthMessage(&pMsg, &len);
if (pMsg == NULL) {return;}

QString authMsg = pMsg;
postDataObj["authMsg"] = authMsg;
effectPtr->freeAuthMessage(pMsg);
qint64 nonceNum = QRandomGenerator::global()->generate64() % 99999999;  //随机生成 0 到 9 的随机数
postDataObj["nonce"] = nonceNum;
// timestamp
qint64 curUtcSeconds = QDateTime::currentSecsSinceEpoch();
postDataObj["timestamp"] = curUtcSeconds;
// digest
QString digestData = key;
digestData += QString::number(nonceNum);
digestData += QString::number(curUtcSeconds);
digestData += authMsg;
QString sign = QMessageAuthenticationCode::hash(digestData.toUtf8(), secret.toUtf8(), QCryptographicHash::Sha256).toHex();
sign = sign.toUpper();
postDataObj["digest"] = sign;

QJsonDocument doc(postDataObj);
auto body = doc.toJson();
auto &httpInstance = Http::instance();
// http 接口请求
auto reply = httpInstance.post(QUrl(strGetLicenseUrl), body, "application/json");
connect(reply, &HttpReply::finished, this, [=](auto &reply) {//验证 http 请求结果
    if (reply.isSuccessful()) {
        QJsonParseError error;
        QJsonDocument doc = QJsonDocument::fromJson(reply.body(), &error);
        if (error.error != QJsonParseError::NoError){
                return;//json 解析出错
        }
        auto obj = doc.object();
        auto data = obj["data"].toString().toUtf8();
        auto statusCode = obj["status_code"].toInt();
        if (statusCode != 0){
            return; //statusCode 不是 0
        }
        auto digest = obj["digest"].toString();
        auto dataContent = data.fromBase64(data);
        QString sign = QMessageAuthenticationCode::hash(data, secret.toUtf8(), QCryptographicHash::Sha256).toHex();
        sign = sign.toUpper();
        if (sign != digest) {
                return;
        }
        //http 接口数据解析成功,接下来开始验证美颜证书
        ...
    } else {
          qDebug() << "Something's wrong here" << reply.statusCode() << reply.reasonPhrase();
    }
});
- 调用 initCVResource,查看返回值,判断是否集成成功。你需要设置:
- 完整的证书文件路径,即指定到具体的证书文件。
- 模型文件路径指定到 ModelResource.bundle 这层即可。
auto ret = video_effect->initCVResource(license_path_ptr, model_path_ptr);
video_effect->enableVideoEffect();
关闭所有美颜特效。
auto ret = video_effect->disableVideoEffect();
美颜
美颜特效素材存放在 ComposeMakeup.bundle 文件中,需使用 setEffectNodes 设置素材路径并使用 updateEffectNode 更新特效强度才可显示美颜效果。updateEffectNode 可以设置的素材 key 可以参考素材key对应说明。
注意:资源路径需要指定到 ../ComposeMakeup.bundle/ComposeMakeup/beauty_Android_lite 这层。
ret = video_effect->setEffectNodes(reinterpret_cast<const char**>(&effect_node_paths[0]), data.nodeNum);
std::string node_path = GetFilePath("cvlab_for_pc/" + data.nodePath);
ret = video_effect->updateEffectNode(node_path.c_str(), data.nodeKey.c_str(), data.nodeValue);
贴纸
贴纸特效素材存放在 StickerResource.bundle 文件中,使用的接口为 setEffectNodes 设置素材路径后方可显示贴纸效果。
注意:贴纸路径需要指定到特定贴纸名,例如 ../StickerResource.bundle/stickers/stickers_zhaocaimao
ret = video_effect->setEffectNodes(reinterpret_cast<const char**>(&effect_node_paths[0]), data.nodeNum);
风格妆
风格妆特效素材存放在 ComposeMakeup.bundle 文件中,使用 setEffectNodes 设置素材路径并使用 updateEffectNode 更新特效强度方可显示风格妆效果。updateEffectNode 可以设置的素材 key 可以参考素材key对应说明。
注意:风格妆路径需要指定到特定风格妆名,例如 ../ComposeMakeup.bundle/ComposeMakeup/style_makeup/aidou
ret = video_effect->setEffectNodes(reinterpret_cast<const char**>(&effect_node_paths[0]), data.nodeNum);
std::string node_path = GetFilePath("cvlab_for_pc/" + data.nodePath);
ret = video_effect->updateEffectNode(node_path.c_str(), "Makeup_ALL", data.nodeValue);
滤镜
滤镜特效素材存放在 FilterResource.bundle 文件中,使用 setColorFilter 设置素材路径后,可使用 setColorFilterIntensity 调整滤镜强度。默认强度为 1.0,取值范围 [0, 1],超出范围时设置无效。
注意:滤镜路径需要指定到特定滤镜名,例如 ../FilterResource.bundle/Filter/Filter_01_38
std::string res_path = GetFilePath("cvlab_for_pc/" + data.resPath);
auto ret = 0;
ret = video_effect->setColorFilter(res_path.c_str());
ret = video_effect->setColorFilterIntensity(data.intensity);
虚拟背景
使用 enableVirtualBackground(background_sticker_path, source) 开启虚拟背景特效,参数 bg_sticker_path 为背景贴纸素材的绝对路径,参数 source 为期望设置的背景,当你期望设置一张自定义图片作为背景时,需将 source_type 指定为 kVirtualBackgroundSourceImage,并通过 sourcePath 设置自定义背景图片的绝对路径。
注意:虚拟背景的贴纸特效素材类型必须选择为“matting_bg”。
//开启虚拟背景
std::string bg_sticker_path = GetFilePath("cvlab_for_pc/" + data.bg_model_path);
std::string source_path = GetFilePath(data.source.source_path);
const char* source_path_ptr = source_path.c_str();
bytertc::VirtualBackgroundSource source;
source.source_color = data.source.source_color;
source.source_path = source_path_ptr;
source.source_type = data.source.source_type;
auto ret = video_effect->enableVirtualBackground(bg_sticker_path.c_str(), source);
//关闭虚拟背景
video_effect->disableVirtualBackground();
旧版智能美化特效
智能美化特效相关接口自 3.50 版本起由 IRTCVideo 类迁移至 IVideoEffect 类。若你使用 3.50 之前版本的 RTC SDK,需通过 IRTCVideo 实例调用智能美化特效相关接口。强烈建议你使用最新版 RTC SDK 以体验更加丰富而全面的智能美化特效功能,旧版接口也将在 3.56 版本删除。
API 调用时序图
接口使用
auto ret = video->checkLicense(nullptr, nullptr, license_path_ptr);
    video_effect->setAlgoModelPath(model_path.c_str());
    ret = video->setVideoEffectNodes(reinterpret_cast<const char**>(&effect_node_paths[0]), data.nodeNum);
    ret = video->updateVideoEffectNode(node_path.c_str(), data.nodeKey.c_str(), data.nodeValue);
    ret = video->setVideoEffectColorFilter(res_path.c_str());
    ret = video->setVideoEffectColorFilterIntensity(data.intensity);
    //开启虚拟背景
    std::string bg_sticker_path = GetFilePath("cvlab_for_pc/" + data.bg_model_path);
    std::string source_path = GetFilePath(data.source.source_path);
    const char* source_path_ptr = source_path.c_str();
    bytertc::VirtualBackgroundSource source;
    source.source_color = data.source.source_color;
    source.source_path = source_path_ptr;
    source.source_type = data.source.source_type;
    ret = video->setBackgroundSticker(bg_sticker_path.c_str(), source);
    //关闭虚拟背景
    ret = video->setBackgroundSticker(nullptr, source);
Electron 框架下功能实现
智能美化特效库及相关资源集成
- 下载并解压 RTC SDK,获取对应平台的特效库文件,并复制到项目目录下:
- Windows:VolcEngineRTC/bin/Win32(x64)/effect.dll,pthreadVC2.dll
- macOS:libeffect.dylib
- 更新打包配置,把美颜所需的动态库复制到指定目录。
以 electron-builder 打包组件为例,在 extraResources 字段中指定需要打包的文件以及打包后的目标路径。- Windows:把动态库复制到主程序 exe 相同目录下。
- macOS:把动态库复制到 Frameworks 目录下。
"build": {
    "win": {
       "extraResources": [
        {
          "from": "./effect.dll",
          "to": "../effect.dll"
        },
        {
          "from": "./pthreadVC2.dll",
          "to": "../pthreadVC2.dll"
        }
      ]
    },
    "mac": {
       "extraResources": [
        {
          "from": "./libeffect.dylib",
          "to": "../Frameworks/libeffect.dylib"
        }
      ]
    }
  }
- 在工程中添加素材资源
cvlab/
  ComposeMakeup.bundle/
    ComposeMakeup/
      beauty_Android_live/
      ...
  FilterResource.bundle/
    Filter/
      Filter_06_03
      ...
  ModelResource.bundle/
    handmodel/
      tt_hand_gesture_v11.1.model
      ...
    ...
  StickerResource.bundle/
    stickers/
      biaobaiqixi
      ...
API 调用时序图
初始化
- 创建引擎并调用 startVideoCapture 开启视频采集。
const { RTCEngine } = require('@volcengine/vertc-electron-sdk');
const rtcEngine = new RTCEngine();
rtcEngine.createRTCEngine({ app_id: APP_ID, parameters: '' });
rtcEngine.startVideoCapture();
- 设置美颜资源和证书路径。
const secret = "xxxxx";// 业务密钥,创建业务时候同 key 一起获得。
  const payload = {
    key: "biz_xxxxx", // 业务标识,对应用户开通的业务类型。
    authMsg: rtcEngine.getAuthMessage(),
    nonce: Math.floor(Math.random() * 999999999),
    timestamp: Math.floor(Date.now() / 1000),
  };
  payload["digest"] = crypto
    .createHmac("sha256", secret)
    .update(payload.key + payload.nonce + payload.timestamp + payload.authMsg)
    .digest("hex")
    .toUpperCase();
  console.log("authMsg: " + payload.authMsg);

  axios.post(
      "https://cv-tob.bytedance.com/v1/api/sdk/tob_license/getlicense",
      payload,
    ).then(res => {
      var licBase64 = res.data.data;
      if (!licBase64) {
        console.error(
          "failed, authMessage: ",
          payload.authMsg,
        );
      }
      var licUtf = Buffer.from(licBase64, "base64").toString("binary");
      fse.writeFile(
        lic_path,
        licUtf,
        { flag: "w+", encoding: "binary" },
        err => {
          if (err) {
            console.error(err);
          }
          console.log("get lic suc: " + lic_path);
        },
      );
    }).catch(error => {
      console.log("write lic error.");
      console.error(error);
    });
- 初始化美颜资源。
查看返回值,判断是否集成成功。
const AlgoModelPath = path.join(
  __dirname,
  "../assets/cvlab/ModelResource.bundle",
);
let ret = rtcEngine.initCVResource(lic_path, AlgoModelPath);
美颜
- 开启美颜特效
let ret = rtcEngine.enableVideoEffect();
- 关闭美颜特效
let ret = rtcEngine.disableVideoEffect();
- 设置特效素材
const beautyResPath = path.join(
  __dirname,
  "../assets/cvlab/ComposeMakeup.bundle/ComposeMakeup",
);
const EffectNodesPath = [
  beautyResPath + "/beauty_Android_live",
  beautyResPath + "/reshape_live",
];
let ret = rtcVideo.setEffectNodes(EffectNodesPath);
- 设置美颜特效强度
// 美白
rtcVideo.updateEffectNode(
   beautyResPath + "/beauty_Android_live",
   "whiten",
   0.8,
 );
// 磨皮
rtcVideo.updateEffectNode(
   beautyResPath + "/beauty_Android_live",
   "smooth",
   0.8,
 );

//大眼
rtcVideo.updateEffectNode(
   beautyResPath + "/reshape_live",
   "Internal_Deform_Eye",
   0.6,
 );

//瘦脸
rtcVideo.updateEffectNode(
   beautyResPath + "/reshape_live",
   "Internal_Deform_Overall",
   0.5,
 );
贴纸
const stickerResPath = path.join(
 __dirname,
 "../assets/cvlab/StickerResource.bundle/stickers",
);
EffectNodesPath.push(stickerResPath + "/zhaocaimao");
rtcVideo.setEffectNodes(EffectNodesPath);
滤镜
// 设置颜色滤镜
const filterResPath = path.join(
 __dirname,
 "../assets/cvlab/FilterResource.bundle/Filter",
);
rtcVideo.setColorFilter(filterResPath + "/Filter_06_03");
// 设置滤镜强度
rtcVideo.setColorFilterIntensity(0.8);
虚拟背景
const url = "<YOUR_IMAGE_URL>";
const path = beautyResPath + "/matting_bg";
let source = {
 source_type: url ? 1 : 0,
 source_path: url || "",
 source_color: 0xffffffff,
};
// 开启
rtcVideo.enableVirtualBackground(path,source);

// 关闭
rtcVideo.disableVirtualBackground();
人脸检测
const interval = 200; // ms
const faceModelPath = AlgoModelPath + "/ttfacemodel/tt_face_v10.0.model";

// 开启
rtcVideo.enableFaceDetection(interval, faceModelPath);

// 关闭
rtcVideo.disableFaceDetection();
Flutter 框架下功能实现
智能美化特效库及相关资源集成
- 在项目中集成 3.51 及以上版本的 RTC Flutter SDK 并实现 RTC 视频通话功能。
- 下载并解压 RTC SDK,获取对应平台的特效库文件,并复制到项目目录下。具体集成方式参看:
- Android:Android 智能美化特效库及相关资源集成
- iOS:iOS 智能美化特效库及相关资源集成
API 调用时序图
初始化
创建引擎
创建RTCVideo引擎实例并开启视频采集,以在开启特效后在本地预览画面中查看美颜等效果。RTCVideo rtcVideo = await RTCVideo.createRTCVideo(engineContext); rtcVideo.startVideoCapture();初始化
RTCVideoEffect
设置特效资源和证书路径,并初始化特效资源。RTCVideoEffect videoEffect = rtcVideo.videoEffectInterface; String licenseFile = '$FullPath/LicenseBag.bundle/licenseFileName.licbag'; String modelPath = '$FullPath/ModelResource.bundle'; int? ret = await videoEffect.initCVResource(licenseFile, modelPath);
开启/关闭视频特效
// 开启
int? ret = await videoEffect.enableVideoEffect();

// 关闭
int? ret = await videoEffect.disableVideoEffect();
美颜特效
设置特效素材
设置特效素材包,支持叠加设置。美颜特效素材存放在ComposeMakeup.bundle文件中,更多素材参看素材包结构说明。List<String>? effectNodesPath = [ // lite 美颜 '$FullPath/ComposeMakeup.bundle/ComposeMakeup/beauty_Android_lite', // iOS 为 beauty_IOS_lite // lite 微整形 '$FullPath/ComposeMakeup.bundle/ComposeMakeup/reshape_lite', // 美体 '$FullPath/ComposeMakeup.bundle/ComposeMakeup/body/allslim', …… ] int? ret = await videoEffectInterface.setEffectNodes(effectNodesPath);设置特效强度
使用setEffectNodes设置素材路径后,特效强度默认为 0,需使用updateEffectNode更新特效强度才会显示特效效果。强度取值范围为 [0, 1],超出范围时设置无效。更多素材参看素材key对应说明。// 美白 videoEffect.updateEffectNode( '$FullPath/ComposeMakeup.bundle/ComposeMakeup/beauty_Android_lite', // iOS 替换为 beauty_IOS_lite 'whiten', 0.8, ); // 瘦脸 videoEffect.updateEffectNode( '$FullPath/ComposeMakeup.bundle/ComposeMakeup/reshape_lite', 'Internal_Deform_Overall', 0.5, ); // 天鹅颈 videoEffect.updateEffectNode( '$FullPath/ComposeMakeup.bundle/ComposeMakeup/body/allslim', 'BEF_BEAUTY_BODY_ENHANCE_NECK', 0.6, );
贴纸特效
贴纸特效素材存放在 StickerResource.bundle 文件中,使用 setEffectNodes 设置素材路径后方可显示贴纸效果。如下所示,贴纸路径需要指定到特定贴纸名。
effectNodesPath.add('$FullPath/StickerResource.bundle/stickers/stickers_zhaocaimao');
videoEffect.setEffectNodes(effectNodesPath);
滤镜特效
设置特效素材
滤镜特效素材存放在FilterResource.bundle文件中。// 加载滤镜 String filterResPath = '$FullPath/FilterResource.bundle/Filter/<YOUR_FILTER_NAME>'; videoEffect.setColorFilter(filterResPath); // 卸载滤镜 videoEffect.setColorFilter(null);设置特效强度
使用setColorFilter设置素材路径后,可使用setColorFilterIntensity调整滤镜强度。默认强度为 1.0,取值范围 [0, 1],超出范围时设置无效。videoEffect.setColorFilterIntensity(0.8);
虚拟背景
使用 enableVirtualBackground 开启虚拟背景特效,通过参数 modelPath 设置背景贴纸素材的绝对路径,通过 source 指定设置图片或纯色作为背景。
String modelPath = '$FullPath/ModelResource.bundle/mattingmodel';
// 设置一张自定义图片作为背景
VirtualBackgroundSource source = VirtualBackgroundSource(
  sourceType: VirtualBackgroundSourceType.image,
  // 背景颜色,sourceType 为 color 时必填,sourceType 为 image 时可置空
  sourceColor: 0xffffffff,
  sourcePath: '$FullPath/xxx.png',
);
// 开启
videoEffect.enableVirtualBackground(modelPath: modelPath, source:source);

// 关闭
videoEffect.disableVirtualBackground();
人脸检测
使用 enableFaceDetection 注册人脸检测结果回调观察者,在检测结果回调中增加处理逻辑。
// 开启
var observer = RTCFaceDetectionObserver(onFaceDetectResult: (FaceDetectionResult result) {
  // 处理人脸识别结果
});
String faceModelPath = '$FullPath/ModelResource.bundle/ttfacemodel/tt_face_vxx.model';
videoEffect.enableFaceDetection(observer: observer, modelPath: faceModelPath, interval: 500);

// 关闭
videoEffect.disableFaceDetection();
示例项目
API 参考
说明:表格中的 macOS API 接口为 Objective-C,而示例项目中的 macOS 项目使用的是 Windows SDK 中的 API 接口。
关键流程 | 业务逻辑 | Android | iOS | macOS | Windows | Electron | 备注 |
|---|---|---|---|---|---|---|---|
【必须】初始化资源 | 检查智能美化特效证书,设置算法模型路径,并初始化特效模块。 | 关于许可证的相关问题,参看授权相关。 | |||||
【可选】使用特效处理 | 开启特效。 | ||||||
设置智能美化特效素材包。 | |||||||
设置特效强度。 | |||||||
设置颜色滤镜。 | 在选择滤镜素材时,请参看 滤镜素材对应序号。 | ||||||
设置已启用颜色滤镜的强度。 | |||||||
关闭特效。 | 虚拟背景、人脸检测不受特效关闭影响。 | ||||||
【可选】使用虚拟背景 | 开启虚拟背景。 | 虚拟背景功能使用参看背景分割。 | |||||
关闭虚拟背景。 | |||||||
【可选】使用人脸识别 | 开启人脸识别。 | ||||||
关闭人脸识别。 |
FAQ
Q1. 调用接口可能返回的错误码有哪些?
A:参考接口返回错误码。
Q2. 如何判断 Android 的美颜资源是否拷贝到指定路径上?
A:在集成测试阶段可以通过 adb 工具去查看。如果没有 adb 工具,需自行下载安装。
指令:adb shell、ls、cd
//1. 先 adb shell
~/ adb shell
//2. cd 到指定的路径
cupid:/ $ cd /storage/emulated/0/Android/data/com.ss.rtc.demo.advanced/
//3. 通过ls查看文件夹下的文件,再通过cd进入文件夹
cupid:/storage/emulated/0/Android/data/com.ss.rtc.demo.advanced/files/assets $
ls
Effect
cupid:/storage/emulated/0/Android/data/com.ss.rtc.demo.advanced/files/assets $
cd Effect
cupid:/storage/emulated/0/Android/data/com.ss.rtc.demo.advanced/files/assets/Effect $ ls
ComposeMakeup.bundle   LicenseBag.bundle     StickerResource.bundle
FilterResource.bundle  ModelResource.bundle
Q3. -121 错误怎么处理?
A:先检查下文件路径是否正确,然后再检查下指定的资源名称是否正确。
Q4. 如果资源路径正确,代码调用顺序正确,但是美颜没效果如何处理?
A:完成如下自检
- 检查包名是否和证书匹配。
- 检查调用的接口是否有返回错误码,跟进错误码进行处理。
- 确保有没有新旧智能美化特效接口没有混用。
- 查看控制台信息中美颜 SDK 的日志输出进行排查。参看常见错误日志。
Q5. 测试证书能否上线?
A:测试证书无法上线,需替换为正式证书。请购买产品获取正式证书。
Q6. 更新 App 或者需要上马甲包是否需要重新申请美颜证书?
A:包名和证书不匹配,需重新申请并替换。
Q7. iOS 虚拟背景使用 png 图片为何不生效?
A:Xcode 会对 png 图片进行压缩处理,点击对应的图片,修改 Type 为 Data。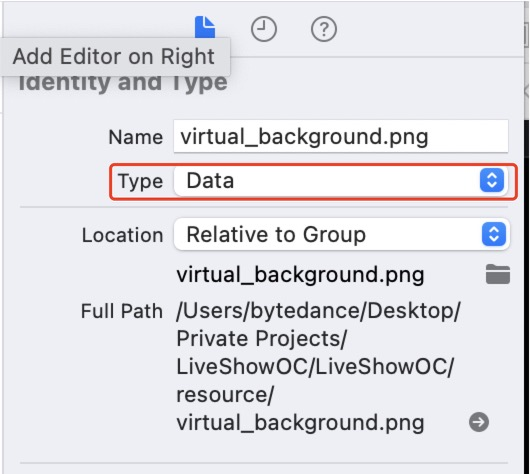
Q8. Android 怎么实现智能美化特效 SDK 不被混淆?
A:参看如何进行混淆配置?
Q9. 美颜资源太大、美颜证书会过期、美颜类型新增和删除等都需要更新 App 比较麻烦,如何处理?
A:建议将美颜素材资源存储在云端进行管理,App 使用时按需从云端下载资源到本地,以节省包大小、方便素材的新增/删除/升级。
Q10. 美颜实际效果与预期效果为什么不匹配?
A:可能在 Lite 版本 SDK 中使用了仅可应用于 Standard 版本 SDK 的特效素材。请检查使用的特效 SDK 版本和特效素材版本是否一致。
Q11. 智能特效 SDK 的 Standard 版本和 Lite 版本有什么区别?
A:Lite 版本无 3D 渲染能力;Standard 版本具备 3D 渲染能力,可支持风格妆、Animoji、新颖贴纸、AR 功能等 3D能力,但 SDK 包体积也会相应增加,如无以上需求且需控制 App 体积,建议选择 Lite 版本。请咨询销售获取更多信息。
更多常见问题参看智能美化特效 FAQ。
常见错误日志
特效素材缺失或 SDK 版本与特效素材版本不匹配
[FileUtil.cpp 112] FileUtil: readFile: file /****/cvlab/ModelResource.bundle/ttfacemodel/tt_face_v10.0.model is not exist -1...素材文件损坏或者授权文件与素材不匹配
RenderManager::_buildComposerEffect: effectParser->parse fail, path: /****/cvlab/StickerResource.bundle/stickers/****